1. 서론
This user manual provides comprehensive instructions for the installation, operation, and maintenance of your HDWR videoCAR-L300 Dash Cam. Please read this manual thoroughly before using the device to ensure proper functionality and to maximize its lifespan. Keep this manual for future reference.
2. 제품 오버view
The HDWR videoCAR-L300 is a versatile dash camera designed to enhance your driving safety and record your journeys. It functions as both a front and rear recording device, integrated into a rearview mirror with a touchscreen display.
주요 특징:
- 풀 HD 비디오 녹화: The front camera records in Full HD (1920x1080) resolution, providing clear and detailed video footage.
- 후방 카메라 기능: The rear camera offers VGA (640x480) recording resolution and can also serve as a reverse camera for parking assistance.
- Integrated 4.7-inch Touchscreen Display: The wide mirror, approximately 30 cm, features a built-in 4.7-inch touchscreen for easy operation and increased rear visibility.
- 120-Degree Wide-Angle Lens: The front camera's lens offers a 120-degree viewing angle, capturing a broad area in front of your vehicle.
- 자동 작동: Features include automatic camera start and stop, motion detection, and adjustable sensitivity.
- G-Sensor for Impact Detection: Automatically protects recordings from being overwritten in the event of sudden braking or a collision.
- MicroSD 카드 지원: Supports microSD memory cards up to 32GB for storing recorded video and audio files.

그림 2.1: 전면 view of the HDWR videoCAR-L300 Dash Cam, showing the mirror display with a car image.
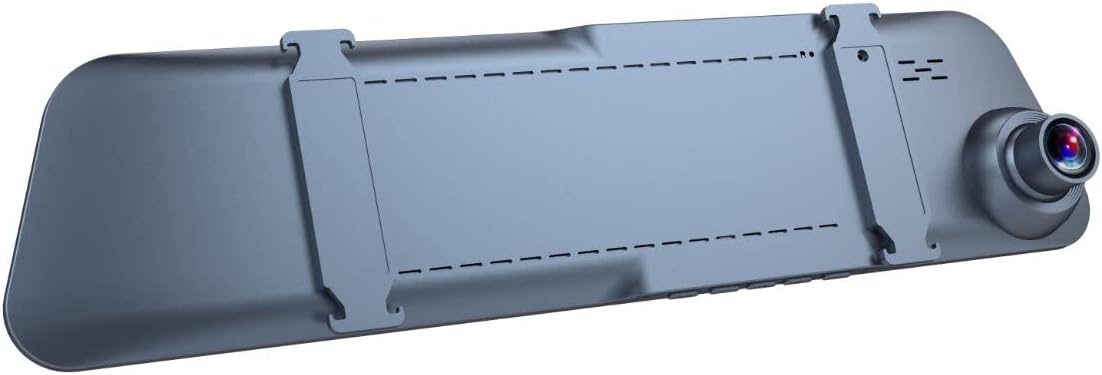
그림 2.2: 후면 view of the HDWR videoCAR-L300 Dash Cam, highlighting the mounting clips for installation.
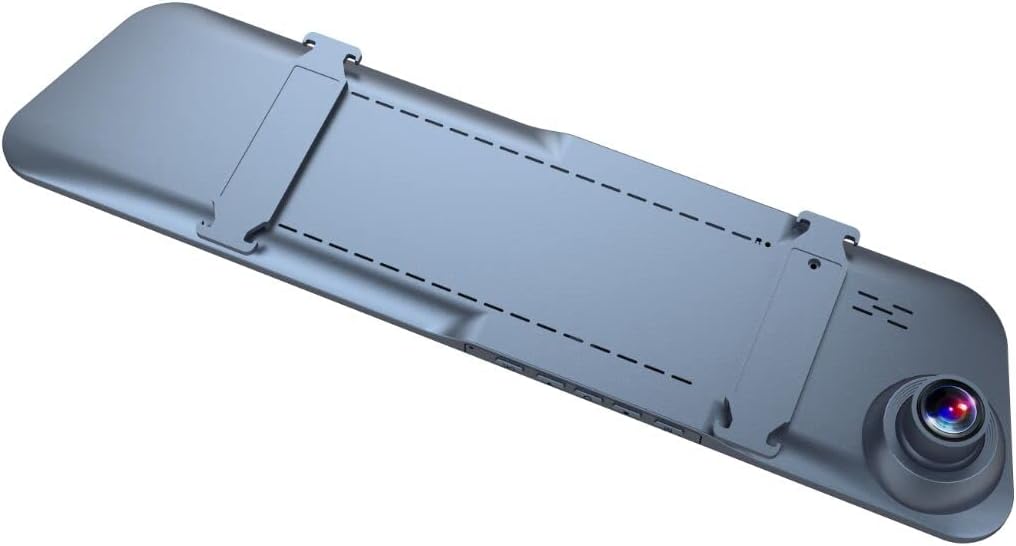
그림 2.3: 각진 후면 view of the HDWR videoCAR-L300 Dash Cam, showing the camera lens and mounting clips.

그림 2.4: 폭발 view illustrating the various perspectives of the HDWR videoCAR-L300 Dash Cam.
3. 설정 및 설치
3.1 상자 내용물
설치를 시작하기 전에 모든 구성 요소가 있는지 확인하세요.
- HDWR videoCAR-L300 Dash Cam Unit
- 충전 케이블
- 설치 도구
- 사용 설명서 (본 문서)
3.2 Installation Steps (Windshield Mount)
The videoCAR-L300 is designed for windshield mounting, typically over your existing rearview 거울.
- 장치 준비: Gently unbox the dash cam and ensure the protective film is removed from the screen and lens.
- 설치: Securely attach the dash cam to your vehicle's rearview mirror using the integrated clips. Ensure it is firmly in place and does not obstruct your view.
- 전원 연결: Use the provided charging cable to connect the dash cam to your vehicle's 12V power outlet (cigarette lighter socket). Route the cable neatly to avoid interference with driving.
- 후방 카메라 설치(선택 사항): If using the rear camera, connect it to the main unit and route its cable to the rear of the vehicle. Mount the rear camera in a suitable location, typically near the license plate or inside the rear window, ensuring a clear view.
- MicroSD 카드 삽입: Insert a compatible microSD card (up to 32GB, not included) into the designated slot on the dash cam. Ensure it is inserted correctly until it clicks into place.
- 초기 전원 켜기: Start your vehicle. The dash cam should automatically power on. If not, press the power button.
- 각도 조정: Adjust the angle of the front camera lens to ensure it captures the road ahead clearly. Use the live view on the touchscreen display for precise alignment.

Figure 3.1: The dash cam installed on the vehicle's rearview mirror, showing its integration into the car's interior.
4. 사용 설명서
4.1 전원 켜기/끄기
- 자동 작동: The device is designed to automatically power on and begin recording when your vehicle's ignition is turned on, and power is supplied. It will automatically power off when the ignition is turned off.
- 수동 조작: To manually power on or off, press and hold the power button located on the device.
4.2 터치스크린 탐색
The 4.7-inch touchscreen display allows for intuitive navigation through menus and settings.
- 메인 인터페이스: 라이브로 표시 view from the front and/or rear cameras.
- 메뉴 접근: Tap the screen to reveal menu icons. Swipe left/right or up/down to navigate through options.
- 옵션 선택: 아이콘이나 옵션을 탭하여 선택하세요.

Figure 4.1: The dash cam's screen showing a live road view, indicating active recording.
4.3 녹음 모드
- 루프 녹음: The dash cam continuously records video in segments (e.g., 1, 3, or 5 minutes). When the memory card is full, the oldest unlocked files는 자동으로 덮어씌워집니다.
- G-센서(비상 녹화): In the event of sudden braking or a collision, the built-in G-Sensor detects the impact and automatically locks the current video segment, preventing it from being overwritten by loop recording.
- 동작 감지: When enabled, the camera will automatically start recording if it detects movement in front of the vehicle while parked. This feature requires continuous power supply.
4.4 재생
다시view 기록된 footage:
- From the main screen, tap to access the menu.
- Select the "Playback" or "Gallery" option.
- Browse through the recorded video and audio files. 잠김 files (from G-Sensor events) will typically be in a separate folder.
- 탭하세요 file to play it back on the screen.
4.5 Settings Adjustment
설정 메뉴에 접근하여 다양한 매개변수를 사용자 지정하세요.
- 비디오 해상도: Adjust recording quality (e.g., Full HD, VGA).
- 루프 녹음 기간: Set the length of video segments.
- G-센서 감도: Adjust the sensitivity of the impact detection.
- 동작 감지: 이 기능을 활성화하거나 비활성화합니다.
- 날짜/시간 Stamp: 정확한 녹화 시간을 위해 날짜와 시간이 올바르게 설정되어 있는지 확인하십시오.amps.
- 오디오 녹음: 마이크 녹음을 활성화 또는 비활성화합니다.
- 화면 보호기: Set the display to turn off after a period of inactivity to avoid distraction while driving.
5. 유지관리
정기적인 유지 관리는 블랙박스의 최적 성능과 수명 연장을 보장합니다.
- 렌즈 청소: 부드럽고 보풀 없는 천으로 카메라 렌즈를 살살 닦아주세요. 렌즈에 흠집이 생길 수 있으므로 연마성 재질이나 강한 화학 약품은 사용하지 마세요.
- 화면 청소: Wipe the touchscreen display with a soft, dry cloth. For stubborn smudges, slightly damp천에 물을 적셔요.
- MicroSD 카드 관리: Format the microSD card regularly (e.g., once a month) within the camera's settings to prevent data corruption and ensure smooth recording. Back up any important footag서식을 적용하기 전에 e를 입력하세요.
- 온도: Avoid exposing the device to extreme temperatures (very hot or very cold) for extended periods, as this can affect battery life and component performance.
- 안전한 장착: Periodically check that the dash cam is securely mounted to prevent vibrations from affecting video quality or causing the device to fall.
6. 문제 해결
If you encounter issues with your HDWR videoCAR-L300, refer to the following common problems and solutions:
| 문제 | 가능한 원인 | 해결책 |
|---|---|---|
| 장치의 전원이 켜지지 않습니다. | 전원 공급 안 됨; 케이블 연결 불량; 전원 어댑터 불량. | Check the charging cable connection to the device and the vehicle's power outlet. Ensure the vehicle's ignition is on. Try a different power outlet or cable if available. |
| 녹음이 중지되거나 정지됩니다. | Full or corrupted microSD card; slow microSD card; G-Sensor triggered too often. | Format the microSD card (back up data first). Use a high-speed (Class 10 or U1/U3) microSD card. Adjust G-Sensor sensitivity in settings. |
| 비디오 푸tage는 흐릿하거나 불분명합니다. | Dirty lens; protective film still on lens; improper camera angle. | Clean the camera lens with a soft cloth. Remove any protective film. Adjust the camera angle to ensure a clear view 도로의. |
| 화면이 응답하지 않습니다. | 일시적인 소프트웨어 오류입니다. | Perform a soft reset by pressing and holding the power button until the device restarts. If unresponsive, disconnect power and reconnect. |
| 후방 카메라가 작동하지 않습니다. | Loose connection; faulty cable or camera. | 후면 카메라 케이블과 본체의 연결 상태를 확인하십시오. 케이블이 손상되지 않았는지 확인하십시오. |
If the problem persists after trying these solutions, please contact HDWR customer support for further assistance.
7. 사양
| 특징 | 세부 사항 |
|---|---|
| 상표 | HDWR |
| 모델명 | videoCAR |
| 품목 모델 번호 | L300 |
| 제품 치수 | 3.5D x 29.7W x 7H cm; 180 grams |
| 화면 크기 | 4.7인치 |
| 비디오 해상도(전면) | 풀HD(1920x1080p) |
| 비디오 해상도(후면) | VGA (640x480) |
| View잉 각도 | 120도 |
| 플래시 메모리 유형 | microSD(최대 32GB) |
| 연결 기술 | 보조 |
| 특별 기능 | Motion Sensor, G-Sensor |
| 제어 방법 | 만지다 |
| 장착 유형 | 윈드 실드 마운트 |
| 배터리 포함 | 아니요 |
| 호환 장치 | 스마트폰 |
8. 보증 및 지원
For warranty information and technical support, please refer to the official HDWR website or contact their customer service directly. Details regarding warranty periods and service procedures are typically provided with your purchase documentation or on the manufacturer's web대지.
추가 지원을 받으려면 다음을 방문하세요. www.hdwr.eu


