1. 서론
This manual provides comprehensive instructions for the installation and operation of the BRIKSMAX LED Lighting Kit designed specifically for the LEGO Technic 42152 Firefighter Aircraft model. This lighting kit is intended to enhance the visual display of your LEGO model by adding integrated LED lights. Please read all instructions carefully before beginning installation.
2. 안전 정보
- 소형 부품 경고: This kit contains small parts that may pose a choking hazard for children under 3 years of age. Keep all components out of reach of small children.
- 전기 안전: Ensure all connections are secure and correctly made to prevent short circuits. Do not expose the lighting components to water or excessive moisture.
- 배터리 취급: If using a battery box, ensure batteries are inserted with correct polarity. Do not mix old and new batteries or different types of batteries. Remove batteries if the kit will not be used for an extended period.
- 부드러운 취급: LED wires are delicate. Handle them with care during installation to avoid damage.
3. 패키지 내용
Verify that all components listed below are present in your BRIKSMAX LED Lighting Kit package. The LEGO Technic 42152 Firefighter Aircraft model is not included with this lighting kit.

이미지: 이상view of the BRIKSMAX LED Lighting Kit package contents, including various lights, cables, expansion boards, and a battery box.
| 목 | 수량 | 설명 |
|---|---|---|
| 30cm White Dot Lights | 1 | 일반 조명에 사용. |
| Warm White Strip Light(s) | 1 | For cockpit or interior lighting. |
| 접착 사각형 | 1 | 구성 요소를 고정합니다. |
| 30cm Red Dot Lights | 1 | For navigation or warning lights. |
| 6-port Expansion Boards | 1 | To connect multiple light components. |
| Block Part (Random Color) | 1 | Small LEGO-compatible block for integration. |
| 30cm Slow Flashing Red Dot Lights | 1 | For specific flashing effects. |
| 30cm Connecting Cables | 2 | To extend connections between components. |
| Block Part (Random Color) | 1 | Small LEGO-compatible block for integration. |
| 30cm Slow Flashing Green Dot Lights | 1 | For specific flashing effects. |
| 50cm Connecting Cables | 1 | Longer cable for extended connections. |
| Building Block Type Battery Box (AA battery) | 1 | Power source (AA batteries not included). |
| Adhesive Light Strip White | 2 | Additional adhesive light strips. |
| 30cm USB Power Cable | 1 | Alternative power source via USB. |
4. 설정 및 설치
The installation process involves carefully integrating the LED components into your existing LEGO Technic 42152 Firefighter Aircraft model. A step-by-step instruction guide is included with your kit to facilitate the process. It is recommended to follow these instructions precisely.
- 준비: Ensure your LEGO model is fully assembled according to its original instructions. Identify the areas where lights will be installed as indicated in the BRIKSMAX guide.
- 분해 (필요한 경우): Some sections of your LEGO model may need to be partially disassembled to properly route wires and place lights. Refer to the specific steps in your BRIKSMAX instruction manual.
- 구성 요소 배치: Carefully place the LED lights in the designated positions. Use the adhesive squares provided to secure lights or wires where necessary.
- 와이어 라우팅: Route the delicate wires along the structure of the LEGO model, ensuring they are hidden and not pinched by LEGO bricks. Utilize the connecting cables and expansion boards to link all lights to the main power source.
- 전원 연결: Connect the assembled lighting system to either the battery box (insert AA batteries, not included) or the USB power cable.
- 테스트: Before reassembling all LEGO parts, test the lighting system to ensure all lights function correctly.
- 최종 조립: Reassemble any disassembled LEGO sections, ensuring wires are not damaged during the process.
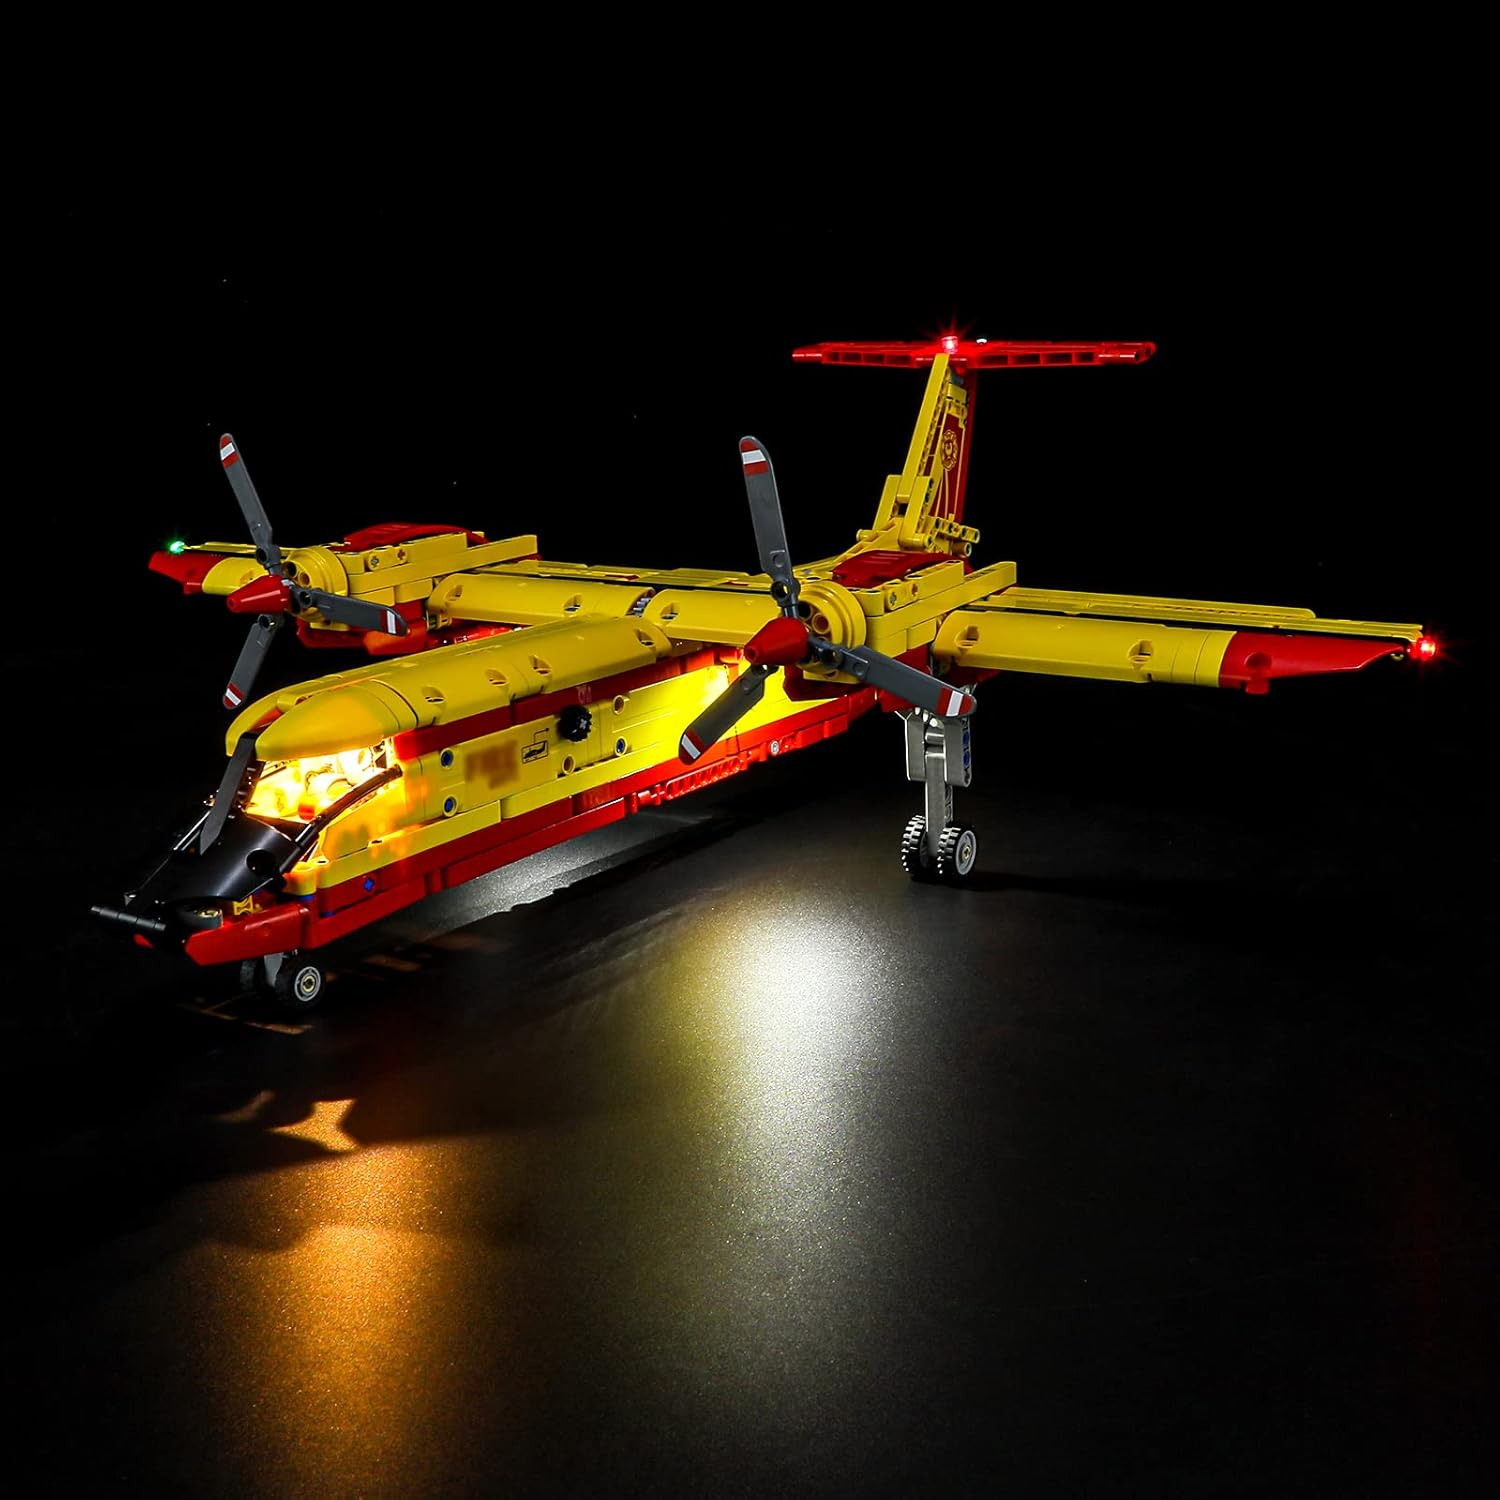
Image: The LEGO Technic 42152 Firefighter Aircraft model illuminated by the BRIKSMAX LED Lighting Kit, shown from a front-side perspective.

Image: The LEGO Technic 42152 Firefighter Aircraft model illuminated by the BRIKSMAX LED Lighting Kit, shown from a direct front view.

Image: The LEGO Technic 42152 Firefighter Aircraft model illuminated by the BRIKSMAX LED Lighting Kit, shown from a rear-side perspective.

이미지: 클로즈업 view of the cockpit area of the LEGO Firefighter Aircraft, showing the integrated LED lighting.

이미지: 자세한 view of the fuselage of the LEGO Firefighter Aircraft, highlighting the subtle integration of the LED lights.

Image: A close-up of the tail section of the LEGO Firefighter Aircraft, showing the red LED lights installed.
Video: A demonstration of the BRIKSMAX LED Lighting Kit installed on the LEGO Technic 42152 Firefighter Aircraft, showcasing various illuminated sections and effects.
5. 사용 설명서
Once the BRIKSMAX LED Lighting Kit is fully installed and connected to a power source, operating the lights is straightforward.
- 전원 켜기/끄기: If using the battery box, ensure batteries are correctly installed and switch the power button to the 'ON' position to activate the lights. Switch to 'OFF' to turn them off. If using the USB power cable, connect it to a compatible USB power source (e.g., a USB wall adapter, power bank, or computer USB port) to turn the lights on. Disconnect to turn them off.
- 조명 효과: The kit includes both steady and slow-flashing lights (red and green dot lights). These effects are pre-programmed into the respective LED components and will activate automatically upon power-up.
6. 유지관리
Proper maintenance ensures the longevity and optimal performance of your BRIKSMAX LED Lighting Kit.
- 청소: To clean the LED components or wires, gently wipe them with a dry, soft cloth. Avoid using liquids or abrasive cleaners.
- 배터리 교체: If using the battery box and lights dim or stop working, replace the AA batteries. Ensure correct polarity during replacement.
- 저장: If storing the LEGO model with the lighting kit for an extended period, it is recommended to remove the batteries from the battery box to prevent leakage.
- 와이어 검사: Periodically inspect wires for any signs of wear, fraying, or damage. If damage is found, discontinue use and contact support.
7. 문제 해결
If you encounter issues with your BRIKSMAX LED Lighting Kit, refer to the following troubleshooting steps:
| 문제 | 가능한 원인 | 해결책 |
|---|---|---|
| 표시등이 켜지지 않습니다. | No power, incorrect battery installation, loose connection. | Check if the battery box switch is ON or if the USB cable is connected to a working power source. Ensure batteries are correctly inserted. Verify all wire connections are secure. |
| 일부 조명이 작동하지 않습니다. | Loose connection, damaged LED, faulty expansion board. | Check the connections for the specific non-working lights to the expansion board. Inspect the wire for damage. If a single LED is damaged, it may need replacement. |
| 조명이 어둡거나 깜빡입니다. | Low battery power, unstable power source. | Replace batteries in the battery box. If using USB, try a different USB port or power adapter. |
| Wires are visible or pinched. | Improper wire routing during installation. | Carefully re-route wires to be hidden within the LEGO structure. Ensure no bricks are pressing excessively on the wires. |
8. 사양
| 특징 | 세부 사항 |
|---|---|
| 제품 치수 | 6.5 x 4.72 x 1.77 인치 |
| 품목 무게 | 4.6 온스 |
| 모델 번호 | 42152 (for compatible LEGO set) |
| 제조업체 | Briksmax |
| 추천연령 | 8 months and up (for compatible LEGO set) |
| 전원 | Battery Box (AA batteries, not included) or USB Power Cable |
9. 보증 및 지원
BRIKSMAX is committed to providing quality products and excellent customer service. If you encounter any difficulties with your product or require assistance, please do not hesitate to contact us.
- 고객 서비스: For support, please refer to the contact information provided on the BRIKSMAX official website or the service card included in your package.
- 보증: Information regarding product warranty can be found on the BRIKSMAX official website or by contacting customer support directly.


