1. 서론
This manual provides detailed instructions for the installation, operation, and maintenance of the Supermicro X13SEI-F Server Motherboard. This motherboard is designed for high-performance server applications, supporting Intel Xeon processors with an LGA4677 socket and DDR5 memory.
Please read this manual thoroughly before attempting to install or operate the motherboard to ensure proper setup and to prevent damage to the components.
2. 안전 정보
부상 및 장비 손상을 방지하기 위해 다음 안전 수칙을 준수하십시오.
- 구성품을 설치하거나 제거하기 전에 항상 전원 코드를 전원 공급 장치에서 분리하십시오.
- Wear an anti-static wrist strap when handling the motherboard and other components to prevent electrostatic discharge (ESD).
- Ensure the installation environment is dry and free from static electricity.
- 마더보드를 습기나 극한의 온도에 노출시키지 마세요.
- 민감한 부품을 만지지 않도록 마더보드의 가장자리를 잡으세요.
- 전원 연결과 관련된 구체적인 안전 지침은 전원 공급 장치의 설명서를 참조하십시오.
3. 패키지 내용
모든 품목이 있는지, 그리고 양호한 상태인지 확인하십시오. 파손되었거나 누락된 품목이 있으면 판매업체에 문의하십시오.
- Supermicro X13SEI-F Server Motherboard
- I / O 실드
- SATA 케이블 (수량은 다를 수 있습니다)
- Quick Reference Guide / User Manual (this document)
- 드라이버 CD/DVD 또는 USB 드라이브(또는 다운로드 방법)
4. 제품 오버view
The Supermicro X13SEI-F is a high-performance server motherboard featuring the LGA4677 socket, designed to support Intel Xeon Scalable processors. It offers robust memory capabilities with 8 DDR5 DIMM slots, supporting up to 4800MHz memory speed. The board also includes multiple PCIe slots for expansion.
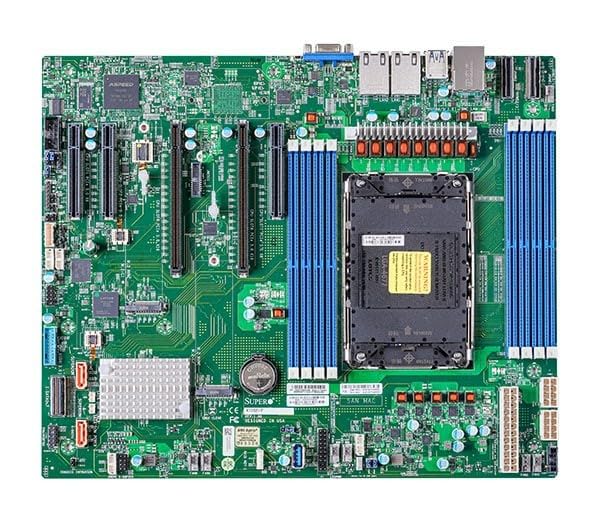
Figure 1: Supermicro X13SEI-F Server Motherboard. This image displays the overall layout of the motherboard, including the CPU socket, DIMM slots, and various connectors.
4.1 주요 특징
- CPU 소켓 : LGA4677 for Intel Xeon Scalable Processors
- 칩셋: 인텔 C621
- 메모리: 8x DDR5 DIMM slots, up to 4800MHz
- 확장 슬롯: Multiple PCIe slots (specific configuration depends on model variant)
- 저장: Support for various storage interfaces (SATA, NVMe - specific details in specifications)
- 네트워킹: Integrated LAN controllers
5. 설정 및 설치
Before beginning installation, ensure your system case is compatible with the motherboard's form factor and that you have all necessary components.
5.1 CPU 설치(LGA4677)
- 메인보드에서 LGA4677 소켓을 찾으세요.
- Carefully open the CPU socket retention mechanism according to the instructions provided with your CPU or motherboard.
- Align the CPU with the socket, ensuring the triangular mark on the CPU matches the mark on the socket. Do not force the CPU into the socket.
- CPU를 소켓에 조심스럽게 내려놓으세요.
- Close the CPU socket retention mechanism until it locks securely.
- 제조업체의 지침에 따라 CPU 쿨러를 설치하세요.
5.2 RAM 설치 (DDR5)
- Locate the 8 DDR5 DIMM slots on the motherboard.
- DIMM 슬롯 양쪽 끝에 있는 고정 클립을 엽니다.
- DDR5 메모리 모듈의 노치를 DIMM 슬롯의 키에 맞춥니다.
- Insert the memory module firmly into the slot until the retention clips snap into place. Ensure both clips are closed.
- For optimal performance, refer to the motherboard's manual for recommended memory population order.
5.3 PCIe 카드 설치
- Identify the appropriate PCIe slot for your expansion card (e.g., GPU, RAID card).
- 섀시에서 해당 확장 슬롯 덮개를 제거하십시오.
- Align the PCIe card with the slot and press down firmly until it is fully seated.
- 카드를 나사나 고정 클립으로 섀시에 고정하십시오.
5.4 저장장치 설치
- SATA 드라이브: Connect SATA data cables from the motherboard's SATA ports to your SATA hard drives or SSDs. Connect power cables from the PSU to the drives.
- NVMe M.2 드라이브: Locate the M.2 slots. Insert the M.2 drive at an angle, then push it down and secure it with the provided screw or retention mechanism.
5.5 전원 연결
- 전원 공급 장치의 24핀 ATX 전원 커넥터를 마더보드의 주 전원 소켓에 연결합니다.
- Connect the 8-pin (or 4+4 pin) EPS 12V CPU power connector(s) to the corresponding sockets near the CPU.
- 모든 전원 연결이 단단히 고정되었는지 확인하십시오.
5.6 전면 패널 연결
Connect the front panel cables (Power LED, HDD LED, Power Switch, Reset Switch, USB, Audio) from your chassis to the corresponding headers on the motherboard. Refer to the motherboard's silkscreen labels or the detailed manual for exact pin configurations.
6. 사용 설명서
6.1 첫 번째 부팅
- After completing all hardware installations, connect the monitor, keyboard, and mouse.
- Connect the power cord to the power supply and turn on the power switch on the PSU.
- 본체의 전원 버튼을 누르세요.
- The system should power on, and you should see the BIOS/UEFI POST screen.
6.2 BIOS/UEFI 설정
BIOS/UEFI 설정 유틸리티를 시작하려면 다음을 누르세요. 델 or F2 key repeatedly during the POST process. Within the BIOS/UEFI, you can configure:
- 부팅 순서
- 시스템 시간 및 날짜
- CPU 및 메모리 설정
- Storage configurations (RAID, AHCI)
- 팬 속도 제어
- 보안 설정
Save changes before exiting the BIOS/UEFI.
6.3 운영 체제 설치
Insert your operating system installation media (USB drive or DVD) and set it as the primary boot device in the BIOS/UEFI. Follow the on-screen instructions to install your preferred operating system. After installation, install all necessary drivers from the Supermicro web사이트 또는 제공된 드라이버 미디어.
7. 유지관리
7.1 청소
- Regularly clean dust from the motherboard and system components using compressed air.
- 청소하기 전에 시스템의 전원이 꺼져 있고 플러그가 뽑혀 있는지 확인하세요.
- 액체 세척제를 부품에 직접 사용하지 마십시오.
7.2 펌웨어 업데이트
슈퍼마이크로를 주기적으로 점검하세요 website for updated BIOS/UEFI firmware. Firmware updates can improve system stability, performance, and compatibility. Follow the specific instructions provided by Supermicro for updating the firmware to avoid system damage.
8. 문제 해결
이 섹션에서는 일반적으로 발생할 수 있는 문제에 대한 해결책을 제공합니다.
8.1 전원 없음/POST 없음(Power-On Self-Test)
- 전원 연결 확인: Ensure the 24-pin ATX and 8-pin EPS 12V power connectors are securely seated.
- PSU 확인: Test the power supply unit (PSU) with another system or a PSU tester.
- 구성 요소 재장착: CPU, RAM 모듈 및 모든 확장 카드를 다시 장착하십시오.
- CMOS 지우기: Refer to the motherboard manual for instructions on how to clear the CMOS (Complementary Metal-Oxide-Semiconductor) settings, which can resolve boot issues.
- 최소 구성: Try booting with only the CPU, one RAM stick, and the necessary power connections.
8.2 디스플레이 출력 없음
- 모니터 연결: Ensure the monitor is properly connected to the graphics output (either integrated or discrete GPU) and is powered on.
- 그래픽 카드: If using a discrete graphics card, ensure it is fully seated in its PCIe slot and has all necessary power connectors from the PSU.
- 통합 그래픽: If your CPU supports integrated graphics, try connecting the monitor to the motherboard's video output to rule out a discrete GPU issue.
8.3 운영체제가 부팅되지 않음
- 부팅 순서: Check the BIOS/UEFI settings to ensure the correct boot device (e.g., SSD, HDD) is selected as the primary boot option.
- Drive Connections: Verify that your storage drives are properly connected (data and power).
- 운영체제 설치: If the OS is newly installed, ensure the installation process completed successfully and all drivers are installed.
9. 사양
| 특징 | 세부 사항 |
|---|---|
| 상표 | 슈퍼마이크로 |
| 모델명 | MBD-X13SEI-F-B |
| CPU 소켓 | LGA 4677 |
| 호환 프로세서 | Intel Xeon Scalable |
| 칩셋 유형 | 인텔 C621 |
| RAM 메모리 기술 | DDR5 |
| 메모리 속도 | 4800MHz |
| RAM 슬롯 | 8x DDR5 DIMM slots |
| 제품 크기(LxWxH) | 16 x 12 x 5 인치 |
| 품목 무게 | 3.19파운드 |
| 첫 번째 가능한 날짜 | 20년 2023월 XNUMX일 |
Note: Specifications are subject to change without notice. For the most current information, please refer to the official Supermicro product page.
10. 보증 및 기술 지원
10.1 보증 정보
Supermicro products are covered by a limited warranty. For detailed warranty terms and conditions, including duration and coverage, please visit the official Supermicro website or consult the warranty card included with your product. Keep your proof of purchase for warranty claims.
10.2 기술 지원
For technical assistance, driver downloads, BIOS updates, and further product information, please visit the official Supermicro support web대지:
https://www.supermicro.com/support
Before contacting support, please have your motherboard model number (MBD-X13SEI-F-B) and serial number ready.


