1. 서론
This manual provides detailed instructions for the installation, operation, and maintenance of your SmallRig Foldable L-Bracket, model 3984. This L-bracket is specifically designed for Sony Alpha 7R V, Alpha 7 IV, and Alpha 7S III cameras, facilitating quick transitions between horizontal and vertical shooting orientations.

Image 1.1: The SmallRig Foldable L-Bracket 3984 mounted on a compatible Sony Alpha camera.
2. 설정 및 설치
Follow these steps to securely attach the L-Bracket to your camera:
- Align the L-bracket with the bottom of your Sony Alpha 7R V, Alpha 7 IV, or Alpha 7S III camera. Ensure the locating pins on the L-bracket align with the corresponding holes on the camera body.
- Secure the L-bracket to the camera using the integrated 1/4"-20 screw. Tighten the screw firmly with the built-in flat-head screwdriver or a coin.
- Verify that the L-bracket is flush against the camera body and does not wobble. The integrated cushions prevent scratches to your camera.

Image 2.1: The anti-deflection pin ensures a secure, twist-free attachment to the camera body.

Image 2.2: The L-bracket securely mounted, providing a stable base for the camera.
3. 사용 설명서
3.1. 가로 촬영과 세로 촬영 전환
The L-bracket features a foldable side plate for seamless transitions between shooting orientations.
- For Horizontal Shooting: The side plate can be folded onto the bottom baseplate via a folding press button. This integrates it as a single baseplate for Arca-Swiss compatible tripods.
- For Vertical Shooting: Press the middle button to quickly unfold the side plate. Once unfolded, it locks securely into place, allowing for vertical mounting on an Arca-Swiss compatible tripod head.

Image 3.1: Visual representation of switching from horizontal to vertical shooting.

Image 3.2: Detailed steps for folding and unfolding the side plate.
3.2. LCD Screen Access
When the side plate is folded down for horizontal shooting, it allows the camera's LCD screen to be smoothly turned and flipped without obstruction.
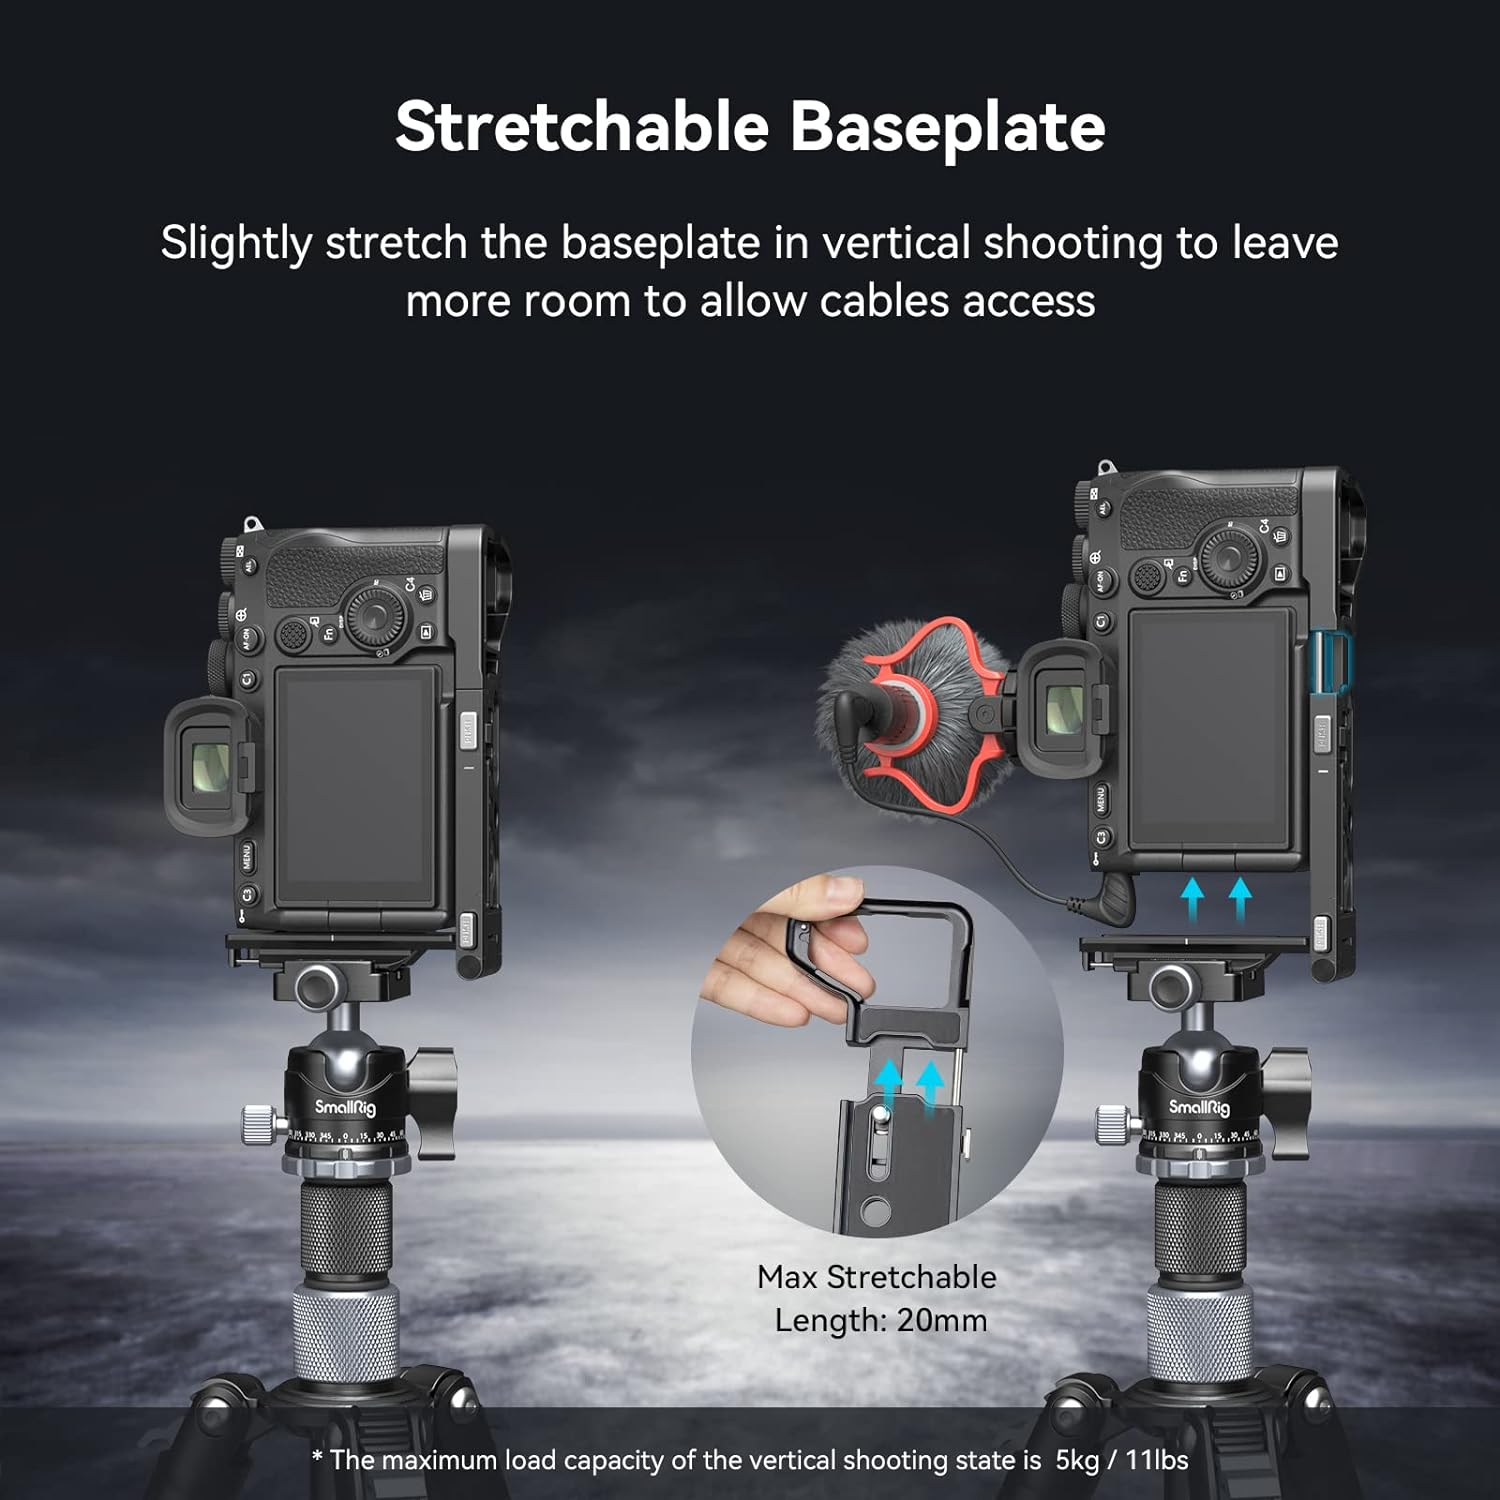
Image 3.3: The L-bracket design ensures full articulation of the LCD screen.
3.3. Cable Access and Stretchable Baseplate
For vertical shooting, the baseplate can be stretched by up to 20mm to provide additional clearance for cables, such as USB-C and multi-interface cables. Note that only right-angle data cables are compatible when the baseplate is stretched.
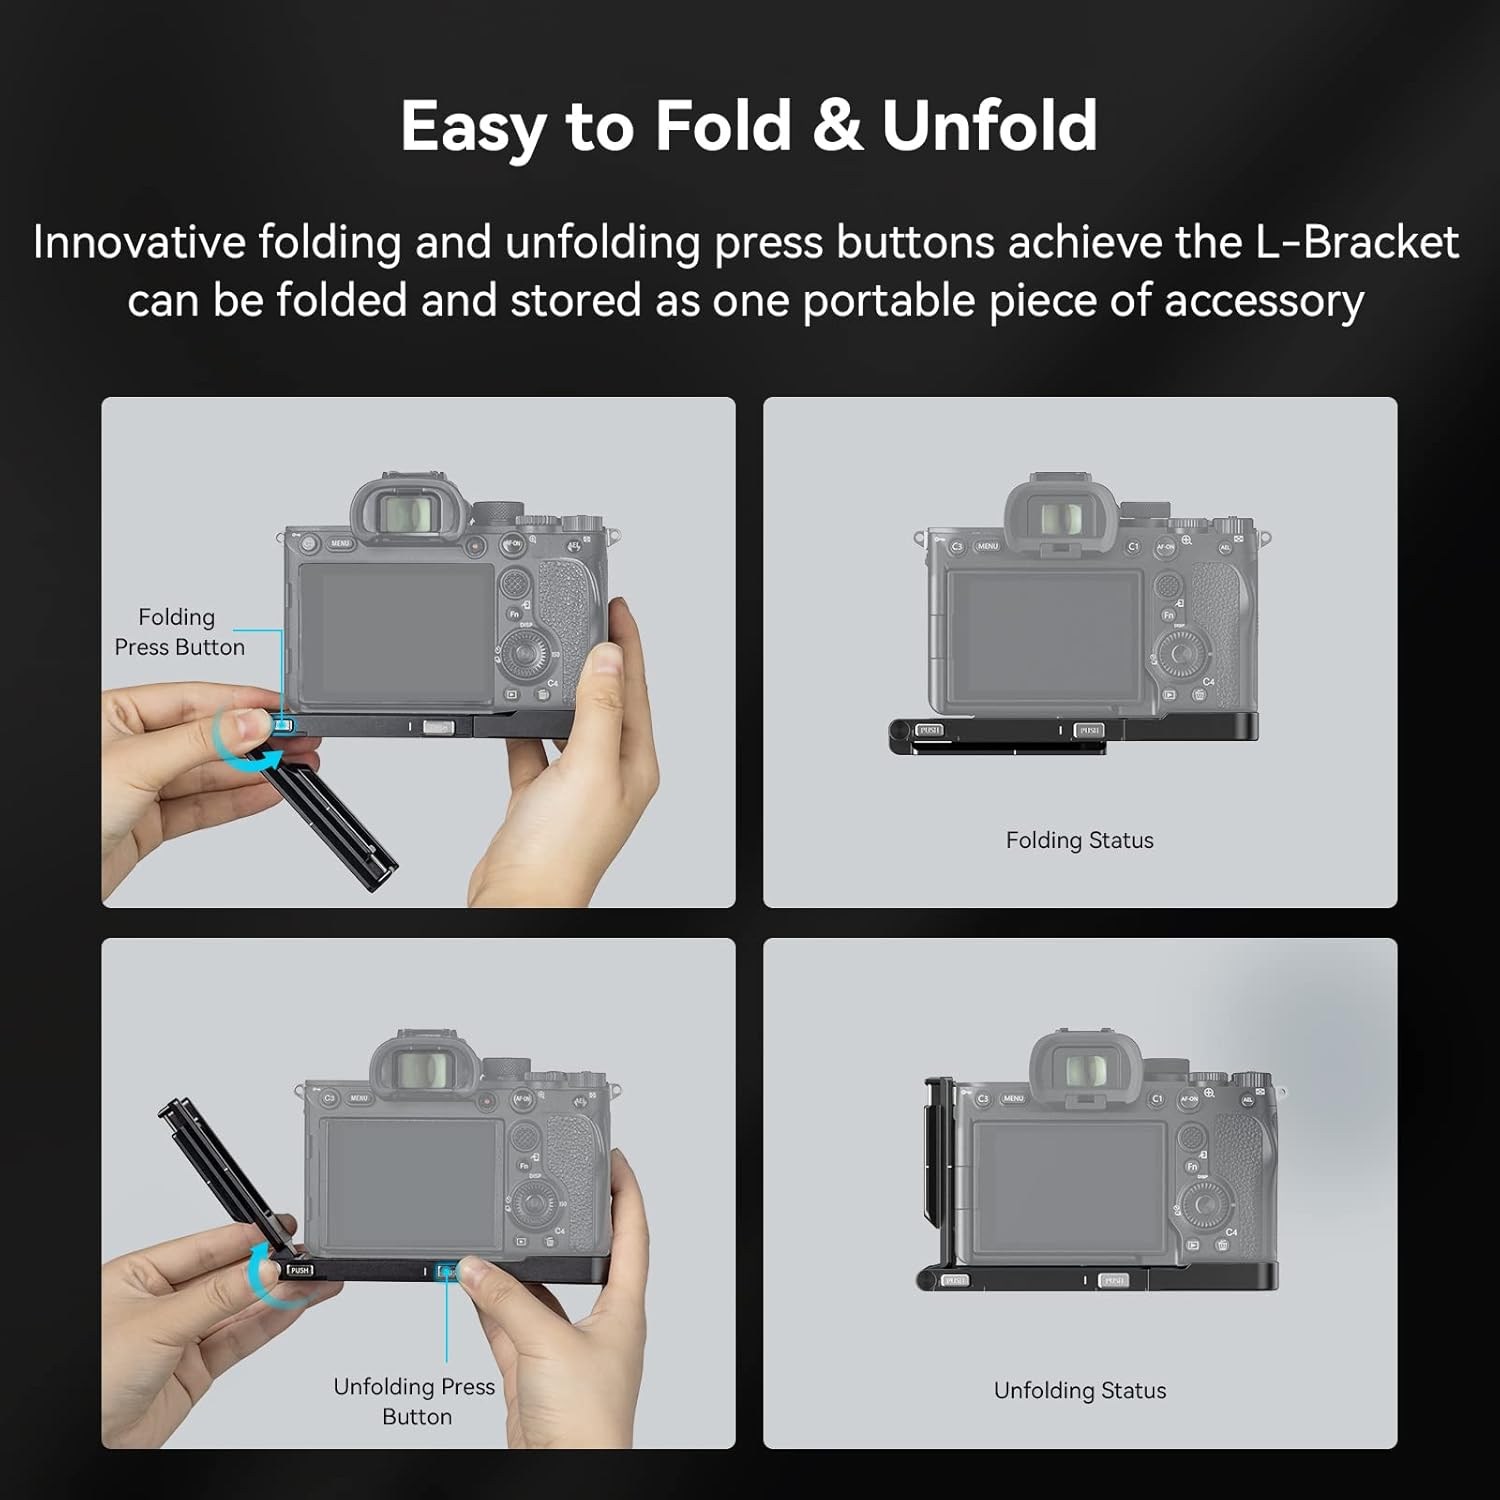
Image 3.4: The baseplate can be extended to accommodate cable connections during vertical shooting.
3.4. 배터리 교체
The L-bracket features a hinge arm at the battery door, allowing for easy battery replacement without needing to disassemble the L-bracket from the camera.

Image 3.5: The hinge arm design facilitates quick battery changes.
3.5. Additional Features and Expandability
The L-bracket is equipped with multiple 1/4"-20 threaded holes for attaching accessories such as magic arms, cold shoes for monitors, microphones, and other video production tools. It also includes a wrist strap hole and a QD connector for quick attachment of shoulder or wrist straps. A slotted screwdriver is integrated for convenience.

이미지 3.6: 이상view of the L-bracket's expandability features and built-in tools.
4. 유지관리
To ensure the longevity and optimal performance of your SmallRig Foldable L-Bracket, please observe the following maintenance guidelines:
- 청소: Wipe the L-bracket with a soft, dry cloth to remove dust and fingerprints. For stubborn dirt, a slightly damp 천을 사용하여 세척 후 바로 말리세요. 연마성 세척제나 용제는 사용하지 마세요.
- 저장: Store the L-bracket in a dry, clean environment when not in use. If storing attached to the camera, ensure it is placed in a protective camera bag.
- 점검: Periodically check all screws and moving parts for tightness and smooth operation. Do not overtighten screws.
5. 문제 해결
This section addresses common questions and potential issues:
- Issue: L-bracket feels loose on the camera.
해결책: Ensure the 1/4"-20 screw is fully tightened. Check that the anti-deflection pins are correctly seated in the camera's corresponding holes. - Issue: Difficulty folding or unfolding the side plate.
해결책: Ensure the press buttons are fully depressed. Check for any obstructions or debris in the hinge mechanism. Do not force the mechanism. - Issue: Cables cannot be connected in vertical shooting mode.
해결책: Activate the stretchable baseplate feature by pulling it outwards to create more space. Ensure you are using right-angle data cables for optimal compatibility. - Issue: LCD screen movement is restricted.
해결책: Ensure the side plate is fully folded down for horizontal shooting, or fully extended for vertical shooting, to provide maximum clearance for the LCD screen.
6. 사양
| 특징 | 세부 사항 |
|---|---|
| 모델 번호 | 3984 |
| 호환성 | Sony Alpha 7R V, Alpha 7 IV, Alpha 7S III |
| 재료 | Aluminum Alloy (typical for SmallRig products) |
| 접힌 치수(L x W x H) | 5.8인치 x 3.42인치 x 2.72인치(147.2 x 69 x 17.5mm) |
| 품목 무게 | 5.1온스(144그램) |
| Max Load Capacity (Vertical Shooting) | 5kg / 11lbs |
| Stretchable Baseplate Length | 최대 20mm |
| 장착점 | 1/4"-20 threaded holes, QD connector, Wrist strap hole |
| 색상 | 검은색 |
7. 보증 및 지원
SmallRig products are manufactured to high-quality standards. For specific warranty information, please refer to the warranty card included with your product or visit the official SmallRig website. For technical support, product inquiries, or assistance with any issues, please contact SmallRig customer service through their official channels.
공식적인 Web대지: www.smallrig.com


