1. 서론
This manual provides detailed instructions for the Waveshare 3.2-inch Resistive Touch Screen TFT Display. This display features a hardware resolution of 320 × 240 pixels and resistive touch control. It is designed for direct integration with various Raspberry Pi versions, including 4B, 3B+, 3A+, 3B, 2B, 1B+, 1A+, Zero 2 W, Zero W, and Zero. Drivers are provided to ensure compatibility with operating systems such as Raspbian, Ubuntu, Kali, and Retropie. The display also supports FBCP software drivers, allowing for adjustable software resolution and dual-screen display configurations.
For optimal performance, driver installation is required. Please refer to the relevant sections in this manual for installation procedures.
2. 패키지 내용
아래 나열된 모든 품목이 패키지에 포함되어 있는지 확인하세요.
- Waveshare 3.2-inch Resistive Touch Screen TFT Display
- 첨필
- 장착 하드웨어(나사 및 스탠드오프)

Image: Contents of the Waveshare 3.2-inch Resistive Touch Screen TFT Display package, showing the display module, a black stylus, and two sets of gold standoffs with screws and nuts.
3. 주요 특징
- Hardware Resolution: 320 × 240 pixels.
- 터치 컨트롤: Resistive touch technology.
- 호환성: Directly compatible with all versions of Raspberry Pi.
- 드라이버 지원: Drivers provided for Raspbian, Ubuntu, Kali, and Retropie systems.
- 디스플레이 특징: Supports FBCP software driver for adjustable software resolution and dual-screen display.
- 인터페이스: SPI for both display and touch.
- PCB Process: Immersion Gold.
- 전력 소비량: Lower power design.
- 인증: CE 인증.

이미지: 이상view of the Waveshare 3.2-inch Touch Display, highlighting its 3.2-inch size, 320x240 resolution, SPI display and touch ports, resistive touch type, Immersion Gold PCB process, lower power consumption, and CE certification.
4. 장치 및 시스템 호환성
The Waveshare 3.2-inch Resistive Touch Screen TFT Display is designed for broad compatibility with Raspberry Pi single-board computers. It supports all versions of Raspberry Pi, including:
- 라즈베리파이 4B
- 라즈베리파이 3B+
- 라즈베리파이 3A+
- 라즈베리파이 3B
- 라즈베리파이 2B
- 라즈베리파이 1B+
- 라즈베리파이 1A+
- Raspberry Pi Zero 2 W
- 라즈베리파이 제로 W
- 라즈베리파이 제로
Drivers are provided to ensure seamless operation with popular Raspberry Pi operating systems such as Raspbian, Ubuntu MATE, Kali, and Retropie. The display also supports FBCP software drivers for advanced display configurations.

Image: Visual representation of various Raspberry Pi models (Pi 3B+, Pi 3A+, Pi 4B, Pi Zero 2 W, Pi Zero, CM4) and connection examples of the display with Raspberry Pi 4 and Raspberry Pi Zero W, demonstrating proper physical integration.
5. 설정 및 설치
5.1 물리적 연결
To connect the display to your Raspberry Pi, align the 26-pin header on the display with the corresponding GPIO pins on your Raspberry Pi. Gently press down to ensure a secure connection. Use the provided mounting hardware (standoffs and screws) to firmly attach the display to the Raspberry Pi, if desired, for a stable assembly.
5.2 드라이버 설치
The LCD requires a driver to function correctly. Waveshare provides drivers compatible with Raspbian, Ubuntu, Kali, and Retropie systems. Please refer to the official Waveshare documentation or product page for the most up-to-date driver installation instructions specific to your Raspberry Pi model and operating system. Typically, this involves downloading a script and running it on your Raspberry Pi to configure the display and touch functionality.
Note: Incorrect driver installation can lead to display issues. Follow the official guides carefully.
이미지: 상세 view of the Waveshare 3.2-inch display connected to a Raspberry Pi 4 and a Raspberry Pi Zero W, illustrating the compact and integrated setup.
6. 핀 배치 정의
Understanding the pinout is crucial for advanced users or custom integrations. The display utilizes a 26-pin header for communication and power. Below is a table detailing the function of each pin:
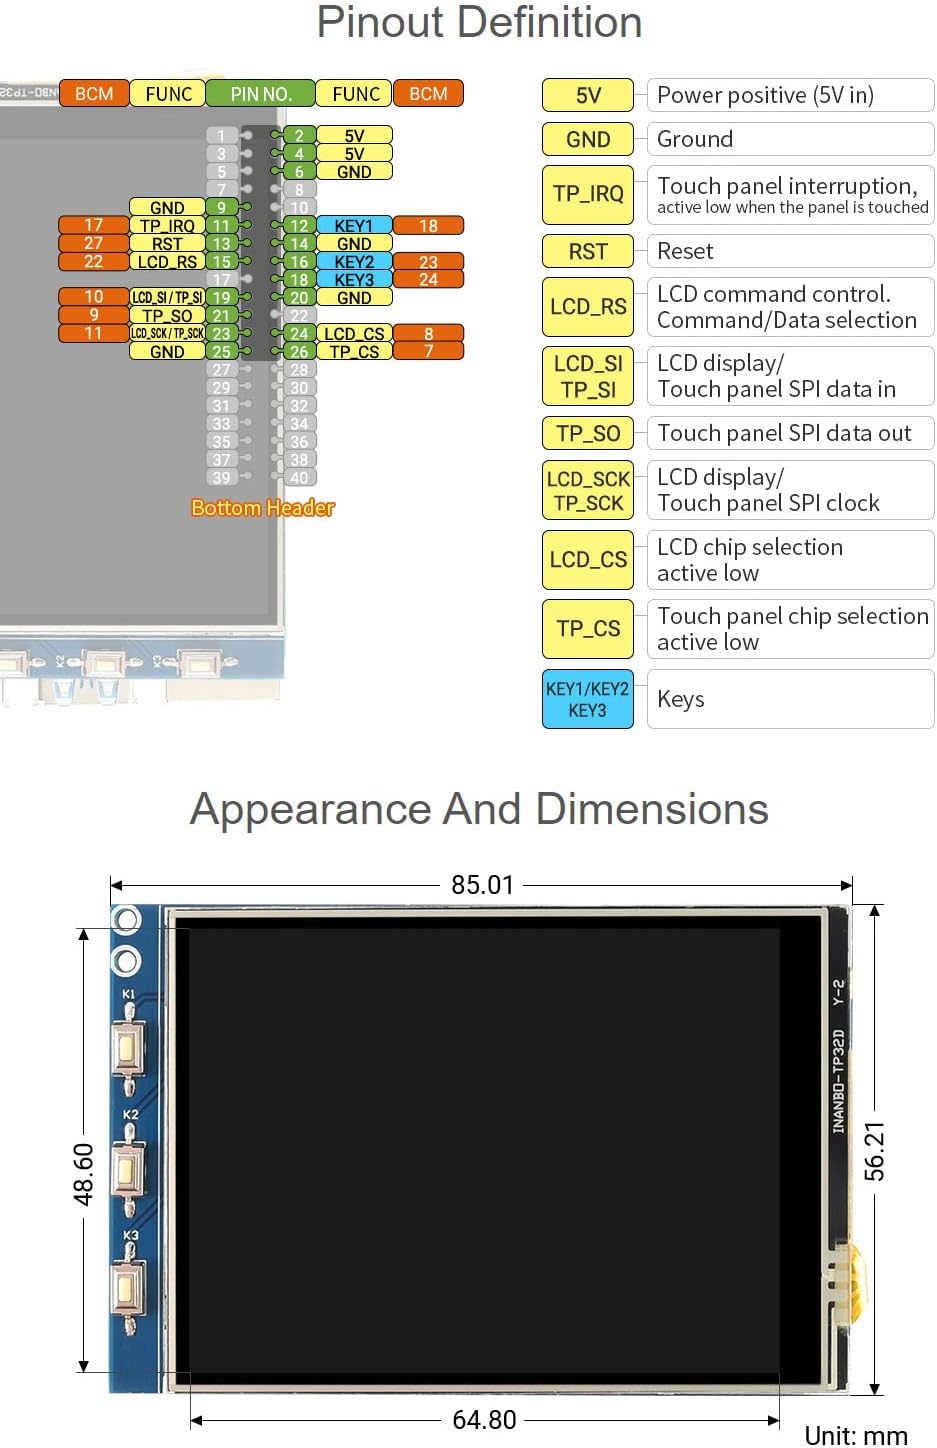
Image: A diagram illustrating the 26-pin header pinout for the Waveshare 3.2-inch display, showing pin numbers, functions (e.g., 5V, GND, TP_IRQ, RST, LCD_RS, LCD_SI, TP_SO, TP_SCK, LCD_CS, TP_CS), and corresponding BCM numbers. Also shows three physical buttons labeled K1, K2, K3.
Key Pin Functions:
- 5V : Power positive (5V input).
- GND : 접지 연결.
- TP_IRQ: Touch panel interrupt, active low when the panel is touched.
- RST : 리셋 핀.
- LCD_RS: LCD command control / data selection.
- LCD_SI / TP_SI: LCD display / Touch panel SPI data in.
- TP_SO: Touch panel SPI data out.
- LCD_SCK / TP_SCK: LCD display / Touch panel SPI clock.
- LCD_CS: LCD chip selection, active low.
- TP_CS: Touch panel chip selection, active low.
- KEY1/KEY2/KEY3: User-programmable keys.
7. 사용 설명서
7.1 디스플레이 동작
Once the drivers are correctly installed and the Raspberry Pi is powered on, the display should automatically initialize and show the graphical interface of your operating system. The FBCP (Framebuffer Copy) software driver allows for flexible display management, including setting custom resolutions and enabling dual-screen setups if you have another display connected.

Image: The Waveshare 3.2-inch display showing a desktop environment, illustrating its functionality as a primary or secondary display with FBCP software driver support.
7.2 터치 컨트롤
The display features resistive touch control. After driver installation, the touch functionality will be enabled. Use the provided stylus for precise input. Resistive touch screens respond to pressure, so a light press with the stylus or a fingernail is sufficient. Avoid using sharp objects that could damage the screen surface.
Image: A hand using the stylus to interact with the Waveshare 3.2-inch display, demonstrating the resistive touch control feature for navigation and input.
8. 외관 및 치수
The Waveshare 3.2-inch Resistive Touch Screen TFT Display is compact and designed to integrate seamlessly with Raspberry Pi boards. Below are the physical dimensions of the display module:
Image: A technical drawing showing the precise dimensions of the Waveshare 3.2-inch display module in millimeters. The width is approximately 64.80 mm, and the height is approximately 85.01 mm, with the screen area being 48.60 mm by 56.21 mm.
- 전체 치수: Approximately 85.01 mm (height) × 64.80 mm (width).
- 디스플레이 영역: Approximately 56.21 mm (height) × 48.60 mm (width).
9. 기술 사양
| 특징 | 사양 |
|---|---|
| 제조업체 | 웨이브셰어 |
| 품목 모델 번호 | 03201bfe-f4ac-4199-b39a-750c53ac1b06 |
| 디스플레이 크기 | 3.2인치 |
| 하드웨어 해상도 | 320 × 240 픽셀 |
| 터치타입 | 저항성 |
| 디스플레이 인터페이스 | 에스피에이 |
| 터치 인터페이스 | 에스피에이 |
| 호환 장치 | Raspberry Pi (all versions), Personal Computer (via Raspberry Pi) |
| 플랫폼 지원 | Linux (Raspbian, Ubuntu, Kali, Retropie) |
| 주 전원 커넥터 유형 | 24-Pin (via Raspberry Pi GPIO) |
| 그래픽 카드 인터페이스 | Integrated (via Raspberry Pi) |
10. 문제 해결
- 디스플레이가 작동하지 않음:
- Ensure the display is securely connected to the Raspberry Pi's GPIO pins.
- Verify that the correct drivers are installed for your specific Raspberry Pi model and operating system. Refer to the Waveshare official documentation for driver installation guides.
- Check power supply to the Raspberry Pi; insufficient power can affect display operation.
- 터치가 응답하지 않음:
- Confirm that touch drivers are installed and configured correctly.
- Calibrate the touch screen if the input is inaccurate. Calibration tools are usually provided with the driver package.
- Ensure you are using a stylus or a suitable object for resistive touch input.
- 화면 깜박임 또는 왜곡:
- Check for loose connections between the display and Raspberry Pi.
- Ensure the Raspberry Pi's power supply is stable and adequate.
- Reinstall or update display drivers.
For further assistance, consult the official Waveshare wiki or support forums.
11. 유지관리
- 청소: 부드럽고 털이 없는 천을 살짝 사용하세요.ampened with water or a screen cleaner to gently wipe the display surface. Avoid abrasive materials or harsh chemicals.
- 손질: Handle the display by its edges to avoid touching the screen surface or the electronic components on the PCB.
- 저장: Store the display in a cool, dry environment, away from direct sunlight and extreme temperatures.
- 보호: When not in use, consider covering the display to protect it from dust and scratches.
12. 보증 및 지원
Waveshare products typically come with a standard manufacturer's warranty. For specific warranty terms, duration, and conditions, please refer to the warranty information provided with your purchase or visit the official Waveshare web사이트. 보증 청구를 위해 구매 증빙 자료를 보관하세요.
For technical support, driver downloads, and additional resources, please visit the official Waveshare support page or their product wiki. You can often find detailed tutorials, FAQs, and community forums there.
웨이브쉐어 공식 계정 Web대지: www.waveshare.com


