소개
This manual provides detailed instructions for the setup, operation, maintenance, and troubleshooting of your NiPoGi AK1 PRO Mini PC. The AK1 PRO is a compact desktop computer powered by an 11th Generation Intel Celeron N5105 processor, designed for efficient daily tasks, multimedia playback, and business applications. It features 12GB DDR4 RAM, a 256GB M.2 SSD, 4K UHD video output, dual display support, Dual Band WiFi, and Bluetooth 4.2.
상자 안에 무엇이 들어있나요?
도착 시 패키지 내용물을 확인해 주세요. 표준 패키지에는 다음이 포함됩니다.
- 1 x NiPoGi AK1 PRO Mini PC (12GB RAM, 256GB ROM)
- EU 전원 어댑터 1개
- 1 x HDMI 케이블
- 1 x VESA Bracket with Screws
- 1 x 사용자 설명서
제품 끝view
The NiPoGi AK1 PRO Mini PC is designed with various ports for connectivity and expansion. Familiarize yourself with the layout below.
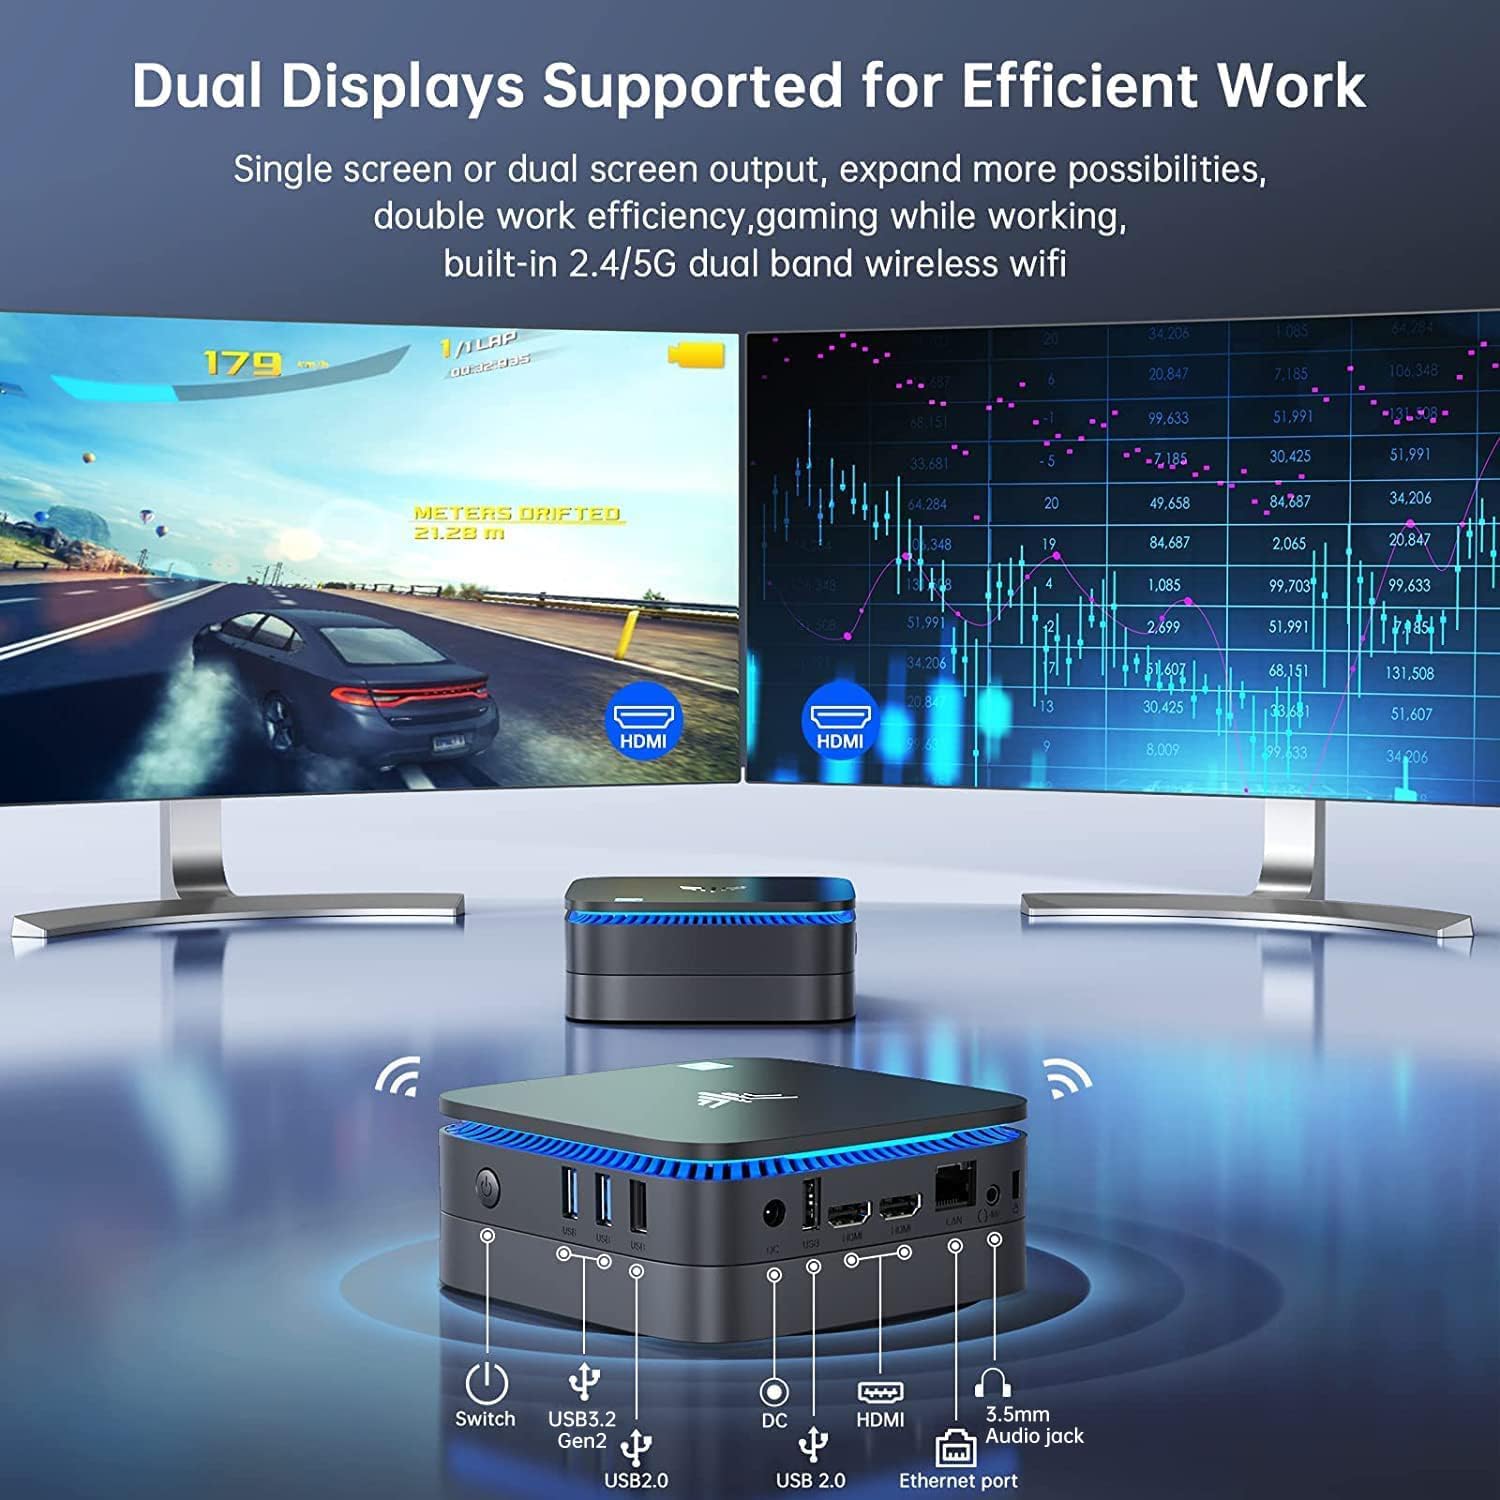
영상: 전면 및 후면 view of the NiPoGi AK1 PRO Mini PC, highlighting its various ports and compact design. The front features the power button and USB ports, while the rear includes HDMI, Ethernet, and additional USB ports.
포트 레이아웃:
- 앞쪽: Power Button, 2 x USB 3.0 ports, 2 x USB 2.0 ports
- 뒤쪽: DC Power Input, 2 x HDMI ports, 1 x RJ45 Gigabit Ethernet port, 1 x 3.5mm Audio Jack
주요 특징:
- 프로세서: 11th Gen Intel Celeron N5105 Quad-Core (up to 2.9 GHz)
- 제도법: Intel UHD Graphics, supporting 4K UHD (4096x2160@60Hz)
- 메모리: 12GB DDR4 램
- 저장: 256GB M.2 SSD (expandable with 2.5-inch SSD/HDD up to 2TB)
- 연결성: Dual Band 2.4GHz+5GHz WiFi, Gigabit Ethernet, Bluetooth 4.2
- 디스플레이 출력: Dual HDMI for dual screen setup
- 운영 체제: 사전 설치된 OS
설치 가이드
Follow these steps to set up your NiPoGi AK1 PRO Mini PC for the first time.
- 디스플레이에 연결: Use the provided HDMI cable to connect the Mini PC to your monitor or TV. The AK1 PRO supports dual displays, so you can connect two monitors via the two HDMI ports.
- 주변기기 연결: 사용 가능한 USB 포트에 USB 키보드와 마우스를 연결하세요.
- 전원에 연결: Connect the EU power adapter to the DC input port on the Mini PC, then plug the adapter into a power outlet.
- 전원 켜기: Press the power button located on the front of the Mini PC. The device will boot up, and the blue light will illuminate.
- 초기 운영체제 설정: 화면의 지시에 따라 언어, 지역 및 네트워크 구성을 포함한 운영 체제 설정을 완료하십시오.
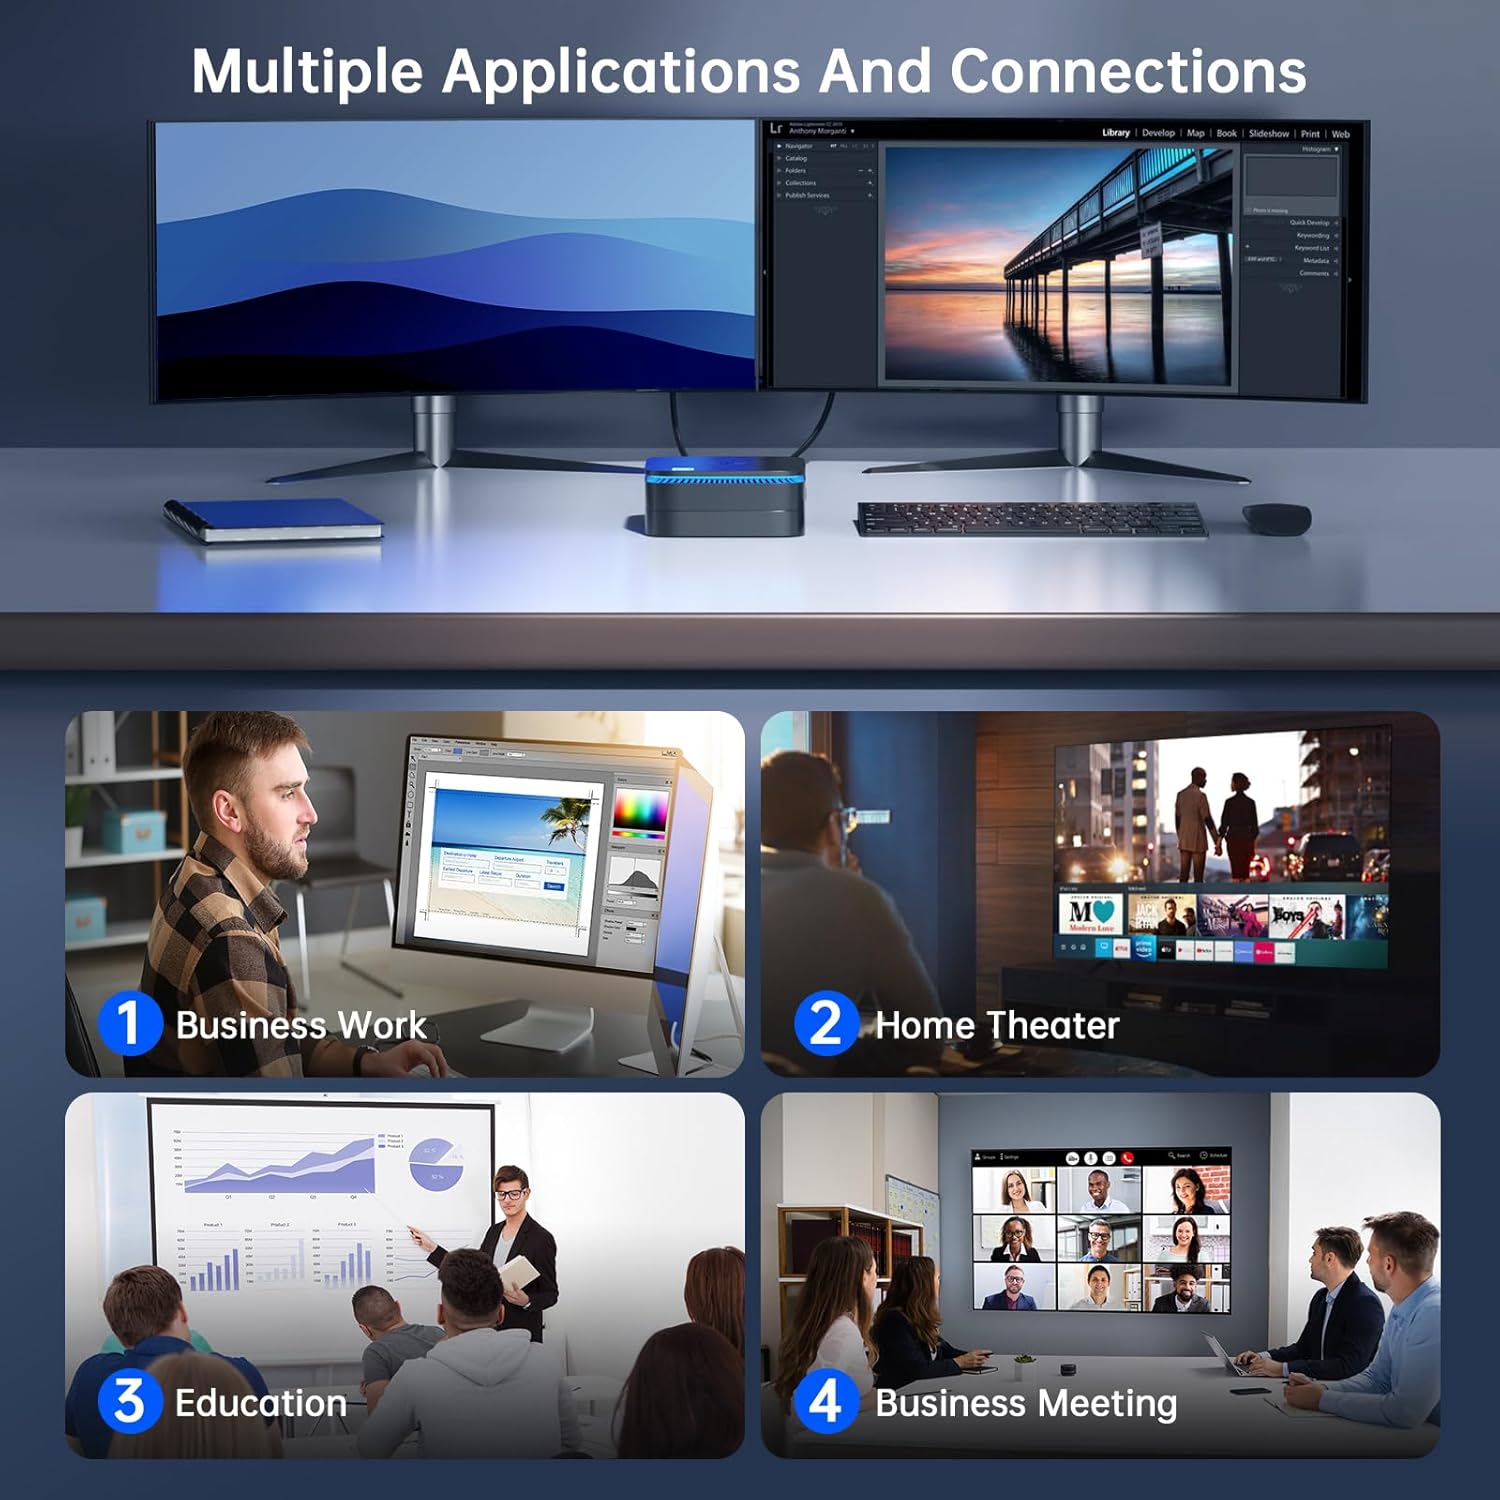
영상: The NiPoGi AK1 PRO Mini PC demonstrating multiple applications and connections, including business work, home theater, education, and business meetings, showcasin다재다능함.
작동 지침
기본 작업:
- 전원 켜기/끄기: Press the front power button to turn the PC on. To turn off, use the operating system's shutdown function or press and hold the power button for a few seconds for a forced shutdown (not recommended for regular use).
- 다시 시작: 운영체제의 재시작 기능을 사용하십시오.
- 수면 모드 : The PC can enter sleep mode to save power. Wake it up by moving the mouse or pressing a key on the keyboard.
4K UHD Video Playback:
The integrated Intel UHD Graphics supports 4K UHD resolution (4096x2160@60Hz), providing a clear visual experience for movies, streaming, and presentations.

영상: A person enjoying 4K HD video playback on a large display, powered by the NiPoGi AK1 PRO Mini PC, highlighting its multimedia capabilities and wireless Bluetooth support.
듀얼 디스플레이 구성:
Connect two monitors to the two HDMI ports for an extended desktop experience. This can enhance productivity for work or provide a more immersive entertainment setup. Configure display settings within your operating system.
저장 공간 확장
The NiPoGi AK1 PRO Mini PC comes with a 256GB M.2 SSD. For additional storage, you can install a 2.5-inch SSD or HDD (not included) in the removable base, supporting up to 2TB.
설치 단계:
- 미니 PC의 전원이 꺼져 있고 전원 어댑터에서 분리되어 있는지 확인하십시오.
- 미니 PC의 아래쪽 덮개를 조심스럽게 여세요.
- Insert your 2.5-inch SSD/HDD into the designated slot in the removable base.
- Secure the drive with screws if necessary (check the base for mounting points).
- 아랫덮개를 다시 부착하세요.
- After powering on, you may need to initialize and format the new drive through your operating system's disk management tools.

영상: A visual tutorial demonstrating how to install a 2.5-inch SSD or HDD into the NiPoGi AK1 PRO Mini PC by opening the bottom cover and inserting the drive into the expansion bay.
VESA 마운트 설치
The included VESA bracket allows you to mount the Mini PC to the back of a compatible monitor or TV, saving desk space and creating an all-in-one computing solution.
설치 단계:
- Attach the VESA bracket to the back of your monitor using the provided screws. Ensure your monitor has standard VESA mounting holes.
- Slide the NiPoGi AK1 PRO Mini PC onto the VESA bracket until it clicks securely into place.
- Connect all necessary cables (power, HDMI, peripherals) to the Mini PC.

영상: The NiPoGi AK1 PRO Mini PC shown mounted on the rear of a computer monitor using a VESA bracket, illustrating how it can transform into an all-in-one computer and save desk space.
유지
적절한 유지관리는 Mini PC의 수명과 최적의 성능을 보장합니다.
- 청소: Regularly clean the exterior of the Mini PC with a soft, dry cloth. Use compressed air to clear dust from ventilation openings to prevent overheating.
- 소프트웨어 업데이트: 보안과 성능을 보장하려면 운영 체제와 드라이버를 최신 상태로 유지하세요.
- 환경 조건: 미니 PC는 통풍이 잘 되는 곳에서 직사광선, 과도한 열, 습기를 피해 사용하십시오.
- 전원 관리 : Use the provided power adapter. Avoid frequent abrupt power cuts.
문제 해결
If you encounter issues with your Mini PC, refer to the following common troubleshooting steps.
- 전원 없음:
- 전원 어댑터가 Mini PC와 작동하는 전원 콘센트에 모두 단단히 연결되어 있는지 확인하세요.
- 다른 장치를 연결하여 전원 콘센트가 작동하는지 확인하세요.
- 디스플레이 없음:
- HDMI 케이블이 미니 PC와 모니터에 제대로 연결되어 있는지 확인하십시오.
- 모니터 전원이 켜져 있고 올바른 입력 소스(HDMI 1, HDMI 2 등)로 설정되어 있는지 확인하십시오.
- 가능하다면 다른 HDMI 케이블이나 모니터를 사용해 보세요.
- 인터넷 연결 없음(Wi-Fi/이더넷):
- For Wi-Fi, ensure the Wi-Fi adapter is enabled in the operating system and you are connected to the correct network with the correct password.
- For Ethernet, ensure the Ethernet cable is securely connected to both the Mini PC and your router/modem. Check router status.
- 라우터/모뎀과 미니 PC를 재시작하세요.
- 느린 성능:
- 백그라운드에서 실행 중인 불필요한 애플리케이션을 닫으세요.
- 메인 드라이브에 충분한 여유 공간이 있는지 확인하십시오.
- 보류 중인 운영 체제 업데이트가 있는지 확인하고 설치하십시오.
- 작업 관리자(Windows)를 통해 CPU 및 RAM 사용량을 모니터링하여 리소스를 많이 사용하는 프로세스를 파악하십시오.
명세서
Detailed technical specifications for the NiPoGi AK1 PRO Mini PC.
| 특징 | 세부 사항 |
|---|---|
| 상표 | 니포기 |
| 모델 시리즈 | AK1PRO N5105/12GB RAM+256GB ROM |
| 프로세서 | Intel Celeron N5105 (11th Gen, Quad-Core, up to 2.9 GHz) |
| 그래픽 코프로세서 | 인텔 UHD 그래픽 |
| 숫양 | 12GB DDR4 |
| 저장 | 256GB M.2 SSD (Expandable with 2.5" SSD/HDD up to 2TB) |
| 운영 체제 | OS |
| 연결성 | Dual Band Wi-Fi (802.11a/b/g/n/ac), Bluetooth 4.2, Gigabit Ethernet |
| USB 포트 | 2 X USB 3.0, 2 X USB 2.0 |
| HDMI 포트 | 2 (supports dual display, 4K UHD resolution) |
| 오디오 | 1 x 3.5mm 오디오 잭 |
| 치수 | 12.8 x 12.8 x 5.15cm (약 5.04 x 5.04 x 2.05인치) |
| 무게 | 274그램 |
| 색상 | 검은색 |
보증 및 지원
NiPoGi provides comprehensive support and warranty services for your Mini PC.
지원팀에 문의:
- Amazon Orders: Log in to Amazon, go to "Your Account", then "Your Orders", and select "Ask Product Question" for assistance.
- 이메일 지원: support@inipogi.com
- 전화 지원: +44 808 175 2348(월~금, 오전 9시~오후 5시(EST))
NiPoGi offers maintenance points for exchange or repair of your mini PC during the warranty period. Please retain your proof of purchase for warranty claims.

영상: Information regarding NiPoGi's "All-Around Protection" plan, including contact methods for support via Amazon, email, and phone, and details about maintenance services.