1. 서론
The Robens Chinook Ursa PRS is a versatile and robust tipi-style tent designed for group camping and outdoor adventures. With a capacity for up to eight people, it offers ample space and features for comfortable outdoor living. Its unique design allows for a fully open front, creating a shaded area, and includes a stove pipe port for heating in colder conditions. This manual provides essential information for the safe and effective use, setup, and maintenance of your tent.
2. 안전 정보
Please read and understand all safety warnings before setting up or using the tent.
- 화재 안전: The tent fabric is flame retardant but not fireproof. Keep all flame and heat sources away from the tent fabric. Do not use open flames inside the tent.
- 통풍: Ensure adequate ventilation, especially if using a tent stove. Carbon monoxide can be deadly.
- Stove Use: If using a tent stove, ensure it is specifically designed for tent use and properly installed through the designated stove pipe port. Follow the stove manufacturer's instructions carefully.
- 날씨 조건: While robust, avoid pitching the tent in extreme weather conditions such as severe winds, heavy snow, or lightning storms.
- 사이트 선택: Choose a level, clear site free of sharp objects, and away from potential hazards like falling rocks or trees.
- 어린이들: Keep children away from hot stoves and guy lines to prevent accidents.
3. 패키지 내용
설정을 시작하기 전에 모든 구성 요소가 있는지 확인하세요.
- Tent Fly (HydroTex HD RS, 75D 190T polyester)
- Central Pole (Anodized #7001 alloy, 32 mm)
- A-Frame Poles (Anodized #7001 alloy, 19 mm)
- Groundsheet (210T Oxford polyester)
- Guy Lines (Reflective)
- 텐트 못
- Repair Patch for Mesh Fabric
- 가방을 기내
4. 설정 지침
텐트를 올바르게 설치하려면 다음 단계를 따르세요.
- 짐을 풀고 배치하세요: Remove the tent from its carry bag and lay the tent fly flat on your chosen site. Ensure the door opening is facing the desired direction.
- Insert Central Pole: Locate the central pole sleeve inside the tent. Assemble the central pole and insert it into the sleeve, pushing it upwards until the tent begins to take shape. Secure the base of the pole.
- 보안 기지: Peg down the base of the tent fly at regular intervals around the perimeter. Ensure the tent is taut but not overstretched.
- Install A-Frame Poles: Assemble the A-frame poles. These poles are used to create the entrance structure. Insert them into the designated sleeves or grommets at the front entrance.
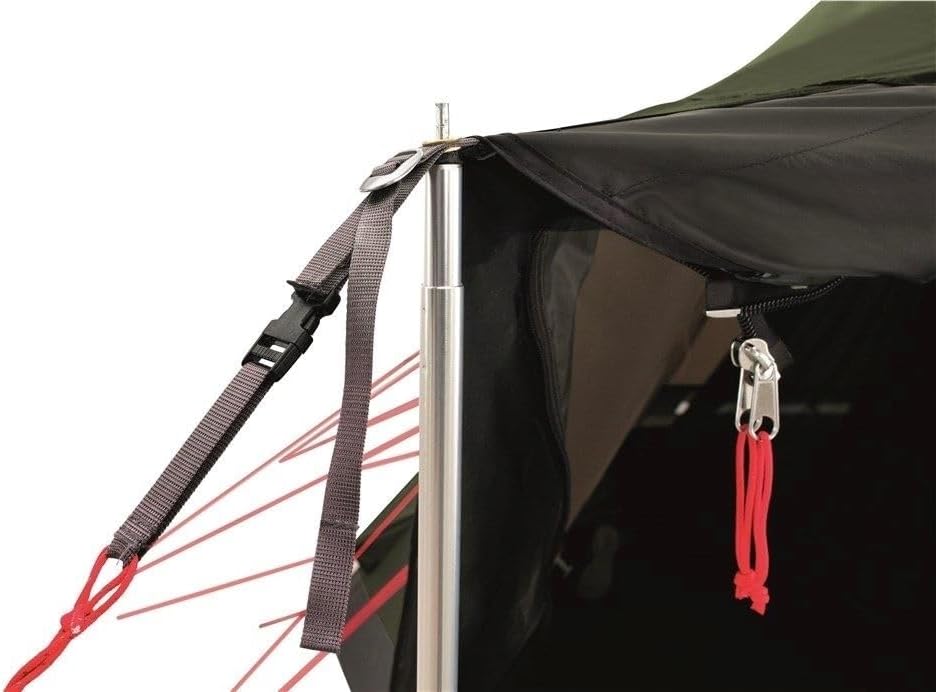
Figure 4.1: Detail of the A-frame pole connection point at the tent entrance.
- 가이라인 부착: Extend all reflective guy lines and peg them securely into the ground at an angle that provides maximum stability. Adjust the tensioners to make the tent taut and stable.

Figure 4.2: The Robens Chinook Ursa PRS tent fully pitched, showing the overall structure and extended guy lines for stability.
- Install Groundsheet: Lay the 210T Oxford polyester groundsheet inside the tent. It features a zipper for attachment to the tent fly, providing a sealed floor.
- 환기 조정: Adjust the internal Apex ventilation control as needed for airflow.
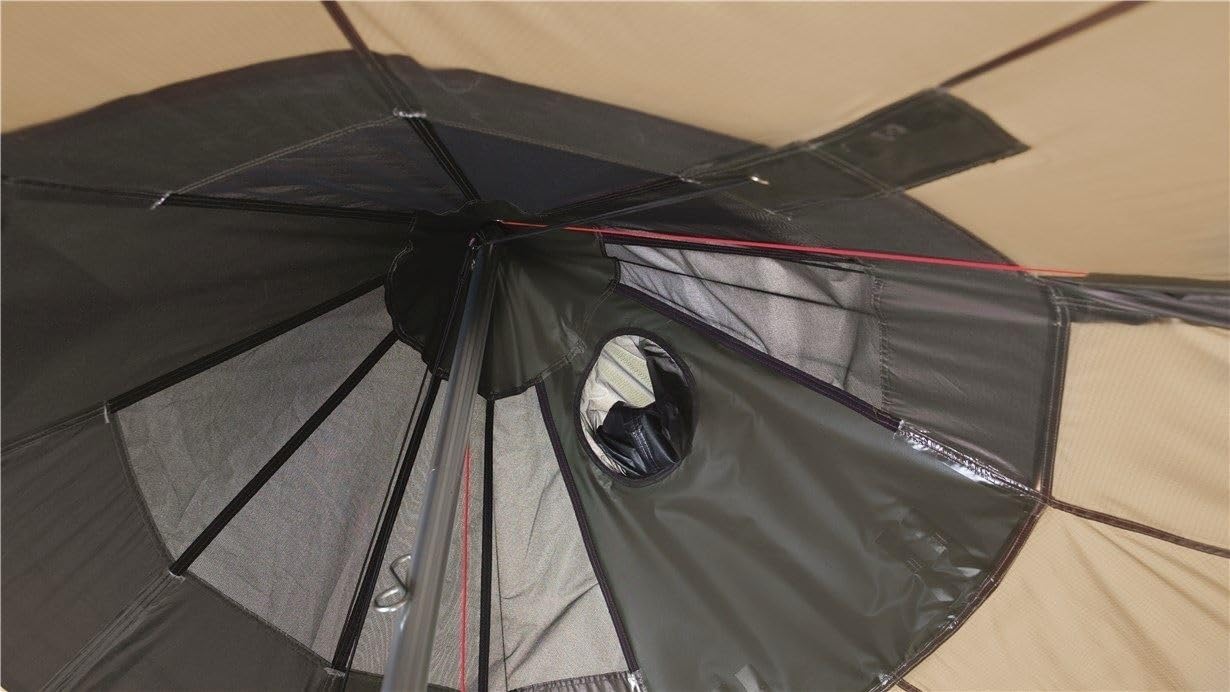
그림 4.3: 내부 view of the tent's apex, illustrating the internal ventilation control mechanism.
5. 작동 특징
5.1. Convertible Entrance / Sunshade
The front entrance of the Chinook Ursa PRS can be fully opened to create a large shaded area, ideal for socializing or enjoying the view. To convert the entrance:
- Unzip the gussets along the sides of the entrance.
- Use the A-frame poles (or additional poles if desired) to prop up the unzipped fabric, extending it outwards to form a canopy.
- Secure the canopy with additional guy lines and pegs if necessary for stability.
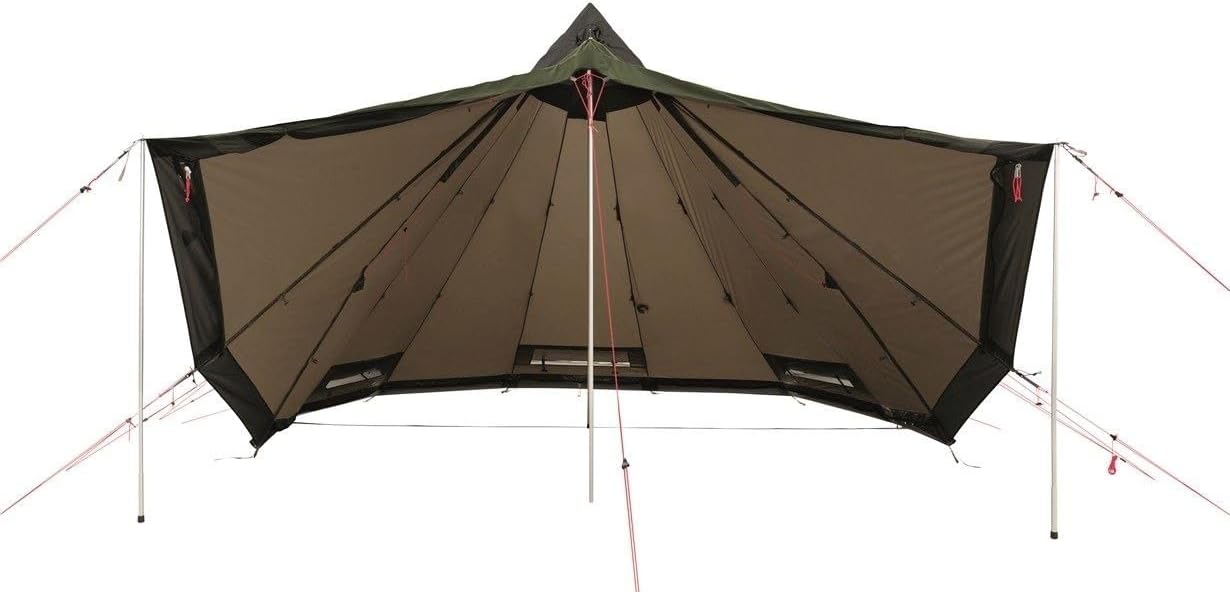
Figure 5.1: The tent with its front entrance fully opened and propped up to form a large sunshade or communal area.
5.2. Stove Pipe Port
The tent includes a dedicated stove pipe port, allowing for the safe use of a compatible tent stove. This feature is particularly useful in colder climates.
- Locate the reinforced stove pipe port near the apex of the tent.
- Carefully open the port and feed the stove pipe through, ensuring a secure and stable installation of your stove.
- 중요한: Always ensure proper ventilation when using a stove. Refer to the stove manufacturer's instructions for safe operation.
5.3. Apex Ventilation Control
The internal Apex ventilation control allows you to regulate airflow within the tent, minimizing condensation and maintaining a comfortable environment.
- Adjust the internal mechanism at the tent's peak to open or close the ventilation vents as needed.
- Keep vents partially open even in cold weather to ensure some air circulation.
6. 유지관리
6.1. 청소
- Clean the tent with a soft brush or sponge and lukewarm water. Do not use harsh detergents, bleach, or solvents, as these can damage the fabric's waterproof coating.
- Rinse thoroughly and allow the tent to air dry completely before packing away. Packing a damp tent can lead to mildew and fabric degradation.
- Clean zippers with a brush and lubricate them periodically with a silicone-based spray.
6.2. 보관
- Store the tent in a cool, dry, and well-ventilated area, away from direct sunlight and extreme temperatures.
- Ensure the tent is completely dry before storage to prevent mildew and odors.
- Store poles and pegs separately if possible to prevent damage to the fabric.
6.3. 수리
- Small punctures or tears in the fabric can be repaired using a tent repair kit or the included repair patch for mesh fabric.
- For larger damage or pole repairs, contact Robens customer support or a professional tent repair service.
7. 문제 해결
| 문제 | 가능한 원인 | 해결책 |
|---|---|---|
| 텐트 내부 결로 현상 | 환기 부족, 높은 습도, 온도 차이 | Increase ventilation by opening Apex vents and door/window mesh. Ensure proper airflow. |
| 바람에 텐트가 불안정함 | Guy lines not taut, pegs loose, incorrect pitching angle | Re-tension all guy lines. Re-peg if necessary, ensuring pegs are fully inserted and angled correctly. Pitch with the narrowest side facing the wind. |
| 물 누출 | Damaged fabric, worn seams, improper pitching allowing pooling | Inspect fabric for tears; use repair patch. Check seam sealing; re-seal if necessary. Ensure tent is pitched tautly to prevent water pooling. |
| 지퍼가 뻑뻑해짐 | Dirt, debris, lack of lubrication | 지퍼 이빨을 브러시로 닦으세요. 실리콘 기반 지퍼 윤활제를 바르세요. |
8. 사양
| 특징 | 세부 사항 |
|---|---|
| 모델 | Chinook Ursa PRS (Model No. 130304) |
| Tent Type | 티피 |
| 용량 | 8인 |
| Flysheet Fabric | HydroTex HD RS, 75D 190T Polyester, Ripstop, Flame Retardant, 100% Polyester |
| Hydrostatic Head (Flysheet) | 5000mm (XNUMXmm) |
| Groundsheet Fabric | 210T Oxford Polyester, 100% Polyester |
| Hydrostatic Head (Groundsheet) | 10,000mm (XNUMXmm) |
| 기둥 | Anodized #7001 Alloy (32 mm Central Pole / 19 mm A-Frame) |
| 패키지 크기 | 108 x 29cm |
| 무게 | 14 kg (Minimum Weight: 12.4 kg) |
| 색상 | 암록색 |
| 특별 기능 | Convertible Entrance/Sunshade, Stove Pipe Port, Apex Ventilation Control, Reflective Guy Lines, Zippered Groundsheet |
9. 보증 및 지원
Robens products are manufactured to high standards and are covered by a limited warranty against defects in materials and workmanship. For specific warranty terms and conditions, please refer to the warranty information provided with your purchase or visit the official Robens web대지.
For technical support, spare parts, or warranty claims, please contact your authorized Robens dealer or Robens customer service. Keep your proof of purchase for any warranty-related inquiries.
Robens Official Web대지: www.robens.de


