소개
The HAPPYMODEL Mobula7 1S HD is a lightweight and efficient 75mm brushless FPV whoop drone designed for high-definition video recording. It features a highly integrated X12 5-IN-1 AIO flight controller with a built-in Frsky receiver, capable of 1080P HD video capture, and includes an external blackbox for Gyroflow stabilization. This manual provides essential information for the safe and effective operation of your Mobula7 1S HD drone.

그림 1: 상단 view of the HAPPYMODEL Mobula7 1S HD Micro FPV Whoop Drone.
안전 정보
Always prioritize safety when operating FPV drones. Failure to follow these guidelines may result in injury or damage to property.
- 사람, 동물 및 장애물로부터 떨어진 탁 트인 공간에서 작업하십시오.
- 드론이 작동하는 동안 안전한 거리를 유지하세요.
- Ensure propellers are clear before connecting the battery.
- 물 근처나 습한 환경에서 작동하지 마십시오.
- Always disconnect the battery after use and before handling the drone for maintenance.
- Use only recommended 1S LiPo/LiHV batteries (not included).
- 18세 미만 사용자의 경우 성인의 감독을 받는 것이 좋습니다.
패키지 내용
패키지에 모든 구성품이 들어 있는지 확인하세요.
- HAPPYMODEL Mobula7 1S HD Micro FPV Whoop Drone (Frsky Version)
- RunCam Split3-Lite Camera (pre-installed)
- 1 inch PC Material Propellers (pre-installed, with spares)
- External Blackbox module
Note: Batteries are not included with this product. Recommended batteries are 1S 450mAh/550mAh/650mAh LiPo/LiHV.
설정
1. 초기 검사
Carefully unbox the drone and inspect it for any visible damage. Ensure all propellers are securely attached and free from bends or cracks. Check all wiring connections for proper seating.
2. 배터리 연결
Connect a fully charged 1S LiPo/LiHV battery to the drone's power connector. Ensure the polarity is correct. The drone will power on and initiate its boot sequence.
3. Binding with Frsky Transmitter
The Mobula7 1S HD (Frsky version) features a built-in SPI Frsky 2.4G receiver. Refer to your Frsky transmitter's manual for specific binding procedures. Typically, you will put your transmitter into binding mode, then power on the drone while holding the bind button (if applicable, consult the flight controller diagram for location) or initiate binding via Betaflight configurator.
4. Flight Controller Configuration (Betaflight)
The drone uses an X12 Frsky V1.0 flight controller (Target: CRAZYBEEF4FR). For advanced configuration, connect the drone to a computer via USB and use the Betaflight Configurator software. This allows for PID tuning, OSD customization, mode setup, and more.
5. External Blackbox Setup
The external blackbox module allows for flight data recording, essential for Gyroflow stabilization.
- Insert a Micro SD card (up to 32GB, formatted to FAT32) into the blackbox module. Be careful when inserting the card to avoid damage.
- Do not pull out the SD card while the battery is connected or the drone is powered on.
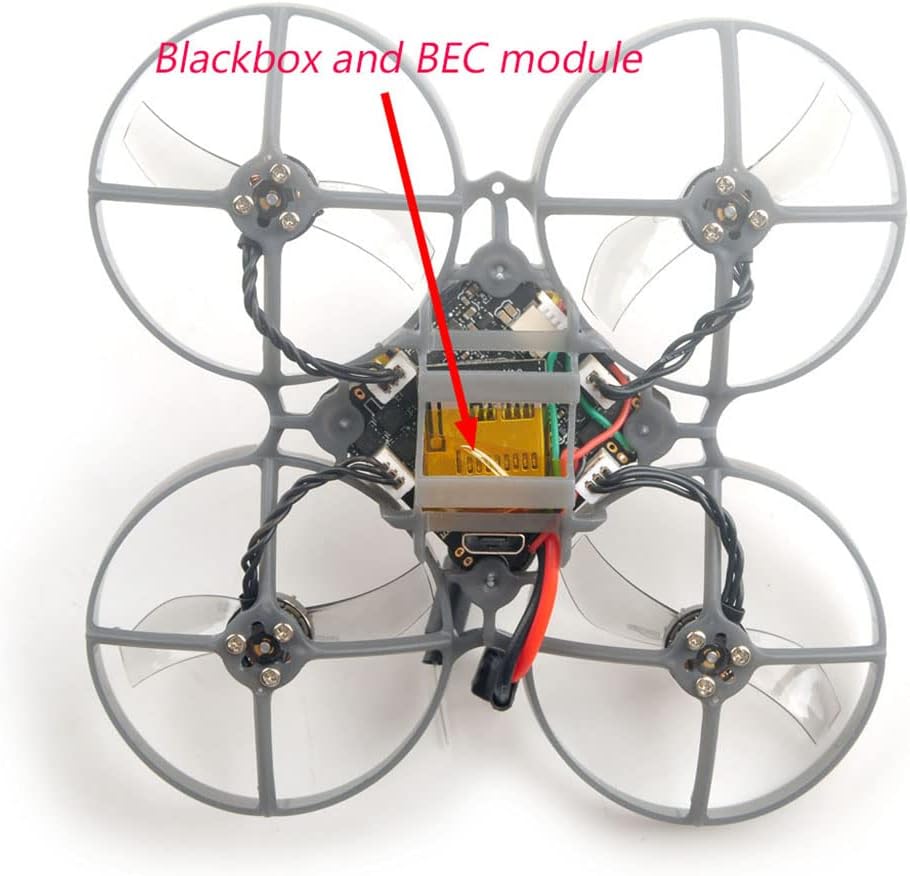
Figure 2: Location of the external blackbox and BEC module on the Mobula7 1S HD.
6. RunCam Split3-Lite Power
The RunCam Split3-Lite camera requires an external voltage booster module for stable power, as the onboard 5V DC module may not handle it optimally. Ensure this connection is secure as per the wiring diagram.
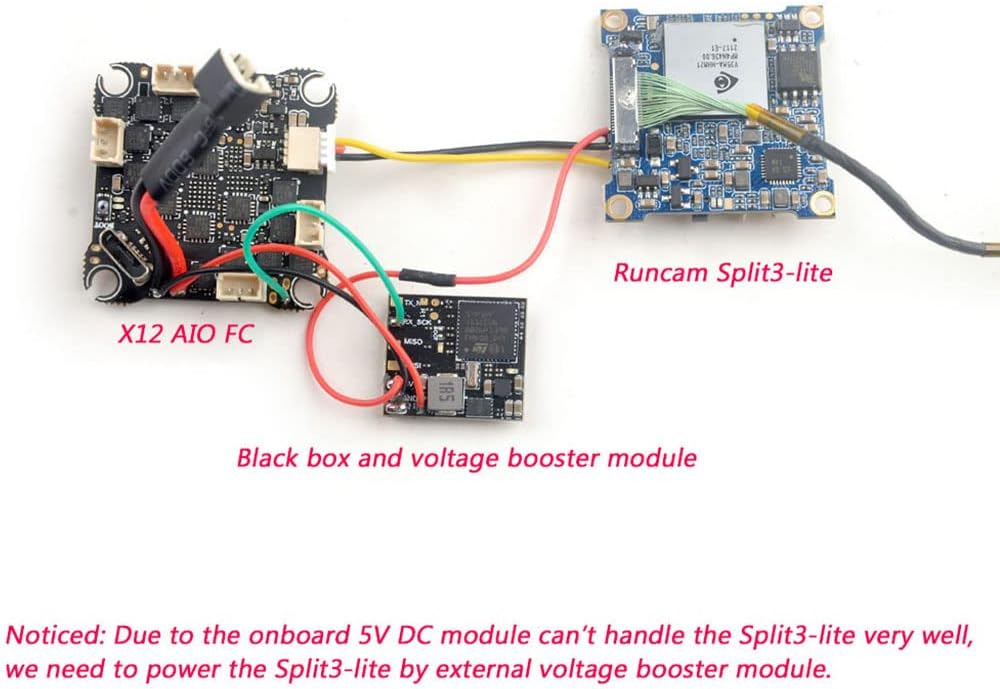
Figure 3: Wiring diagram illustrating connections between the X12 AIO FC, RunCam Split3-Lite, and the external blackbox with voltage booster module.
작동 지침
1. 비행 전 점검
- Ensure your transmitter is powered on and bound to the drone.
- 배터리 용량 확인tage on both the drone and transmitter.
- Verify propellers are free from obstructions and damage.
- Confirm FPV video feed is clear and stable.
2. 무장 및 무장 해제
Arming and disarming procedures are typically configured in Betaflight. Common methods include a stick command (e.g., throttle down and yaw right) or a dedicated switch on your transmitter. Ensure you are in a safe area before arming.
3. 기본 비행 제어
The Mobula7 1S HD is an intermediate-level drone. Familiarize yourself with standard FPV flight controls:
- 조절판: 고도를 조절합니다.
- 롤 : Tilts the drone left or right.
- 정점: Tilts the drone forward or backward.
- 편주: 드론을 수직축을 중심으로 좌우로 회전시킵니다.
4. HD 비디오 녹화
The RunCam Split3-Lite records 1080P HD video. Recording is typically initiated via a switch on your transmitter, configured in Betaflight. Ensure an SD card is inserted into the external blackbox for flight data logging, which is crucial for post-processing with Gyroflow for smooth footage.

그림 4: 클로즈업 view of the RunCam Split3-Lite camera module.
유지
정기적인 유지보수는 드론의 수명과 성능을 보장합니다.
- 청소: After each flight, especially outdoors, gently clean the drone to remove dust, dirt, or debris from the frame, motors, and camera lens. Use a soft brush or compressed air.
- 프로펠러 교체: Inspect propellers before and after each flight for cracks, bends, or chips. Damaged propellers can cause vibrations and affect flight performance. Replace them immediately if damaged.
- 모터 검사: Check motors for any signs of damage, loose wires, or excessive play in the bearings. Ensure they spin freely.
- 펌웨어 업데이트: Periodically check the HAPPYMODEL website or Betaflight resources for firmware updates for the flight controller. Updating firmware can improve performance and add new features.

그림 5: 클로즈업 view of the RS0802 KV20000 motor and 1-inch PC material propeller.
문제 해결
| 문제 | 가능한 원인 | 해결책 |
|---|---|---|
| 드론 전원이 켜지지 않습니다 | 배터리가 연결되지 않았거나, 배터리가 방전되었거나, 연결에 오류가 있습니다. | Ensure battery is fully charged and securely connected. Check power lead for damage. |
| FPV 비디오 피드 없음 | VTX not powered, camera disconnected, incorrect VTX channel. | Check camera and VTX connections. Verify VTX channel matches goggles. Ensure external voltage booster for RunCam Split3-Lite is working. |
| Drone not binding to transmitter | Incorrect binding procedure, receiver issue, transmitter not in bind mode. | Review binding steps in this manual and your transmitter's manual. Ensure correct receiver protocol (Frsky D8/D16). |
| Unstable flight/excessive vibrations | Damaged propellers, loose motors, incorrect PID tuning. | Inspect and replace damaged propellers. Check motor screws. Adjust PID settings in Betaflight if necessary. |
| HD recording issues | SD card full/corrupt, incorrect format, card not inserted correctly. | Format SD card to FAT32. Ensure card is fully inserted. Try a different SD card. |
명세서
| 특징 | 세부 사항 |
|---|---|
| 상표 | HAPPYMODEL |
| 모델명 | Mobula7 1S HD |
| 휠베이스 | 75mm |
| 치수(길이 x 너비 x 높이) | 99mm x 99mm x 45.5mm (길이 3.9인치 x 너비 3.9인치 x 높이 1.79인치) |
| 비행 컨트롤러 | X12 Frsky V1.0 AIO (CRAZYBEEF4FR) |
| MCU | STM32F411CEU6 (100MHZ, 512K FLASH) |
| 감지기 | ICM20689 (SPI connection) |
| 수신기 옵션 | SPI Frsky D8/D16 |
| 키보드 | Built-in 12A (each) Blheli_S 4in1 ESC (Peak 15A for 3s) |
| 모터 | RS0802 KV20000 (9N12P) |
| 프로펠러 | 1 inch PC Material Propellers |
| 카메라 | RunCam Split3-Lite (1080P HD video record) |
| 비디오 캡처 해상도 | 1080p (1920x1080 픽셀) |
| 비디오 캡처 형식 | MP4 |
| 비티엑스 | Built-in 5.8G OpenVTX 0mw~400mw |
| 블랙박스 | External, supports Micro SD card (max 32GB, FAT32) |
| 전원 공급 장치 | 1S battery input (DC 2.9V-4.35V) |
| 추천 배터리 | 1S 450mAh/550mAh/650mAh (not included) |
| 기술 수준 | 중급 |
| 재료 | PC |
| 한국어: | 086972526571 |
보증 정보
Specific warranty details for the HAPPYMODEL Mobula7 1S HD Micro FPV Whoop Drone are not provided within this manual. Please refer to the product packaging, the seller's website, or contact HAPPYMODEL directly for warranty terms and conditions.
지원하다
For technical support, troubleshooting beyond this manual, or inquiries regarding your HAPPYMODEL Mobula7 1S HD drone, please contact the seller or visit the official HAPPYMODEL website. Online communities and forums dedicated to FPV drones can also be valuable resources for assistance.


