1. 제품 오버view
The AZZA CSAZ-280B Spectra Black is an ATX Mid Tower gaming case designed to house various computer components. It features a tempered glass side panel and a steel right panel. This manual provides instructions for the proper installation and maintenance of your computer components within this case.

이미지 1.1: 앞 왼쪽 view of the AZZA CSAZ-280B Spectra Black case, showcasing the tempered glass side panel and the front panel design with integrated RGB lighting.
주요 특징:
- Left Panel: Tempered glass with rubber mounts for secure installation.
- Right Panel: Solid steel panel.
- Motherboard Compatibility: Supports ATX, Micro-ATX, and ITX motherboards.
- Drive Bays: Up to three 2.5" drive bays and up to two 3.5" drive bays.
- Maximum CPU Cooler Height: Up to 170 mm.
- Maximum Video Card Length: Up to 290 mm.
2. 설정 및 구성 요소 설치
Follow these steps for proper installation of your computer components into the AZZA CSAZ-280B case. Ensure the system is powered off and unplugged before beginning any installation.
2.1 Front I/O Panel Connections
The top panel of the case features various input/output ports and controls for convenient access.

이미지 2.1: 위에서 아래로 view of the case's front I/O panel, indicating the Power button, LED control button, Audio jacks (Mic and Headphone), two USB 2.0 ports, and one USB 3.0 port.
- 전원 버튼: Press to power on or off the system.
- LED 버튼: Controls the RGB lighting effects of the case.
- 오디오 잭: Separate ports for microphone and headphones.
- USB 2.0 포트: Two ports for connecting USB 2.0 devices.
- USB 3.0 포트 : One port for connecting USB 3.0 devices, offering faster data transfer speeds.
2.2 드라이브 설치
The case supports both 3.5" HDDs and 2.5" SSDs. Refer to the images below for drive bay locations.

이미지 2.2: 내부 view showing the lower drive cage, capable of holding one 3.5" HDD or one 2.5" SSD, and an additional dedicated 3.5" HDD bay.

이미지 2.3: 내부 view showing two dedicated 2.5" SSD mounting brackets located behind the motherboard tray.
- For 3.5" HDDs: Install drives into the designated 3.5" drive cage located at the bottom front of the case. Secure with screws.
- For 2.5" SSDs: Install drives into the dedicated 2.5" mounting brackets behind the motherboard tray or in the lower drive cage. Secure with screws.
2.3 그래픽 카드 설치
이 케이스는 최대 290mm 길이의 그래픽 카드를 지원합니다.

이미지 2.4: 내부 view illustrating the maximum supported length for a video card, which is 290mm.
- 케이스 뒷면에서 필요한 PCI-E 슬롯 커버를 제거합니다.
- Carefully insert the graphics card into the PCI-E slot on your motherboard.
- 그래픽 카드를 나사를 사용하여 케이스에 고정하십시오.
2.4 팬 설치 및 공기 흐름
Proper fan placement ensures optimal cooling performance. The case supports various fan configurations:
- 앞쪽: Supports 3 x 120mm fans or 2 x 140mm fans.
- 맨 위: 120mm 팬 2개를 지원합니다.
- 뒤쪽: 120mm 팬 1개를 지원합니다.
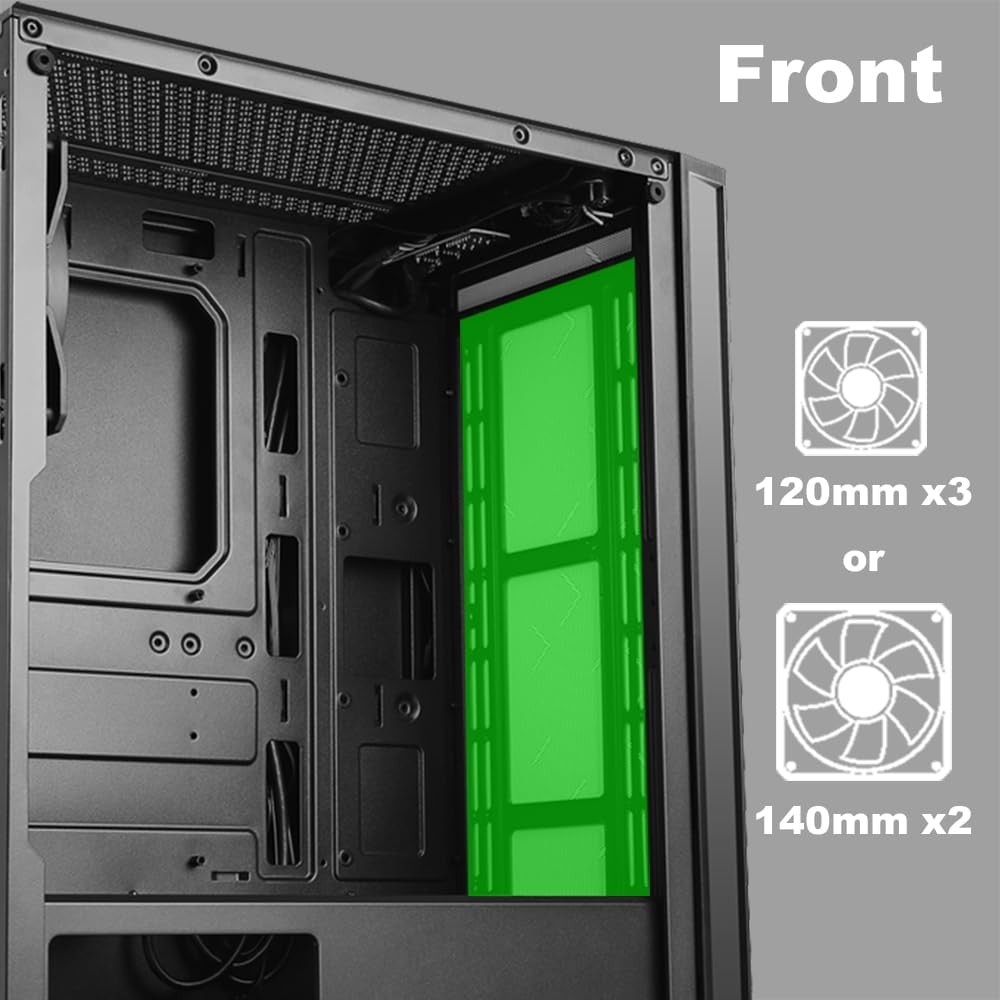
이미지 2.5: 내부 view of the front panel, highlighting the mounting locations for up to three 120mm fans or two 140mm fans.

이미지 2.6: 내부 view of the top panel, showing the mounting locations for up to two 120mm fans.

이미지 2.7: 내부 view of the rear panel, indicating the mounting location for one 120mm fan.
- Identify the desired fan mounting locations (front, top, rear).
- Secure fans to the case using appropriate fan screws.
- Connect fan power cables to the motherboard or a fan controller.
2.5 전원 공급 장치 설치
The power supply unit (PSU) mounts at the bottom of the case.
- Slide the PSU into the designated compartment at the bottom rear of the case.
- 파워서플라이를 케이스 뒷면의 나사를 사용하여 고정하십시오.
- Route power cables through the cable management cutouts to reach your components.
3. 사용 설명서
3.1 전원 켜기/끄기
To power on your system, press the power button located on the top I/O panel. To power off, either shut down through your operating system or press and hold the power button for several seconds.
3.2 LED 제어
Use the dedicated LED button on the top I/O panel to cycle through various lighting modes and colors for the integrated RGB elements of the case.
4. 유지관리
정기적인 유지관리는 PC 구성 요소의 최적의 성능과 수명을 보장하는 데 도움이 됩니다.
- 먼지 청소: 압축 공기를 사용하여 주기적으로 먼지 필터와 내부 부품을 청소하십시오. 청소하기 전에 시스템의 전원을 끄고 플러그를 뽑으십시오.
- 케이블 관리 : Ensure cables are neatly routed to prevent obstruction of airflow and to maintain a clean interior.
- 패널 관리: Clean the tempered glass panel with a soft, lint-free cloth and a mild glass cleaner. Avoid abrasive materials.
5. 문제 해결
이 섹션에서는 일반적으로 발생할 수 있는 문제에 대해 설명합니다.
- 시스템 전원이 켜지지 않음:
- Verify all power cables (24-pin ATX, 8-pin CPU, GPU power) are securely connected to the motherboard and components.
- 전원 공급 스위치가 'ON' 위치에 있는지 확인하세요.
- 전면 패널 전원 버튼 케이블이 마더보드의 전면 패널 헤더에 올바르게 연결되어 있는지 확인하십시오.
- Fans Not Spinning / LEDs Not Lighting Up:
- 팬 전원 케이블이 마더보드 또는 팬 컨트롤러에 제대로 연결되어 있는지 확인하십시오.
- Ensure LED cables are correctly connected to the motherboard's RGB header or the case's LED controller.
- Press the LED button on the top I/O panel to cycle through modes or turn on the lighting.
- USB 포트가 작동하지 않음:
- Check that the USB 2.0 and USB 3.0 headers from the front panel are correctly plugged into the corresponding ports on your motherboard.
- 오디오 잭이 작동하지 않습니다:
- Ensure the HD Audio cable from the front panel is securely connected to the HD Audio header on your motherboard.
6. 사양
Detailed technical specifications for the AZZA CSAZ-280B Spectra Black case.
| 특징 | 사양 |
|---|---|
| 모델명 | CSAZ-280B SPECTRA BLACK |
| 케이스 유형 | 미드 타워 |
| 마더보드 호환성 | ATX, 마이크로 ATX, ITX |
| 재료 | 플라스틱, 강화 유리 |
| 색상 | 검은색 |
| 치수(길이 x 너비 x 높이) | 19.69 x 17.32 x 9.84 인치 |
| 품목 무게 | 11파운드 |
| 2.5인치 드라이브 베이 | 최대 3개 |
| 3.5인치 드라이브 베이 | 최대 2개 |
| 최대 CPU 쿨러 높이 | 170mm (XNUMXmm) |
| 최대 비디오 카드 길이 | 290mm (XNUMXmm) |
| 전면 I / O 포트 | 2 x USB 2.0, 1 x USB 3.0, Audio, Mic, Power, LED Control |
| 전면 팬 지원 | 3 x 120mm 또는 2 x 140mm |
| 탑 팬 지원 | 2 x 120mm |
| 후면 팬 지원 | 1 x 120mm |
| 전원 공급 장치 장착 | 바텀 마운트 |
7. 보증 및 지원
7.1 반품 정책
이 제품은 판매업체의 약관에 따라 30일 이내 반품 시 환불 또는 교환이 가능합니다.
7.2 기술 지원
For technical assistance or inquiries regarding your AZZA product, please visit the official AZZA website or contact their customer support channels. You can find more information and contact details by visiting the AZZA Store on Amazon.


