1. 서론
The Keychron Q1 Knob Version is a fully customizable mechanical keyboard designed for an enhanced typing experience. Featuring a 75% layout and a solid full aluminum frame, it offers premium comfort and extensive customization possibilities. This manual provides detailed instructions for setting up, operating, maintaining, and troubleshooting your Keychron Q1 keyboard.

2. 상자 안에 무엇이 들어있나요?
Upon unboxing your Keychron Q1 Knob Version keyboard, please ensure all the following components are present:
- 1x Fully Assembled Keyboard (including Aluminum Case, PCB, Steel Plate, Sound Absorbing Foam, Case Foam)
- 16x 개스킷(8개 설치 및 8개 상자)
- 4 세트 x 안정기
- 키캡 1세트 (이중 사출 OSA PBT)
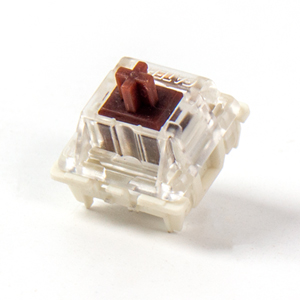
- 1 set x Switches (Gateron G Pro Brown Switch)
- 1x Type-C to Type-C 케이블
- 1x Type-A-Type-C 어댑터
- 1x 스위치 풀러
- 1x 키캡 풀러
- 1x 드라이버
- 1x 육각 키
Note: All tools are typically placed on the bottom of the box.

3. 설정
3.1 키보드 연결
To connect your Keychron Q1 keyboard to your computer:
- 키보드 뒷면에서 USB-C 포트를 찾으세요.
- Connect one end of the provided Type-C to Type-C cable to the keyboard.
- Connect the other end of the cable to a compatible USB-C port on your computer. If your computer only has USB-A ports, use the included Type-A to Type-C adapter.
- 키보드는 플러그 앤 플레이 방식이므로 운영 체제에서 자동으로 인식됩니다.
3.2 운영 체제 전환
The Keychron Q1 features a physical switch on the back to toggle between Windows/Android and Mac/iOS modes. Ensure this switch is set to the correct operating system for optimal key mapping and functionality.
4. 사용 설명서
4.1 기본 키 기능
The Keychron Q1 features a standard 75% layout. Most keys function as labeled. Refer to the keycap legends for primary and secondary functions (accessed via the 'Fn' key).
4.2 노브 기능
The integrated knob on the top right of the keyboard is primarily used for multimedia control. By default, it controls volume:
- 시계 방향으로 회전하세요: 볼륨을 높이다
- 시계 반대 방향으로 회전: 볼륨 감소
- 아래로 누르기: 오디오 음소거/음소거 해제
The knob's function can be customized using the VIA software (see Section 5.1).

4.3 백라이트 제어
The Keychron Q1 features south-facing RGB backlighting. You can cycle through various lighting effects and adjust brightness directly on the keyboard using key combinations. Specific key combinations for lighting control are typically found in the included quick start guide or on the Keychron web대지.

5. 사용자 지정 및 고급 기능
5.1 QMK/VIA 프로그래밍 가능성
The Keychron Q1 supports QMK and VIA firmware, allowing for extensive customization of key assignments, macros, and lighting effects. VIA is a user-friendly graphical interface for configuring your keyboard without needing to flash firmware.
VIA를 사용하려면:
- Keychron 공식 웹사이트에서 VIA 소프트웨어를 다운로드하세요. web사이트 또는 사용 web기반 VIA 구성기.
- Connect your Keychron Q1 keyboard.
- The software should automatically detect your keyboard. You can then remap keys, create macros, adjust lighting, and customize the knob's function across different layers.

5.2 핫스왑 가능 스위치
The Keychron Q1 features hot-swappable sockets, allowing you to change mechanical switches without soldering. This provides flexibility to customize your typing feel with various 3-pin and 5-pin MX mechanical switches.
스위치를 교체하려면:
- Use the included keycap puller to carefully remove the keycap from the desired switch.
- Use the included switch puller to gently grasp the top and bottom clips of the switch and pull it straight up.
- 새 스위치의 핀을 PCB의 구멍에 맞춰 정렬하고 딸깍 소리가 날 때까지 단단히 눌러 제자리에 고정하십시오. 핀이 구부러지지 않았는지 확인하십시오.
- 키캡을 다시 부착하세요.


5.3 Double Gasket Design
The Keychron Q1 features an innovative double-gasket design. This structure incorporates silicone pads between the top and bottom cases, in addition to the gaskets on the plate. This design enhances typing flexibility, improves the overall typing sound profile, and significantly reduces sound resonance and noise from metal-on-metal impact.

5.4 이중 사출 PBT 키캡
The Q1 comes with durable double-shot PBT keycaps in Keychron's unique OSA profile. 이 프로file is designed to provide a comfortable and subtle fingertip feel. PBT material offers excellent oil resistance, ensuring the keycaps maintain their texture and legends over long-term use.

6. 유지관리
6.1 청소
정기적인 청소는 키보드의 성능과 외관을 유지하는 데 도움이 됩니다.
- 일반 청소: 부드럽고 털이 없는 천을 살짝 사용하세요.amp키캡과 프레임을 물이나 순한 세척액으로 닦아주세요. 과도한 습기는 피하십시오.
- 먼지 제거: 압축 공기를 사용하여 키캡 사이의 먼지와 이물질을 불어내십시오.
- 심층 세척(키캡): For thorough cleaning, remove the keycaps using the keycap puller and wash them with warm, soapy water. Ensure they are completely dry before re-attaching.
6.2 Switch and Stabilizer Maintenance
While Gateron G Pro switches are pre-lubed, over time, you may consider re-lubing switches or stabilizers for optimal smoothness and sound. This is an advanced maintenance step and requires specific lubricants and tools.
7. 문제 해결
If you encounter issues with your Keychron Q1 keyboard, try the following troubleshooting steps:
- 키보드가 응답하지 않음:
- USB-C 케이블이 키보드와 컴퓨터에 모두 단단히 연결되어 있는지 확인하세요.
- 컴퓨터의 다른 USB 포트를 사용해 보십시오.
- 다른 USB-C 케이블로 테스트해 보세요.
- Verify the OS switch on the back of the keyboard is set to the correct operating system (Windows/Mac).
- 작동하지 않는 특정 키:
- 제공된 도구를 사용하여 키캡을 조심스럽게 제거한 다음 스위치를 제거하십시오.
- 스위치 핀이 구부러지거나 손상되었는지 검사하세요. 구부러진 경우 부드럽게 펴세요.
- Reinsert the switch firmly. If the issue persists, try swapping it with a known working switch from another less-used key.
- 백라이트 문제:
- 키보드에 전원이 제대로 공급되는지 확인하세요.
- Cycle through lighting modes and brightness levels using the keyboard's built-in shortcuts.
- Check VIA software settings for lighting configurations.
- VIA 소프트웨어에서 키보드를 인식하지 못함:
- Ensure the latest version of VIA is installed or use the web- 기반 구성자.
- Verify the keyboard is connected and the OS switch is correctly set.
- Sometimes, a specific JSON file for the keyboard model needs to be loaded into VIA. Refer to the Keychron support page for your Q1 model.
For further assistance, please visit the official Keychron support web해당 웹사이트를 방문하거나 커뮤니티 포럼을 참조하세요.
8. 사양
| 특징 | 세부 사항 |
|---|---|
| 제품 치수 | 12.93 x 5.71 x 1.41 인치 |
| 품목 무게 | 5.92파운드 |
| 제조업체 | 키크론 |
| 품목 모델 번호 | 키크론 Q1 |
| 상표 | 키크론 |
| 호환 장치 | 노트북, PC, 맥 |
| 연결 기술 | USB-C |
| 키보드 설명 | 노름 |
| 특별 기능 | QMK/VIA, Fully Customizable, Full Aluminum, Hot-swappable |
| 색상(스위치 유형) | Hot-swap Gateron G Pro Brown Switch |
| 키의 개수 | 82 |
| 키보드 백라이팅 | RGB |
| 스타일 | 현대의 |
9. 보증 및 지원
Keychron products are typically covered by a limited warranty. For detailed information regarding warranty terms, conditions, and duration, please refer to the official Keychron web사이트에 접속하거나 제품에 포함된 보증 카드를 확인하세요.
For technical support, frequently asked questions, and additional resources, please visit the official Keychron support page. You can also find the official user guide in PDF format 여기.
Keychron also maintains an active online community where users can share tips, troubleshoot issues, and discuss product features.


