1. 서론
This manual provides essential information for setting up, operating, and maintaining your Intel NUC 11 NUC11PAHi7 Mini PC. Please read this manual thoroughly before using the product to ensure proper functionality and safety.
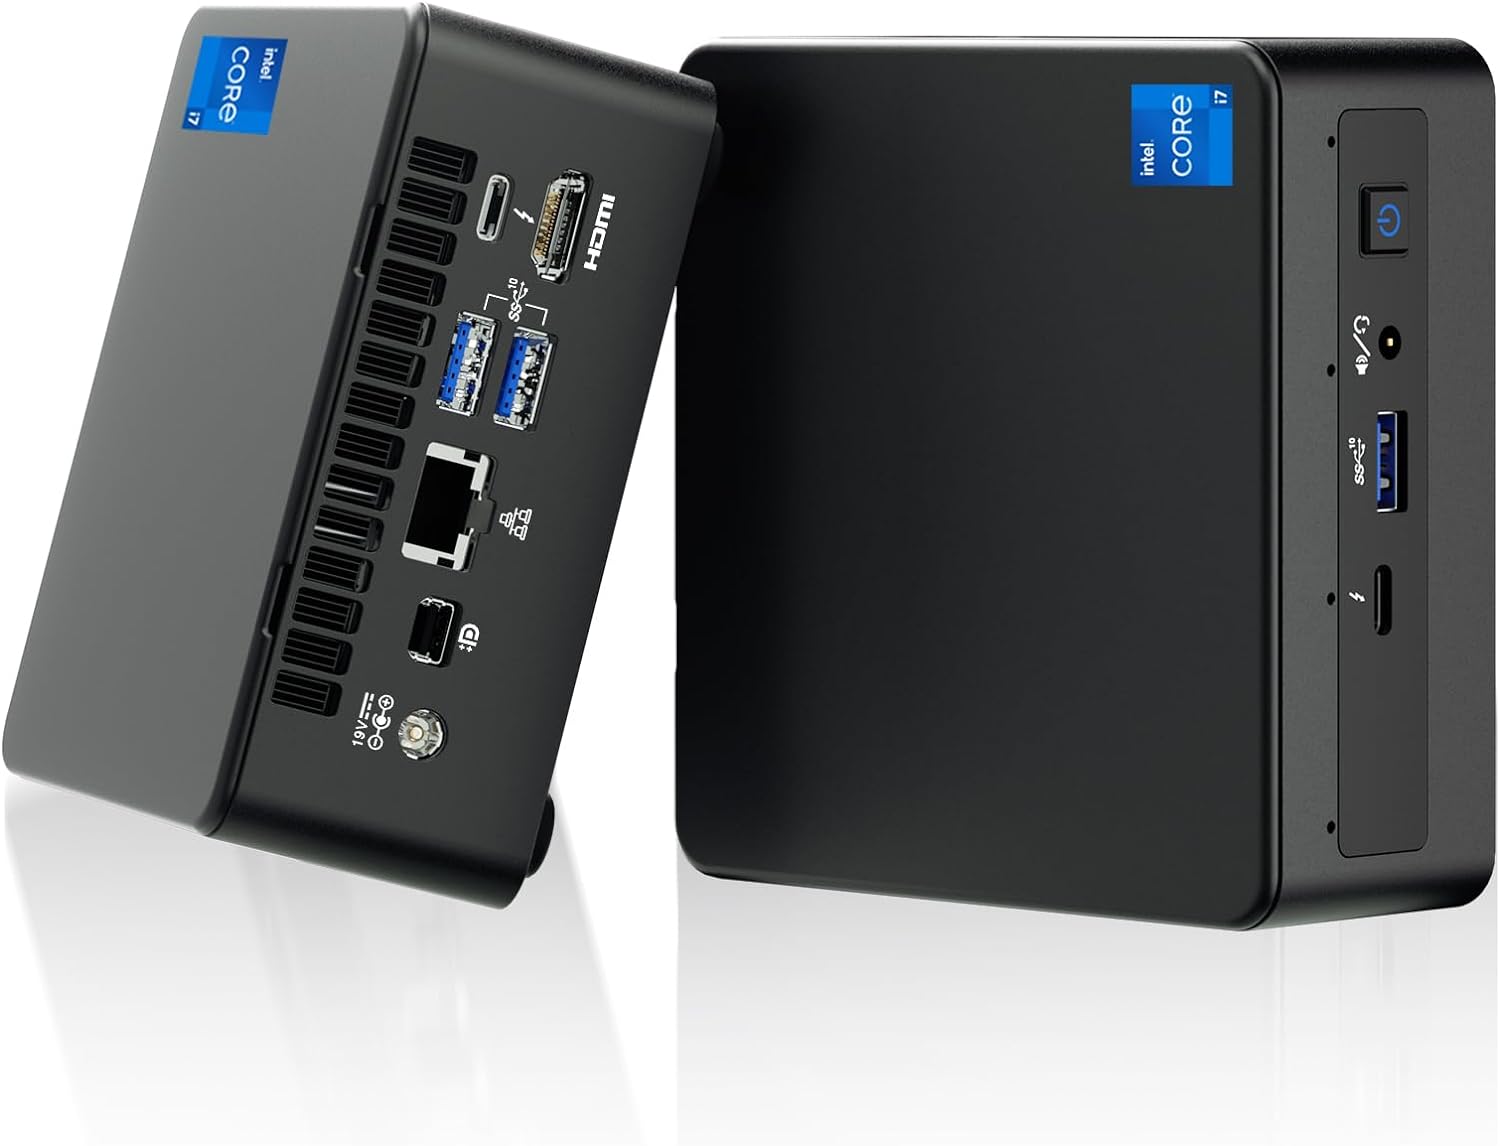
그림 1: 전면 및 후면 view of the Intel NUC 11 Mini PC, showcasin컴팩트한 디자인과 다양한 포트를 갖추고 있습니다.
2. 상자 안에 무엇이 들어있나요?
설치를 진행하기 전에 모든 구성품이 포장에 들어 있는지 확인하세요.
- Intel NUC 11 Mini PC
- 전원 어댑터
- US AC Cord
- VESA 마운트
- Mounting Screws and M.2 Screws (10 pieces)
- 사용 설명서
- Safety Information Documents (2 pieces)

Figure 2: All items included in the Intel NUC 11 Mini PC packaging, including the mini PC, power adapter, VESA mount, and documentation.
3. 제품 특징
The Intel NUC 11 NUC11PAHi7 Mini PC offers a range of advanced features for various computing needs.
- 프로세서: 11th Gen Intel Core i7-1165G7 (12M Cache, up to 4.70 GHz)
- 제도법: Intel Iris Xe Graphics, supporting 4K UHD and quad-screen display.
- 메모리: 16GB SODIMM DDR4 (3200MHz), dual-channel, upgradeable to 64GB.
- 저장: 512GB M.2 PCIe 2280 SSD, with support for external 2.5-inch 7mm HDD expansion.
- 연결성:
- Thunderbolt 3 포트 XNUMX개
- HDMI 2.0b 포트
- Mini DisplayPort 1.4 port
- Three USB 3.1 Gen2 ports
- Intel Ethernet Controller i225-V (Gigabit 2500Mb/s)
- 인텔 Wi-Fi 6
- 블루투스 5.2
- UHS-II를 지원하는 SDXC 슬롯
- 3.5mm 전면 스테레오 헤드셋 잭
- Front consumer infrared port
- 운영 체제: Preinstalled with Windows 11 Pro.
- 추가 기능: Beam-forming, far-field, quad-mic array with Alexa support, Kensington Lock Ready.

그림 3: 이상view of the Intel NUC 11's core specifications, highlighting the i7 processor, Iris Xe graphics, memory, storage, and network capabilities.

Figure 4: Illustration of the various input/output ports available on the Intel NUC 11, including Thunderbolt 3, HDMI, Mini DisplayPort, USB, LAN, and an SD Card slot.
4. 설정 가이드
4.1 초기 연결
- 디스플레이 연결: Connect your monitor(s) to the HDMI, Mini DisplayPort, or Thunderbolt 3 ports using appropriate cables. The NUC supports up to four displays.
- 주변기기 연결: Plug in your keyboard, mouse, and any other USB devices into the available USB 3.1 Gen2 ports.
- 네트워크 연결 : 유선 연결을 위해서는 이더넷 케이블을 LAN 포트에 연결하십시오. 무선 연결을 위해서는 Wi-Fi 네트워크에 접속할 수 있는지 확인하십시오.
- 전원 연결: Connect the power adapter to the DC-in port on the NUC and then plug the AC cord into a power outlet.
4.2 전원 켜기
Press the power button located on the front of the unit. The system will boot into Windows 11 Pro. Follow the on-screen instructions for initial Windows setup if this is the first time powering on.
5. 사용 설명서
5.1 기본 작업
- 운영 체제: Your Intel NUC comes preinstalled with Windows 11 Pro. Familiarize yourself with the Windows interface for daily tasks.
- 다중 디스플레이 설정: Utilize the multiple display outputs (HDMI, Mini DisplayPort, Thunderbolt 3) to extend your desktop across several monitors for enhanced productivity.
- 무선 연결 : Connect to Wi-Fi 6 networks for high-speed wireless internet access. Use Bluetooth 5.2 for connecting wireless peripherals like headphones or keyboards.
- USB and Thunderbolt Ports: Use the USB 3.1 Gen2 ports for high-speed data transfer with external drives and peripherals. The Thunderbolt 3 ports offer even faster data transfer, video output, and power delivery capabilities.

Figure 5: The Intel NUC 11 connected to a monitor, illustrating its advanced networking capabilities with WiFi 6 and Bluetooth 5.2.
6. 유지 관리 및 업그레이드
6.1 일반 유지 관리
- 과열을 방지하기 위해 장치를 통풍이 잘 되는 곳에 보관하십시오.
- 부드럽고 마른 천으로 외부를 정기적으로 닦아주세요. 액체 세제 사용은 피해주세요.
- Ensure software and drivers are updated for optimal performance and security.
6.2 메모리 및 스토리지 업그레이드
The Intel NUC 11 allows for memory and storage expansion:
- 숫양: The device supports dual-channel DDR4 SODIMM memory, upgradeable to a maximum of 64GB (2 x 32GB, up to 3200MHz).
- SSD: The preinstalled 512GB M.2 PCIe 2280 SSD can be upgraded. Additionally, the unit supports an external 2.5-inch 7mm HDD expansion (not included) for increased storage capacity.
Caution: Before performing any internal upgrades, ensure the device is powered off and unplugged. Refer to the detailed instructions in the Intel NUC technical documentation for proper installation procedures. Removing memory and SSD before aftermarket service is recommended for privacy and security.

Figure 6: Illustration of the internal components, specifically the 512GB M.2 SSD and 16GB DDR4 RAM modules, indicating upgrade potential.
7. 문제 해결
이 섹션에서는 일반적으로 발생할 수 있는 문제에 대한 해결책을 제공합니다.
- 전원 없음:
- 전원 어댑터가 NUC와 작동하는 전원 콘센트에 제대로 연결되어 있는지 확인하십시오.
- 다른 장치로 테스트하여 전원 콘센트가 작동하는지 확인하세요.
- 디스플레이 없음:
- Check all display cable connections (HDMI, Mini DisplayPort, Thunderbolt 3) between the NUC and the monitor.
- 모니터의 전원이 켜져 있고 올바른 입력 소스로 설정되어 있는지 확인하세요.
- 다른 디스플레이에 연결하거나 다른 케이블을 사용해 보세요.
- 인터넷에 연결되지 않음:
- For wired connections, ensure the Ethernet cable is properly connected and your router is working.
- For Wi-Fi, check if Wi-Fi is enabled in Windows settings and if you are connected to the correct network with the right password.
- Restart your router and the NUC.
- 시스템 속도 저하:
- 백그라운드에서 실행 중인 불필요한 애플리케이션을 닫으세요.
- 작업 관리자에서 CPU 또는 RAM 사용량이 높은 프로세스를 확인하십시오.
- Windows와 드라이버가 최신 상태인지 확인하세요.
- Consider performing a disk cleanup or defragmentation (for HDDs, not SSDs).
8. 사양
| 특징 | 세부 사항 |
|---|---|
| 프로세서 | 11th Gen Intel Core i7-1165G7 (2.8 GHz, up to 4.7 GHz Turbo, 4 cores, 8 threads, 12 MB Cache) |
| 제도법 | Intel Iris Xe 그래픽(통합) |
| 숫양 | 16 GB DDR4 (3200MHz), expandable to 64 GB |
| 저장 | 512 GB M.2 PCIe SSD (NVMe PCIe Gen4) |
| 운영 체제 | 윈도우 11 프로 |
| 무선 연결 | 인텔 Wi-Fi 6, 블루투스 5.2 |
| 유선 연결 | Intel Ethernet Controller i225-V (2.5 Gigabit) |
| 포트(전면) | 1x USB 3.1 Gen2, 1x Thunderbolt 3, 3.5mm Headset Jack, Power Button |
| 포트(후면) | 2x USB 3.1 Gen2, 1x Thunderbolt 3, HDMI 2.0b, Mini DisplayPort 1.4, LAN, DC-in |
| Other Ports/Slots | SDXC slot with UHS-II support, Kensington Security Slot, Front Consumer Infrared Port |
| 치수(길이x너비x높이) | 4.6 x 4.4 x 2 인치 |
| 무게 | 3.1파운드(약 1.4kg) |
| 색상 | 검은색 |

Figure 7: A detailed comparison table outlining the specifications for different Intel NUC 11 Performance Mini PC and Kit configurations, including processor, graphics, memory, and storage options.
9. 안전 정보
Please observe the following safety guidelines to prevent damage to the device or personal injury.
- Use only the provided power adapter and AC cord.
- 장치를 극한의 온도, 습도 또는 직사광선에 노출시키지 마십시오.
- 기기를 열원 근처나 환기가 잘 안 되는 곳에 두지 마십시오.
- Do not open the chassis unless performing authorized upgrades (RAM/SSD) and always disconnect power first.
- 장치를 액체로부터 멀리 두십시오.
- If you encounter any issues, refer to the troubleshooting section or contact support before attempting repairs.

Figure 8: Important safety warnings and precautions provided in multiple languages, covering electrical safety, environmental conditions, and proper usage.
10. 보증 및 지원
Your Intel NUC 11 Mini PC comes with a comprehensive warranty and support:
- 보증: A 3-year global warranty from Intel and GEEK+ is provided. This includes a 3-year free Warranty Service from Intel for the NUC Barebone part. RAM, SSD, and OS are covered by a three-year warranty provided by GEEK+.
- 지원하다: For issues with the NUC Barebone part, you can contact local Intel NUC after-sales locations directly. For other inquiries or assistance, send a message to GEEK+ for help.
- 개인정보 보호 및 보안: To ensure your privacy and security, it is recommended to remove the Memory and SSD before sending the unit for aftermarket service.
For further assistance, please refer to the official Intel NUC support web사이트를 방문하거나 판매점에 문의하세요.


