1. 서론
Welcome to the user manual for your Ulefone Armor X9 Rugged Phone. This guide provides essential information on setting up, operating, maintaining, and troubleshooting your device. The Ulefone Armor X9 is designed for durability and performance, featuring robust protection and advanced functionalities.
Key features of your Ulefone Armor X9 include:
- IP68/IP69K Grade 360 All Round Protection: 혹독한 환경을 견딜 수 있도록 제작되었습니다.
- 안드로이드 11 운영체제: Enjoy the latest Android experience.
- 4GB RAM + 128GB ROM: Ample memory and storage for your applications and data.
- 16MP Triple Rear Camera: 고화질 사진과 동영상을 촬영하세요.
- Massive 5580mAh Battery Capacity: 사용 시간이 길어졌습니다.
- Triple Navigation System: Enhanced positioning accuracy.
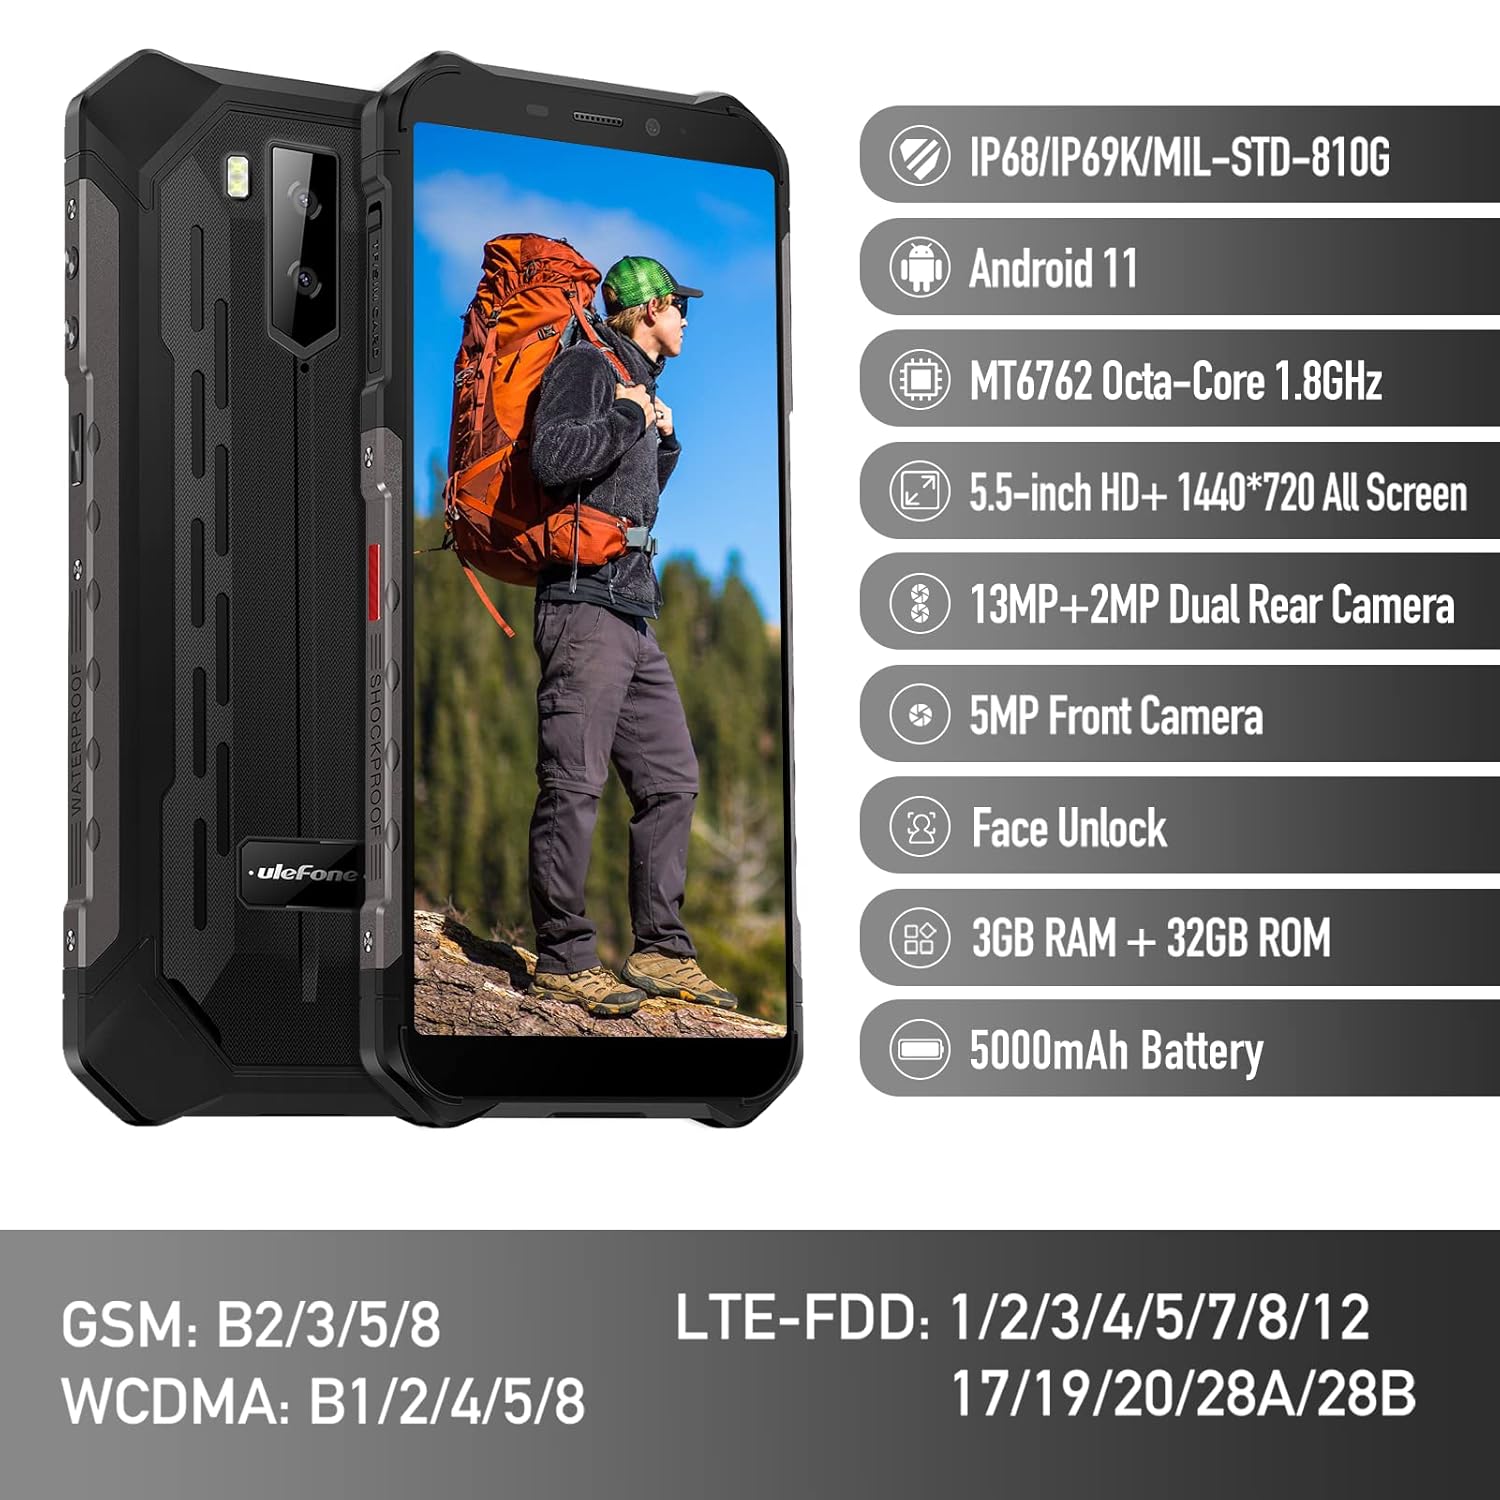
Figure 1: Ulefone Armor X9 Rugged Phone overview, highlighting its robust design and core specifications like IP68/IP69K rating, Android 11, Octa-Core processor, 5.5-inch HD+ screen, 13MP+2MP dual rear camera, 5MP front camera, Face Unlock, 3GB RAM + 32GB ROM, and 5000mAh battery.
2. 설정
2.1. SIM 카드 및 TF 카드 설치
The Ulefone Armor X9 supports dual SIM cards and a TF (microSD) card for expandable storage. Follow these steps to install them:
- 휴대폰 측면에서 SIM 카드 트레이를 찾으세요.
- 제공된 SIM 꺼내기 도구를 사용하여 트레이를 엽니다.
- Carefully place your Nano-SIM cards into the designated slots (SIM1 and SIM2).
- If using a TF card, place it into the dedicated TF card slot. Note that some configurations may share a slot between SIM2 and the TF card.
- Gently push the tray back into the phone until it is flush with the device body. Ensure the tray is properly sealed to maintain water and dust resistance.

Figure 2: Illustration of the dual SIM and TF card tray, showing how to insert SIM1, SIM2, and a TF card into the Ulefone Armor X9.
2.2. 초기 충전
Before first use, it is recommended to fully charge your Ulefone Armor X9. Use the provided USB cable and power adapter.
- USB 케이블을 휴대폰의 충전 포트에 연결하세요.
- USB 케이블의 반대쪽 끝을 전원 어댑터에 연결합니다.
- 전원 어댑터를 벽면 콘센트에 꽂으세요.
- 화면에 충전 표시가 나타납니다. 배터리 아이콘이 완전히 충전될 때까지 휴대폰을 충전하세요.
2.3. 전원 켜기 / 끄기
- 전원을 켜려면: Ulefone 로고가 나타날 때까지 전원 버튼(일반적으로 오른쪽에 있음)을 길게 누르세요.
- 전원을 끄려면: 전원 옵션 메뉴가 화면에 나타날 때까지 전원 버튼을 길게 누르세요. "전원 끄기"를 선택하고 확인하세요.
- 재시작하기 위해: 전원 옵션 메뉴에서 "다시 시작"을 선택하고 확인합니다.
3. 사용 설명서
3.1. 기본 탐색(Android 11)
Your Ulefone Armor X9 runs on Android 11, offering an intuitive user interface. Common gestures and navigation include:
- 위로 스와이프: 앱 서랍에 접근하세요.
- 아래로 쓸어 내려라: 알림 패널과 빠른 설정을 엽니다.
- 수도꼭지: 항목을 선택하거나 앱을 엽니다.
- 길게 누르기 : 상황에 맞는 메뉴에 접근하거나 아이콘을 이동합니다.
- 핀치 투 줌: 이미지 확대/축소 및 web 페이지.

Figure 3: Screenshots of the Android 11 interface on the Ulefone Armor X9, showing settings menus, quick toggles, and the sound recorder application.

Figure 4: The 5.5-inch 18:9 All Screen display of the Ulefone Armor X9, showcasing its immersive viewing experience with an image of a skier.
3.2. 카메라 사용
Your phone is equipped with a 16MP Triple Rear Camera and a Front Camera. To use the camera:
- 홈 화면이나 앱 서랍에서 "카메라" 앱을 엽니다.
- 셔터 버튼을 탭하여 사진을 촬영하세요.
- 필요에 따라 사진 모드와 비디오 모드를 전환하세요.
- Tap the icon to switch between the front and rear cameras.
- Explore various camera modes and settings for optimal results.
3.3. 연결성
The Ulefone Armor X9 supports various connectivity options:
- 와이파이: 사용 가능한 네트워크에 연결하려면 설정 > 네트워크 및 인터넷 > Wi-Fi로 이동하세요.
- 블루투스: Go to Settings > Connected devices > Bluetooth to pair with Bluetooth devices.
- GPS: The phone features AGPS for accurate location services. Ensure location services are enabled in Settings > Location.
- USB: 데이터 전송이나 충전을 위해 USB 케이블을 사용하여 휴대폰을 컴퓨터에 연결하세요.
3.4. 얼굴 인식 잠금 해제
For convenient and secure unlocking, your Ulefone Armor X9 supports Face Unlock:
- 설정 > 보안 > 얼굴 잠금 해제로 이동하세요.
- 화면의 안내에 따라 얼굴을 등록하세요.
- Ensure good lighting and hold the phone at eye level during registration.
- 등록이 완료되면 전면 카메라를 바라보는 것만으로 휴대전화 잠금을 해제할 수 있습니다.
4. 유지관리
4.1. 세척 및 관리
To maintain the performance and appearance of your rugged phone:
- 부드럽고 보푸라기가 없는 천으로 화면과 본체를 닦으세요.
- 잘 지워지지 않는 먼지에는 약간의 d를 사용하세요.amp 천으로 닦으세요. 강한 화학 물질이나 연마재는 피하세요.
- Ensure all port covers are securely closed to maintain water and dust resistance, especially after charging or using headphones.

Figure 5: The Ulefone Armor X9's 360° All Protection Design, showcasing its superior materials and superb durability against impacts and harsh conditions.
4.2. 방수 및 방진 기능 (IP68/IP69K)
The Ulefone Armor X9 is rated IP68/IP69K, meaning it is resistant to dust and water immersion. However, this resistance is not permanent and may decrease over time with normal wear. To ensure optimal protection:
- Do not intentionally submerge the phone in water for extended periods or beyond specified depths.
- Avoid exposing the phone to high-pressure water or extreme temperatures.
- Ensure all port covers are tightly sealed before exposure to water or dust.
- If the phone gets wet, dry it thoroughly before charging or opening any ports.
4.3. 배터리 관리
5580mAh 리튬 폴리머 배터리의 수명을 연장하려면 다음 사항을 준수하십시오.
- 극한의 온도(더위나 추위)는 배터리 성능을 저하시킬 수 있으므로 피하세요.
- 정품 충전기와 케이블 또는 인증된 호환 액세서리만 사용하십시오.
- 배터리가 완전히 방전되지 않도록 자주 방치하지 마십시오. 배터리 잔량이 매우 낮아지기 전에 충전하십시오.
5. 문제 해결
If you encounter issues with your Ulefone Armor X9, try the following troubleshooting steps:
5.1. 전화가 켜지지 않음
- 배터리가 충전되어 있는지 확인하세요. 휴대폰을 충전기에 최소 30분 이상 연결해 두세요.
- 전원 버튼을 10~15초간 길게 눌러 강제로 다시 시작하세요.
5.2. 충전 문제
- Verify that the charging cable and adapter are working correctly. Try a different charger if available.
- 충전 포트가 깨끗하고 이물질이 없는지 확인하세요.
- Make sure the charging cable is fully inserted into the port. Some rugged phone ports may require a firm connection due to protective covers.
5.3. SIM/TF Card Not Detected
- Ensure the SIM/TF card is correctly inserted into the tray and the tray is fully seated.
- 휴대폰을 다시 시작하세요.
- Check if the SIM card is active with your network provider.
5.4. App Crashes or Freezing
- 문제가 있는 앱을 닫았다가 다시 엽니다.
- 앱의 캐시와 데이터를 지웁니다(설정 > 앱 > [앱 이름] > 저장소 및 캐시).
- 앱이 최신 버전으로 업데이트되었는지 확인하세요.
- 휴대폰을 다시 시작하세요.
5.5. 공장 초기화
문제가 지속될 경우 공장 초기화를 통해 해결될 수 있습니다. 경고: 이 작업을 수행하면 휴대폰의 모든 데이터가 삭제됩니다. 진행하기 전에 중요한 데이터를 백업하세요.
- 설정 > 시스템 > 옵션 재설정으로 이동합니다.
- "모든 데이터 지우기(공장 초기화)"를 선택하세요.
- 결정을 확인하고 메시지가 표시되면 PIN/비밀번호를 입력하세요.
6. 사양
Below are the detailed specifications for the Ulefone Armor X9:

Figure 6: Details of the Ulefone Armor X9's Octa-Core Processor, highlighting its power-efficient yet powerful performance, along with 3GB RAM and 32GB ROM, and support for up to 256GB TF card extendable storage.
| 특징 | 사양 |
|---|---|
| 운영 체제 | 안드로이드 11.0 |
| 숫양 | 3GB (XNUMX기가바이트) (Note: Feature bullets mention 4GB RAM, please verify actual model) |
| 메모리 저장 용량 | 32GB (XNUMX기가바이트) (Expandable with TF card up to 256GB. Feature bullets mention 128GB ROM, please verify actual model) |
| CPU 모델 | MT6762 옥타코어 1.8GHz (Note: Specifications list 'Snapdragon', but image indicates MT6762. Please verify actual model) |
| 제품 치수 | 15.8 x 7.75 x 1.38cm |
| 품목 무게 | 472g |
| 배터리 | 리튬 폴리머 배터리 1개(5580mAh, 포함) |
| 무선 통신 | 셀룰러, 블루투스, USB, Wi-Fi |
| GPS | AGPS |
| 특별 기능 | Rear Camera, Face Unlock, IP68/IP69K, MIL-STD-810G |
| 표시하다 | 5.5-inch HD+ 1440*720 All Screen |
| 후방 카메라 | 13MP+2MP Dual Rear Camera (Note: Feature bullets mention 16MP Triple Rear Camera, please verify actual model) |
| 전면 카메라 | 5MP 전면 카메라 |
| 색상 | 검은색 |
| 제조업체 | 울레폰 |
Note: Specifications are based on available product data and may vary slightly. Please refer to your product packaging for the most accurate information. There are discrepancies between feature bullets, specifications, and image text regarding RAM, ROM, CPU, and camera megapixels. This manual uses the most frequently cited or detailed information, with notes for clarification.
7. 보증 및 지원
7.1. 보증 정보
Your Ulefone Armor X9 is covered by a manufacturer's warranty. The specific terms and duration of the warranty may vary by region and retailer. Please refer to the warranty card included in your product packaging or contact your point of purchase for detailed information regarding warranty coverage and claims.
7.2. 고객 지원
For technical assistance, troubleshooting beyond this manual, or warranty inquiries, please contact Ulefone customer support or your authorized dealer. You can typically find contact information on the official Ulefone web사이트나 제품 설명서에서 확인하세요.
- Visit the official Ulefone website for FAQs, software updates, and support contact details.
- 고객 지원팀에 문의하실 때는 구매 영수증과 제품 일련번호를 준비해 주세요.


