1. 서론
This manual provides detailed instructions for the installation, operation, and maintenance of your MAIMEIMI 85mm GPS Speedometer. Designed for a wide range of applications including cars, tractors, trucks, boats, and marine vessels, this speedometer features a clear TFT screen, IP67 waterproof rating, and a wide 9-32VDC working voltage range. Please read this manual thoroughly before installation and use to ensure proper function and safety.
2. 패키지 내용
패키지를 열었을 때 다음 품목이 모두 포함되어 있는지 확인하세요.
- 1 x GPS Speedometer (85mm / 3-3/8")
- 1 x GPS Antenna (3-meter cable length)
- 1 x 사용 설명서

Image: Contents of the MAIMEIMI GPS Speedometer package.
3. 제품 특징
- TFT Screen Display: Provides clear visibility of speed, odometer, trip meter, battery voltage, and course over ground (COG).
- 와이드볼tag전자 범위: Operates on 9-32VDC, suitable for various vehicle types.
- Waterproof & Anti-fogging: IP67 rated for water and fog resistance, ensuring reliable performance in challenging environments.
- Multiple Unit Switching: Easily switch between kilometers per hour (km/h), miles per hour (mph), and knots (rounded to one decimal).
- GPS 신호 수집: Initial signal acquisition takes approximately 30 seconds, with faster connections under clear skies.
- Odometer & Trip Meter: Odometer (0-999999km) is adjustable via the back button. Trip meter (0-999.9km) resets when power is off.
- Orientation Pointer: Displays Course Over Ground (COG) for directional awareness.
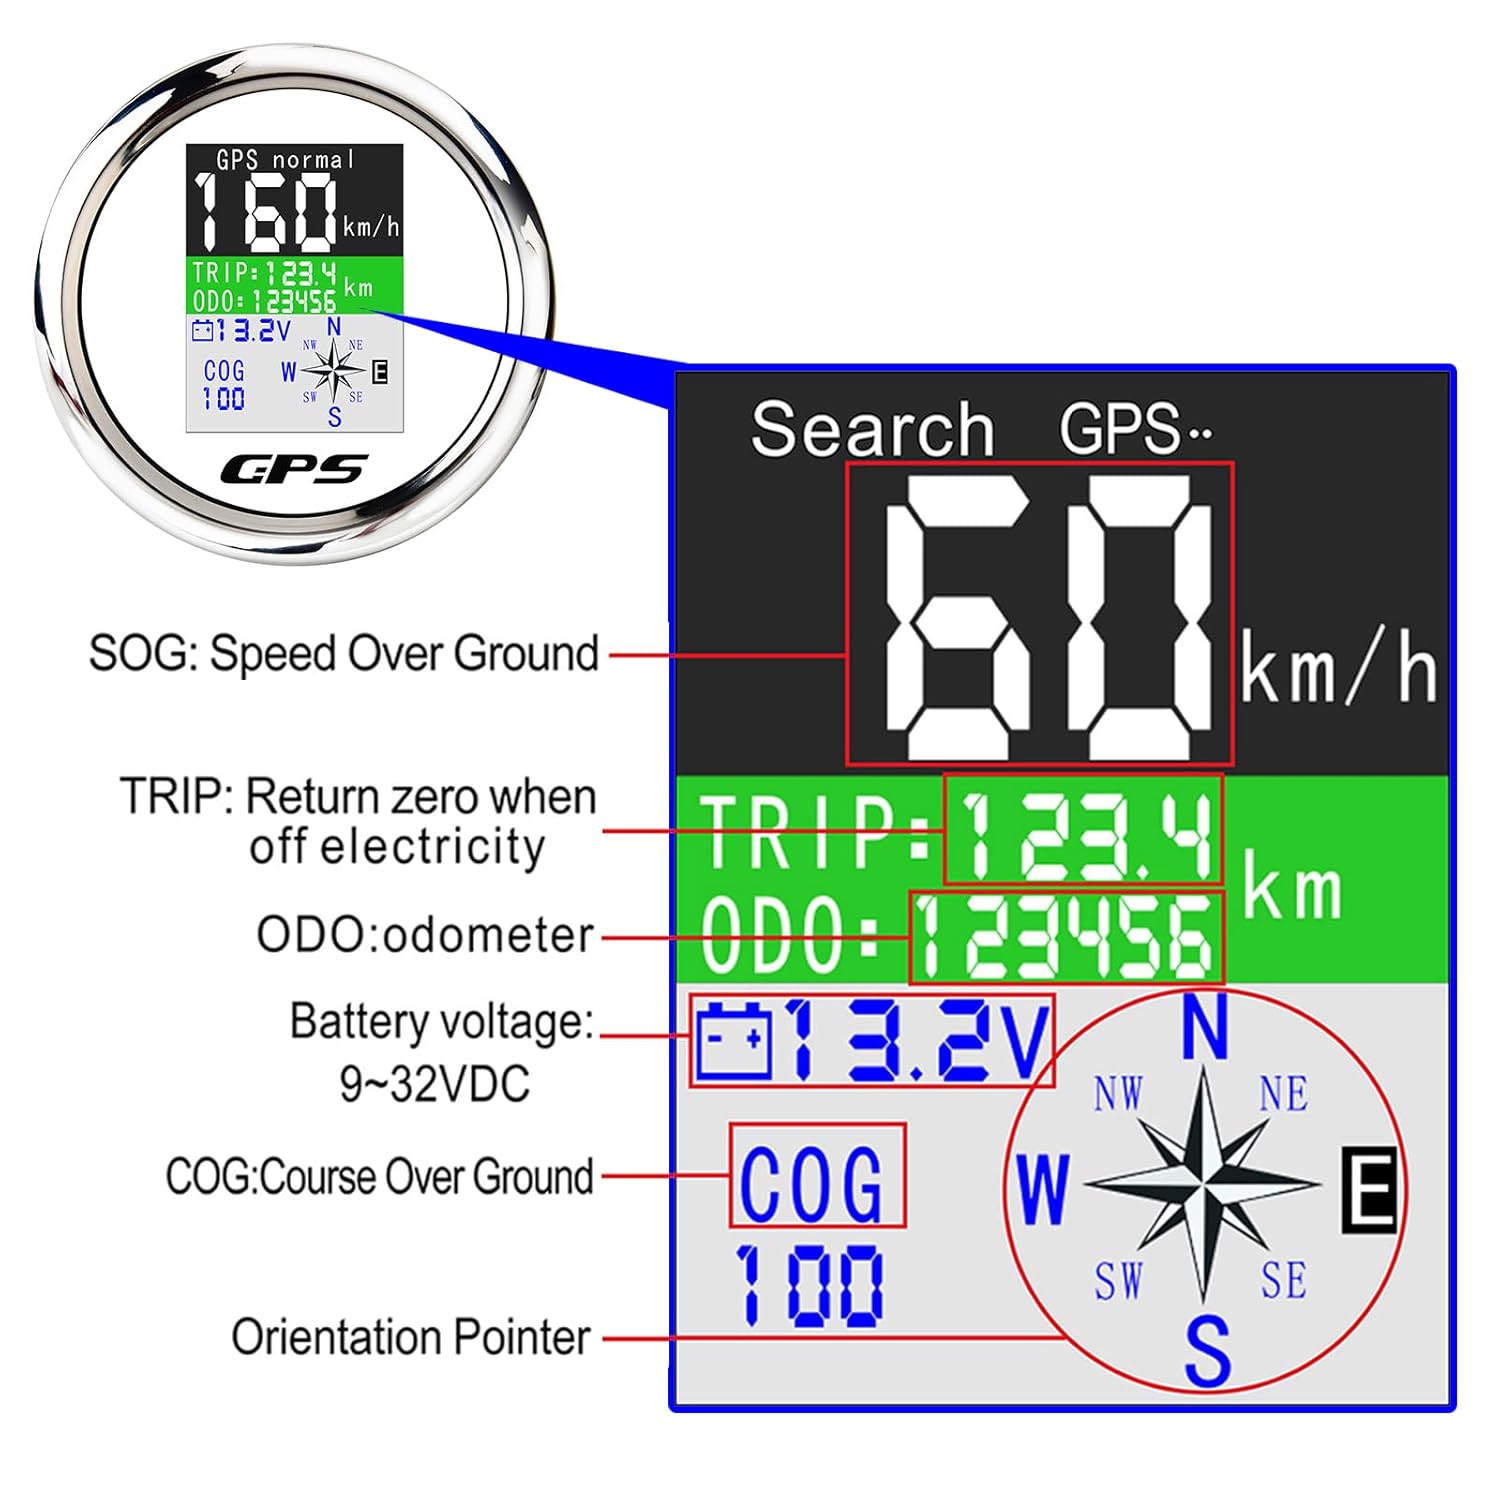
Image: Detailed display information of the GPS Speedometer.

Image: The speedometer undergoing a waterproof test.
4. 설정 및 설치
Follow these steps for proper installation of your GPS Speedometer:
- 장착 구멍을 준비하세요: Open an 85mm (3 3/8") diameter hole in your panel. Ensure there is a 55mm (2 3/16") depth clearance behind the panel for the gauge body.
- Insert the Gauge: Carefully place the speedometer into the prepared hole.
- Secure the Gauge: Use the provided mounting ring to screw down and secure the gauge firmly in place.
- 배선 연결:
- Connect the Black wire to Ground (-).
- Connect the Red wire to 9-30VDC power supply.
- GPS 안테나 연결: Plug the GPS antenna into the designated port on the back of the speedometer. The GPS antenna can be optionally mounted using 3M double-sided tape.

Image: Front and back dimensions of the GPS Speedometer.

Image: Basic wiring diagram for the speedometer.

Image: Step-by-step installation guide for the gauge.
5. 사용 설명서
Once installed and powered, the speedometer will begin searching for a GPS signal. After acquiring a signal, it will display speed and other data.
- 단위 전환: To change the speed unit (km/h, mph, or knots), press the button located on the back of the speedometer. The unit will cycle through the options and save automatically.
- 주행거리계 조정: The odometer value can be adjusted using the button on the back.
- 트립 미터: The trip meter automatically resets to zero when the power is turned off.

Image: Display showing selectable speed units.
Video: Demonstration of the 85mm GPS Speedometer, including unit switching and waterproof features.
6. 유지관리
To ensure the longevity and optimal performance of your GPS Speedometer, follow these general maintenance guidelines:
- Regularly clean the screen and bezel with a soft, damp 옷감. 연마성 세제를 피하십시오.
- 모든 배선 연결이 안전하게 유지되고 부식되지 않았는지 확인하세요.
- Periodically check the GPS antenna for any damage or obstruction to maintain signal integrity.
- While the unit is IP67 waterproof, avoid prolonged submersion or high-pressure water jets.
7. 문제 해결
If you encounter any issues with your GPS Speedometer, consider the following common solutions:
- GPS 신호 없음: GPS 안테나가 깨끗한지 확인하십시오. view of the sky. Obstructions can block the signal. Allow up to 30 seconds for initial signal acquisition.
- 잘못된 속독 방법: Verify that the correct unit (km/h, mph, knots) is selected. If the issue persists, ensure the GPS antenna is securely connected.
- 디스플레이가 작동하지 않음: Check all power connections to ensure they are secure and receiving the correct voltage(9-32VDC).
- 버튼이 응답하지 않음: Ensure the unit is clean and free from debris around the buttons.
위의 단계를 시도한 후에도 문제가 지속되면 고객 지원팀에 문의하여 추가 지원을 받으십시오.
8. 사양
| 사양 | 세부 사항 |
|---|---|
| 제품 치수 | 3.82 x 3.78 x 2.2인치; 10.88온스 |
| 작업 볼륨tage | 9-32VDC |
| 방수 등급 | IP67 |
| 재료 | Stainless Steel, Plastic, Anti-Fogging Glass |
| 속도 범위 | 0-600km/h |
| Odometer Range | 0-999999 km (adjustable) |
| Trip Meter Range | 0-999.9 km (resets on power off) |
| 제조업체 | 마이메이미 |
9. 보증 및 지원
For warranty information or technical support, please refer to the contact details provided with your purchase documentation or visit the official MAIMEIMI web사이트. 보증 청구를 위해 구매 증빙 자료를 보관하세요.


