소개
The Alphacool Eisbaer Pro Aurora 360 CPU All-in-One (AIO) water cooler is engineered for high-performance processors, particularly those with large CPU cores such as AMD Threadripper and Epyc, as well as Intel CPUs utilizing LGA 3647 and LGA 4189 sockets. This AIO solution combines efficient cooling with customizable aesthetics, featuring addressable digital RGB LEDs on both the cooler and the fans.
The system is designed to be expandable and fully compatible with custom DIY water cooling components, offering flexibility for advanced users. It is an optimal cooling solution for demanding processors, ensuring stable operation under heavy loads.
안전 정보
- Always disconnect power from your computer system before installation or maintenance.
- Handle components with care to avoid damage. Avoid touching the thermal paste or the cold plate surface directly.
- Ensure all connections are secure to prevent leaks. Regularly inspect the system for any signs of leakage.
- Do not operate the pump dry. Ensure the loop is filled with coolant before powering on.
- 어린이의 손이 닿지 않는 곳에 보관하세요.
- If any liquid comes into contact with skin or eyes, rinse immediately with plenty of water and seek medical attention if irritation persists.
패키지 내용
아래 나열된 모든 구성 요소가 패키지에 들어 있는지 확인하세요.

그림 1: 위에view of all included components for the Alphacool Eisbaer Pro Aurora 360 CPU cooler, including the radiator with fans, CPU block, various mounting brackets, screws, cables, and thermal paste.
- Alphacool Eisbaer Pro Aurora 360 Radiator with pre-installed fans
- CPU Water Block with integrated pump
- Mounting hardware for various Intel and AMD sockets (LGA 1700, LGA 2011, LGA 2011-3, LGA 2066, LGA 3647, LGA 4189 (optional), LGA 4677 (optional), AM4, AM5, SP3, SP6, sTR5, sWRX8, TR4)
- 열 페이스트
- Fan and RGB cables
- 설치용 나사 및 부속품
설정 및 설치
Follow these general steps for installing your Alphacool Eisbaer Pro Aurora 360 CPU cooler. Refer to your motherboard and PC case manuals for specific instructions regarding component placement and cable routing.
1. CPU와 마더보드를 준비합니다.
- Ensure your motherboard is installed in the PC case.
- Clean the CPU surface thoroughly with isopropyl alcohol to remove any dust or old thermal paste.
- Apply a small amount of the provided thermal paste to the center of the CPU's Integrated Heat Spreader (IHS).
2. 장착 하드웨어 설치
Select the appropriate mounting bracket for your CPU socket (AMD or Intel) from the included accessories.

그림 2: 상세한 view of the CPU block, which houses the pump and connects to the radiator via two tubes.

그림 3: The nickel-plated copper cold plate on the underside of the CPU block, designed for optimal heat transfer from the CPU.
- Attach the correct backplate (if required for your socket) to the rear of the motherboard.
- Secure the standoffs to the motherboard's CPU socket mounting holes.
- Place the CPU block onto the CPU, aligning the mounting holes with the standoffs.
- Secure the CPU block with the provided thumb nuts or screws. 중요한: Tighten the nuts firmly and evenly in a cross pattern until the block is securely seated. Over-tightening can damage components, but insufficient tightening can lead to poor thermal contact and high temperatures.
3. Mount the Radiator
Identify a suitable mounting location for the 360mm radiator in your PC case (e.g., top, front, or bottom panel). Ensure adequate airflow.
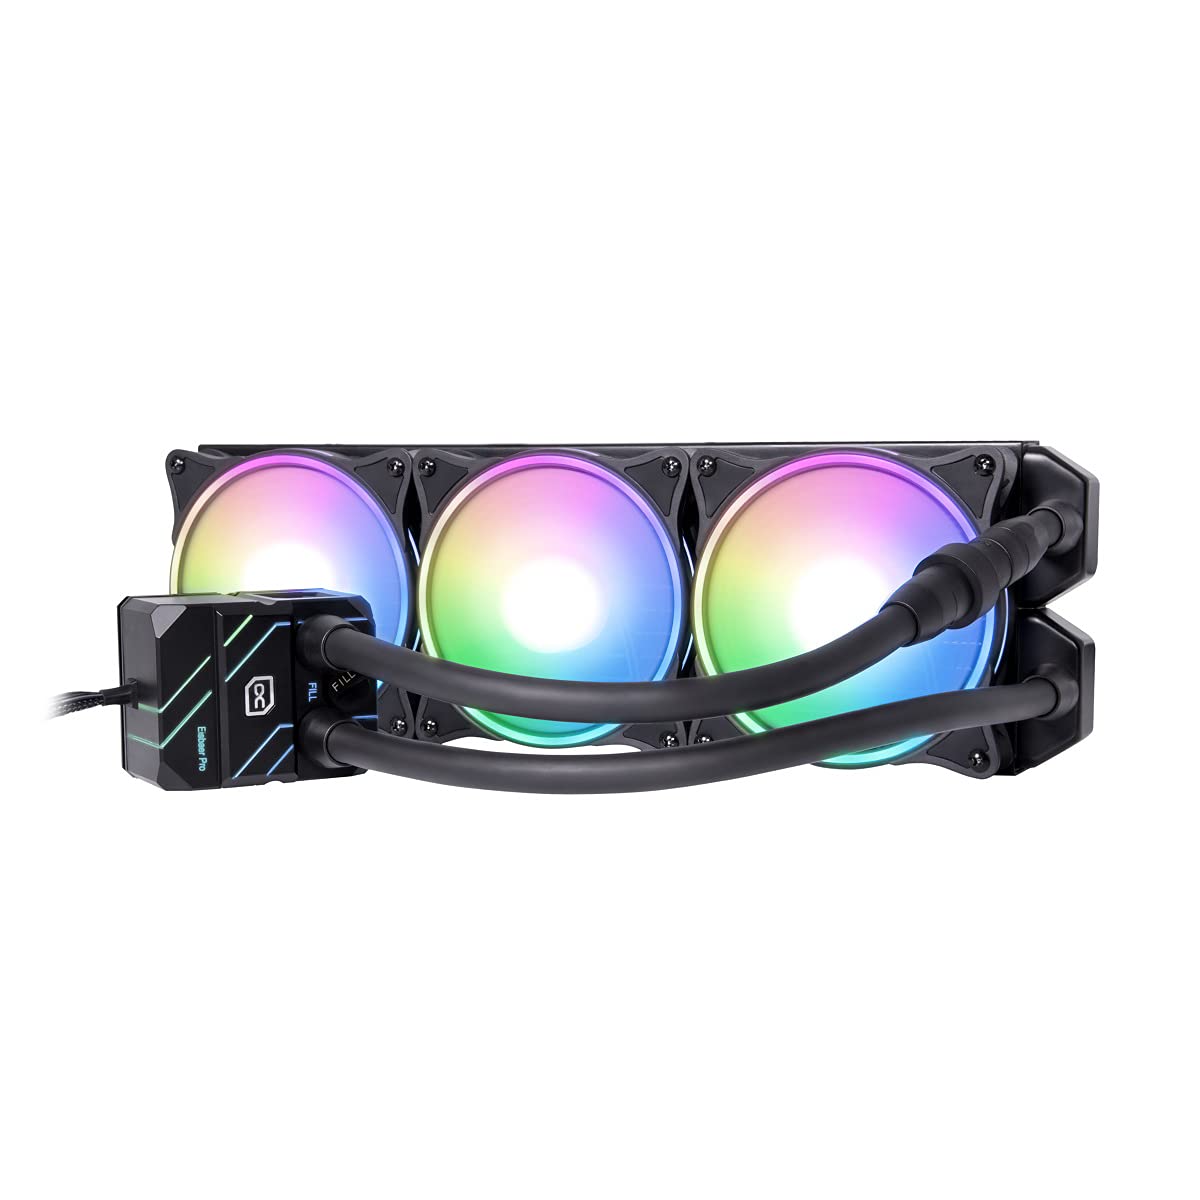
그림 4: The Alphacool Eisbaer Pro Aurora 360 AIO cooler showcasing its vibrant digital RGB lighting on the fans and pump block.

그림 5: The Alphacool Eisbaer Pro Aurora 360 AIO cooler with its fans in a static, unlit state, highlighting the white fan blades.
- Position the radiator and secure it to the case using the long screws provided. Ensure the fans are oriented to provide optimal airflow (intake or exhaust, depending on your case's airflow design).
4. 케이블 연결

그림 6: A selection of cables provided for connecting the fans and RGB lighting to the motherboard or a dedicated controller.
- 펌프의 4핀 전원 케이블을 마더보드의 AIO_PUMP 또는 CPU_FAN 헤더에 연결하십시오.
- Connect the fan cables to the CPU_FAN or SYS_FAN headers on your motherboard, or to a fan controller.
- Connect the digital RGB cables from the fans and pump block to a compatible 3-pin 5V addressable RGB header on your motherboard or an RGB controller.
작동 지침
Once installed, the Alphacool Eisbaer Pro Aurora 360 operates automatically, with the pump and fan speeds controlled by your motherboard's BIOS/UEFI settings or dedicated software.
- 팬 제어: The 120mm Aurora Rise fans feature PWM control, allowing for a wide speed range and zero RPM control for silent operation under low loads. Adjust fan curves in your motherboard's BIOS/UEFI or using software provided by your motherboard manufacturer.
- RGB 조명: The addressable digital RGB LEDs on the fans and pump can be customized using your motherboard's RGB software (e.g., ASUS Aura Sync, MSI Mystic Light, Gigabyte RGB Fusion, ASRock Polychrome Sync) or a standalone RGB controller.
- 초기 시작: Upon first power-on, the pump will prime the loop. You may hear some gurgling noises initially, which should subside as air bubbles are purged from the system.
유지
The Alphacool Eisbaer Pro Aurora 360 is designed for low maintenance, but periodic checks are recommended to ensure optimal performance and longevity.
- 먼지 제거: 압축 공기를 사용하여 라디에이터 핀과 팬 블레이드의 먼지를 주기적으로 청소하십시오. 청소하는 동안 팬이 회전하지 않도록 하십시오.
- 누출 검사: Regularly inspect all connections and tubing for any signs of leaks or moisture. Address any issues immediately.
- Coolant Level (Optional): The Eisbaer Pro Aurora is an expandable system. It features G1/4" connections and a fill port, allowing for refilling or integration into a custom loop. If you notice a significant drop in performance over time, or if you are integrating it into a larger loop, you may need to check and top up the coolant level.
- Quick-Release Mechanism: The system includes quick-release couplings for easy expansion or maintenance without draining the entire loop.

그림 7: The top of the CPU block showing the "IN", "OUT", and "FILL" ports, indicating its expandability and refill capability.
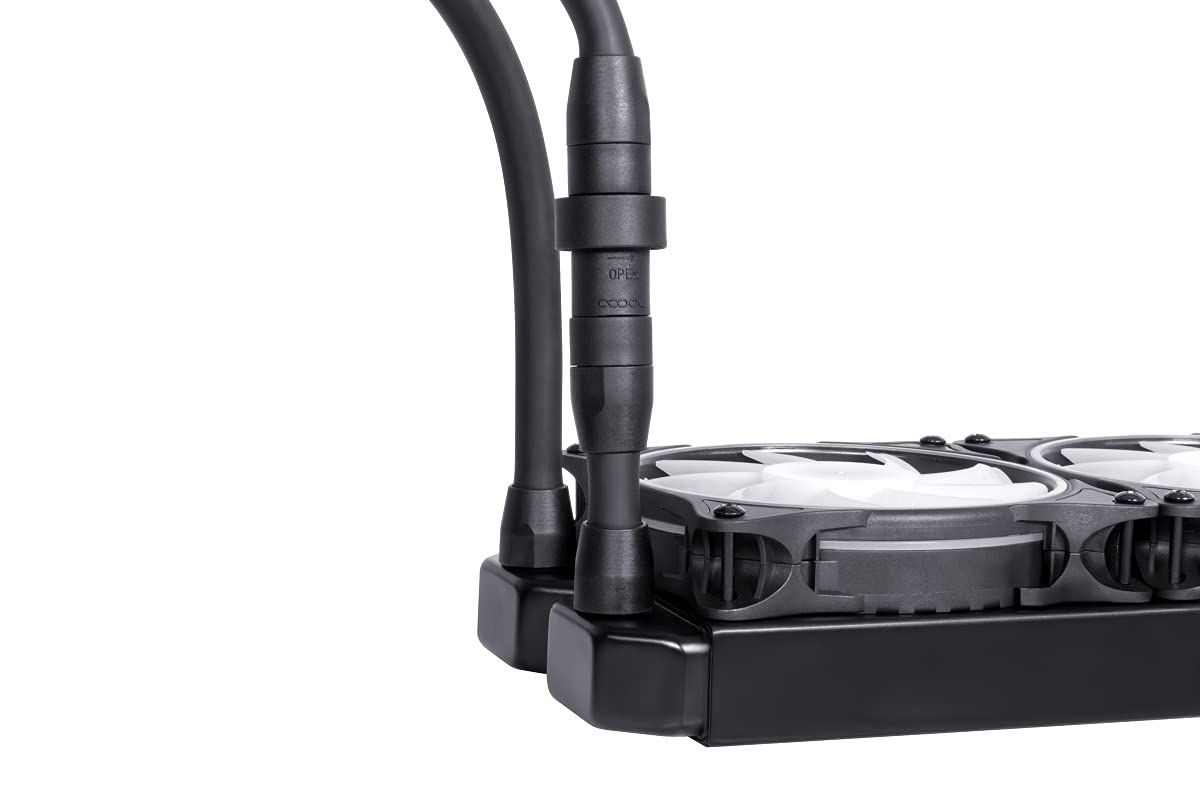
그림 8: A close-up of the quick-release coupling, allowing for easy disconnection and expansion of the liquid cooling loop.
문제 해결
| 문제 | 가능한 원인 | 해결책 |
|---|---|---|
| 높은 CPU 온도 |
|
|
| Pump/Fan Noise |
|
|
| RGB 조명이 작동하지 않음 |
|
|
| 액체 누출 |
|
|
명세서
| 특징 | 세부 사항 |
|---|---|
| 모델 번호 | 11771 |
| 라디에이터 크기 (길이 x 너비 x 높이) | 390 x 120 x 30mm |
| 라디에이터 재질 | Copper fins, pre-chambers & cooling channels; Brass thread; Stainless steel outer casing |
| Cooler with Pump Dimensions (L x W x H) | 64 x 79 x 54.3mm |
| Radiator Base Material | Nickel-plated copper |
| 하우징 소재 | PMMA |
| 펌프 유형 | DC-LT2 |
| 펌프 속도 | 2600 rpm (+/- 10%) |
| 팬 유형 | 120mm Aurora Rise Fan |
| Max. Static Pressure (Fan) | 3.17mm/물 |
| Max. Air Flow (Fan) | 119.8m³/시 |
| 호환성 (AMD) | AM4 / AM5 / SP3 / SP6 / sTR5 / sWRX8 / TR4 |
| 호환성(인텔) | LGA 1700 / LGA 2011 / LGA 2011-3 / LGA 2066 / LGA 3647 / LGA 4189 (optional) / LGA 4677 (optional) |
| 사이 | 2x G1/4" (Radiator & Cooler) |
| 권tage | 12 볼트 |
| 왓tage | 4 와트 |
| 소음 수준 | 30dB(최대) |
보증 및 지원
Alphacool products are manufactured to high standards and undergo rigorous quality control. For information regarding warranty coverage, terms, and conditions, please refer to the official Alphacool web사이트를 방문하거나 구매처에 문의하세요.
For technical support, troubleshooting assistance beyond this manual, or inquiries about replacement parts, please visit the Alphacool support portal or contact their customer service department directly.


