1. 서론
This manual provides comprehensive instructions for the assembly, operation, and maintenance of your Tilta Camera Cage for the Blackmagic Design Pocket Cinema Camera 6K Pro and 6K G2. This protective armor is designed to minimize wear and tear over time while offering extensive mounting options for various accessories. Please read this manual thoroughly before using the product to ensure proper setup and optimal performance.
2. 패키지 내용
The Tilta Camera Cage Advanced Kit (TA-T11-A) includes the following components. Please verify all items are present before proceeding with assembly.
- Tilta Full Camera Cage for BMPCC 6K Pro / G2 (TA-T11-FCC)
- Tiltaing Quick Release Top Handle (TA-QRTH)
- SSD Drive Holder for T5-Black version (TA-SSDH-T5)
- Tiltaing Left Side Advanced Power Handle with Run/Stop (F570 Battery) (TA-LRH-57-G)
- Tiltaing Advanced Left Side Handle Attachment Type VI (TA-AHA6-L)
- Advanced Side Handle Run/Stop Cable for USB-C Port (RS-TA3-USBC)
- Tiltaing 15mm LWS Baseplate Type VI (TA-BSP6-15)
- HDMI 90-Degree Adapter (TA-T01-HDA-90)
- 90-Degree USB-C Cable (30cm) (CB-USBC-30)
- Aluminum Rod 15*200mm (R15-200-B)
- Aluminum Rod 15*100mm (R15-100-B)
- Connection Screw for 15mm Rod (R15-C)


3. 설정 지침
3.1 카메라를 케이지에 부착하기
- Carefully place your Blackmagic Design Pocket Cinema Camera 6K Pro/G2 into the Tilta Full Camera Cage (TA-T11-FCC).
- Secure the camera using the provided screws, ensuring a snug fit without overtightening. The cage is designed to precisely fit the camera body, providing maximum protection.

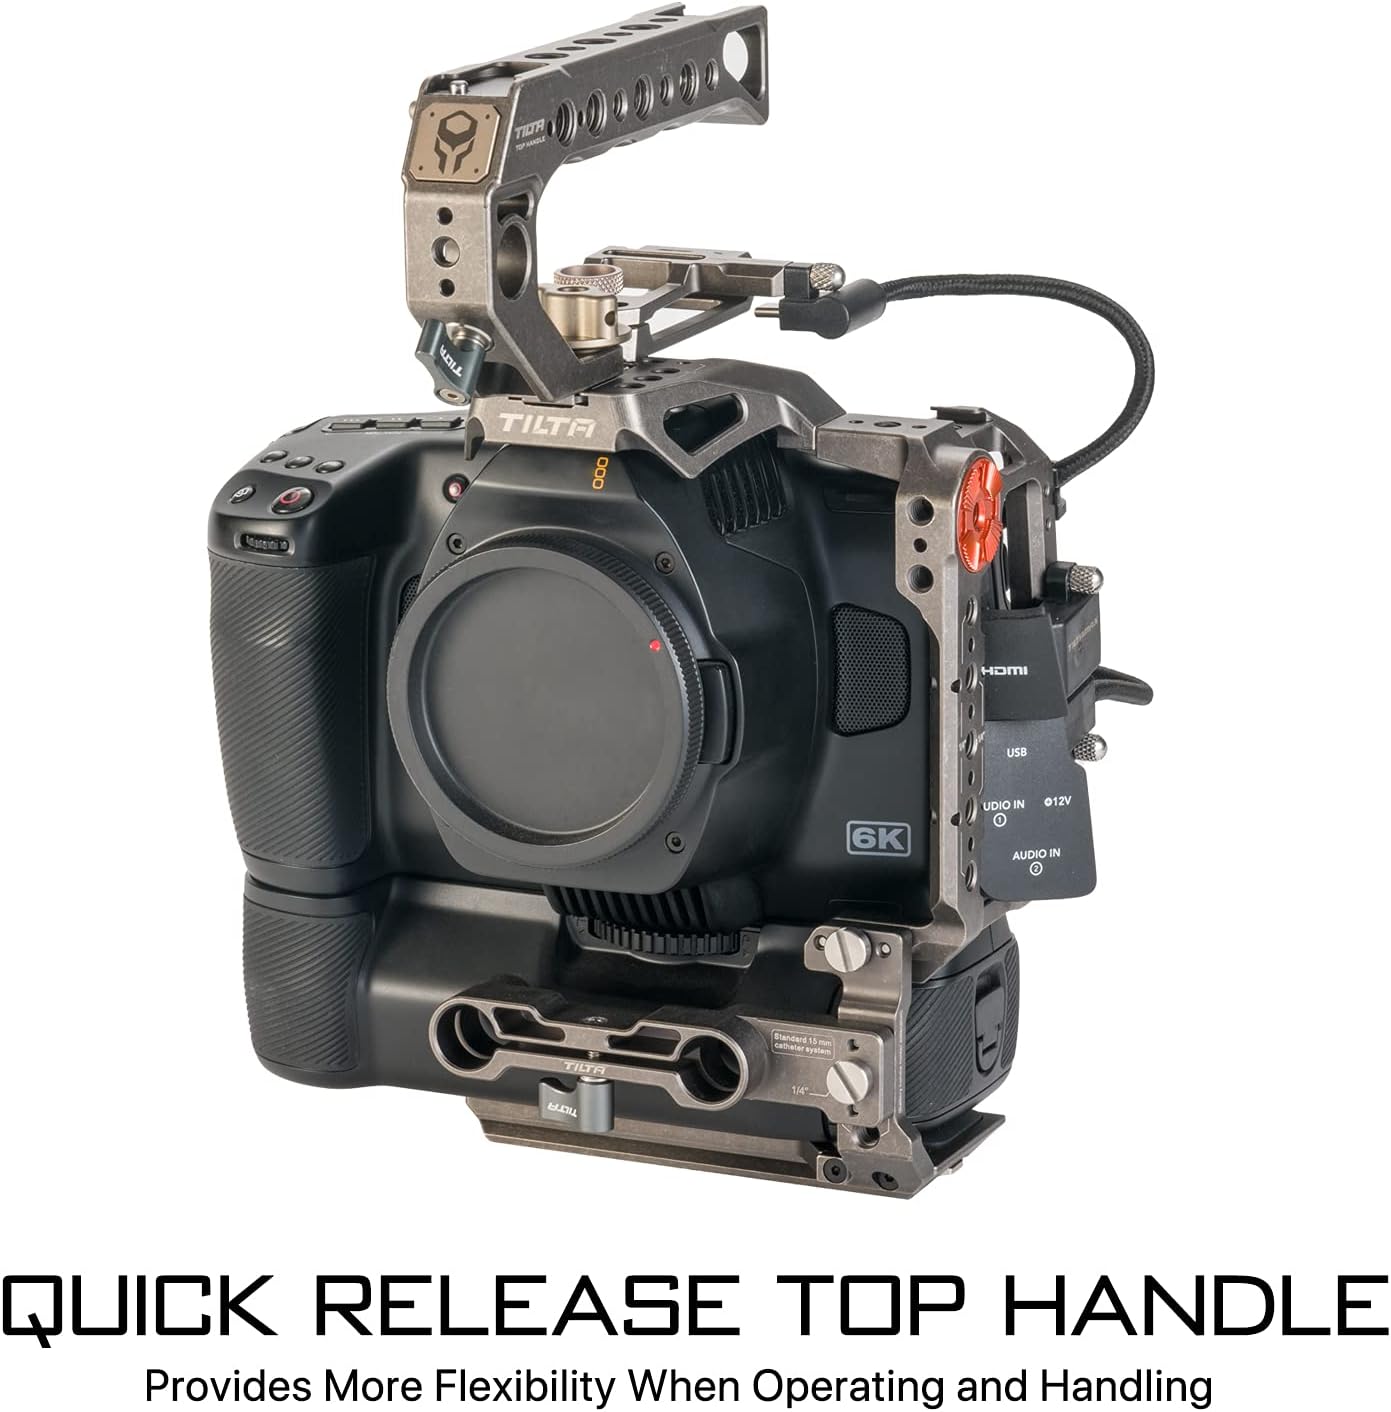
3.2 Attaching the Quick Release Top Handle
- Align the Tiltaing Quick Release Top Handle (TA-QRTH) with the NATO rail on top of the camera cage.
- Slide the handle onto the rail and tighten the locking mechanism to secure it in place. This handle provides additional grip and mounting points.
3.3 Installing the Left Side Advanced Power Handle
- Attach the Tiltaing Advanced Left Side Handle Attachment Type VI (TA-AHA6-L) to the left side of the cage using the designated mounting points.
- Slide the Tiltaing Left Side Advanced Power Handle (TA-LRH-57-G) onto the attachment.
- Connect the Advanced Side Handle Run/Stop Cable for USB-C Port (RS-TA3-USBC) from the handle to your camera's USB-C port to enable run/stop functionality.
3.4 Mounting the 15mm LWS Baseplate and Rods
- Attach the Tiltaing 15mm LWS Baseplate Type VI (TA-BSP6-15) to the bottom of the camera cage. This baseplate is ARCA compatible, allowing for quick mounting to gimbals like the DJI RS 2.
- Insert the Aluminum Rods (R15-200-B and R15-100-B) into the baseplate's 15mm rod holders. Secure them with the connection screws (R15-C).

3.5 SSD Drive Holder and HDMI Adapter Installation
- Attach the SSD Drive Holder for T5-Black version (TA-SSDH-T5) to a suitable mounting point on the cage, typically on the side.
- Connect the HDMI 90-Degree Adapter (TA-T01-HDA-90) and the 90-Degree USB-C Cable (CB-USBC-30) to your camera's ports, routing them neatly to prevent strain.
3.6 Battery Grip Compatibility
The Tilta Camera Cage is designed to be compatible with the original Blackmagic Design battery grip. An adjustable bottom plate ensures a secure fit when the battery grip is attached to your camera.

4. 사용 설명서
4.1 Utilizing Mounting Accessories
The Tilta Camera Cage offers numerous mounting points for various accessories, enhancing your camera rig's versatility:
- 나토 철도: Located on the top and sides, ideal for quick-release handles, monitor mounts, and other NATO-compatible accessories.
- Arri Compatible Rosettes: Provides secure attachment points for side handles, extension arms, and other Arri-standard accessories.
- 콜드슈 리시버: Integrated for mounting microphones, small LED lights, or wireless receivers.
- 1/4"-20 Threads with Locating Pins: Standard threaded holes with anti-twist pins ensure accessories remain securely oriented.
- 3/8"-16 나사산: Larger threaded holes for heavier accessories or specific mounting needs.


4.2 Detachable Design for Flexibility
The cage features a detachable design, allowing you to configure it as a half cage or a full cage depending on your shooting requirements. This flexibility is useful for different setups, such as gimbal use where a lighter, more compact setup might be preferred.

4.3 Using the Quick Release Top Handle
The Quick Release Top Handle provides more flexibility when operating and handling the camera. It can be quickly attached or detached, making it convenient for transitioning between handheld and tripod/gimbal setups.

4.4 공식 제품 영상
5. 유지관리
5.1 청소
To maintain the longevity and appearance of your Tilta Camera Cage, follow these cleaning guidelines:
- Wipe down the cage and accessories with a soft, dry, lint-free cloth after each use to remove dust and fingerprints.
- 잘 지워지지 않는 더러움에는 가볍게 dampen the cloth with water or a mild, non-abrasive cleaning solution. Avoid harsh chemicals that could damage the finish.
- 보관하기 전에 모든 구성 요소가 완전히 건조되었는지 확인하십시오.
5.2 보관
When not in use, store the camera cage and its accessories in a clean, dry environment, preferably in a protective case, to prevent scratches, dust accumulation, and accidental damage.
6. 문제 해결
6.1 General Assembly Issues
If you encounter difficulties during assembly, such as components not fitting correctly:
- 호환성 확인: Ensure you are using the correct Tilta cage model (TA-T11-A) for your specific camera (BMPCC 6K Pro or 6K G2).
- Review 지침: Double-check the assembly steps in this manual, paying close attention to screw placement and component orientation.
- 구성 요소 검사: Verify that no components are bent, damaged, or have manufacturing defects.
- 강요하지 마십시오: Never force components together. If a part does not fit easily, re-evaluate the alignment and ensure all protective caps or covers have been removed.
6.2 Run/Stop Cable Not Functioning
If the run/stop function from the side handle is not working:
- 케이블 연결: Ensure the RS-TA3-USBC cable is securely connected to both the side handle and the camera's USB-C port.
- 카메라 설정: Verify that your camera's settings are configured to accept external run/stop commands via the USB-C port. Refer to your camera's manual for specific instructions.
- 배터리 수준: Ensure the F570 battery in the power handle has sufficient charge.
7. 사양
| 특징 | 세부 사항 |
|---|---|
| 제품 치수 | 4.33 x 7.7 x 5.71인치(10.99 x 19.56 x 14.50cm) |
| 품목 무게 | 3.17파운드(1.44킬로그램) |
| 모델 번호 | TA-T11-A |
| 상표 | 틸타 |
| 호환 장치 | BMPCC 6K G2, BMPCC 6K Pro, Blackmagic Design Cinema Camera 6K |
| 색상 | Tactical Gray |
| 재료 | 알루미늄 합금 |
| 한국어: | 810076272955 |

8. 보증 정보
Specific warranty details for the Tilta Camera Cage (Model TA-T11-A) are not provided in this document. For comprehensive warranty information, including terms, conditions, and registration, please refer to the official Tilta web사이트를 방문하거나 고객 서비스에 직접 문의하세요. 보증 청구를 위해 구매 증빙 자료를 보관하세요.
9. 고객 지원
If you require further assistance, have questions regarding your Tilta Camera Cage, or need technical support, please visit the official Tilta web해당 웹사이트의 지원 페이지에서 자주 묻는 질문(FAQ), 문제 해결 가이드 및 고객 서비스 연락처 정보를 찾을 수 있습니다.
Official Tilta Store: 아마존에서 틸타 스토어를 방문하세요.


