소개
This manual provides detailed instructions for the safe and efficient operation of your KORAD KWR103 Programmable DC Power Supply. Please read this manual thoroughly before using the device to ensure proper functionality and to prevent damage or injury. The KWR103 is a versatile programmable DC power supply offering a wide range of voltage and current outputs, including 60V/15A/300W, designed for various testing and application needs.
중요한 안전 정보
감전, 부상 또는 기기 손상을 방지하기 위해 항상 다음 안전 수칙을 준수하십시오.
- Ensure the power supply is connected to a grounded AC outlet with the correct voltage.
- 물기가 있거나 습기가 있는 곳에서 장치를 작동하지 마십시오.amp 정황.
- c를 열지 마세요asing; 내부에는 사용자가 수리할 수 있는 부품이 없습니다. 수리는 자격을 갖춘 기술자에게 맡기십시오.
- Verify correct polarity and voltage/current settings before connecting to any load.
- 출력 단자가 단락되지 않도록 주의하세요.
- 연결을 하거나 변경하기 전에 전원을 차단하세요.
- 과열을 방지하기 위해 장치 주변에 적절한 환기를 확보하세요.
제품 끝view
The KORAD KWR103 is a high-precision programmable DC power supply. Familiarize yourself with its components:
전면 패널

그림 1: Front panel of the KORAD KWR103, showing the display, control buttons, adjustment knob, and output terminals.
- 표시하다: Digital readouts for voltage(V) 및 전류(A).
- Memory Buttons (M1-M5): For saving and recalling preset voltag전자 및 현재 값.
- 손잡이 조정: Rotary encoder for precise adjustment of voltage와 현재.
- 기능 버튼: OVP, OCP, BEEP, ON/OFF, VSET, ISET, V/A PRIORITY for various settings and controls.
- 출력 단자: Positive (+), Negative (-), and Ground (GND) connections. Max 10A output directly from front terminals.
- 전원 스위치: 장치의 주전원 제어.
후면 패널

그림 2: Rear panel of the KORAD KWR103, featuring power input, communication ports, and sense terminals.
- AC 전원 입력: 주 전원 코드를 연결합니다.
- 퓨즈 홀더: 보호 퓨즈가 포함되어 있습니다.
- Sense Terminals (SENSE TRIG IN+): For remote sensing to compensate for voltag부하 전선에 전류가 흐릅니다.
- RS485 단자: RS485 통신용입니다.
- USB 포트: For computer control and communication.
- RS232 포트: 직렬 통신용.
- LAN 포트: For network communication and control.
포함된 액세서리
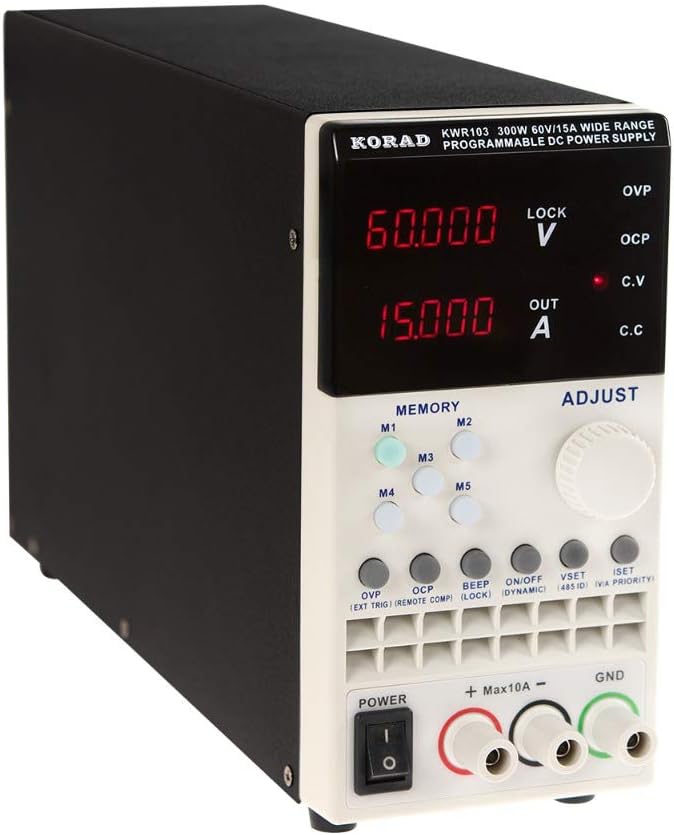
그림 3: The KORAD KWR103 power supply shown with its standard accessories, including power cord, output cables, USB cable, RS232 cable, and software CD.
Your KWR103 package typically includes:
- KORAD KWR103 Programmable DC Power Supply Unit
- AC 전원 코드
- Output Test Leads (Red/Black)
- USB 통신 케이블
- RS232 통신 케이블
- Software CD (for PC control)
- 사용 설명서 (본 문서)
설정
- 짐 풀기: 전원 공급 장치와 모든 액세서리를 포장에서 조심스럽게 꺼내세요. 손상 흔적이 있는지 살펴보세요.
- 놓기: Place the unit on a stable, level surface with adequate ventilation. Ensure no vents are obstructed.
- 전원 연결:
- 전면 패널의 전원 스위치가 OFF 위치에 있는지 확인하십시오.
- Connect the supplied AC power cord to the AC power input on the rear panel.
- AC 전원 코드의 다른 쪽 끝을 접지된 전기 콘센트에 꽂습니다.
- 부하 연결:
- Connect the red output test lead to the positive (+) terminal and the black output test lead to the negative (-) terminal on the front panel.
- Connect the other ends of the test leads to your load, ensuring correct polarity. For currents exceeding 10A, use the rear output terminals (if available on your specific model) or thicker gauge wires directly to the internal terminals, following safety guidelines.
- 정확한 볼륨을 위해tage regulation at the load, especially with long cables or high currents, connect the remote sense wires (SENSE TRIG IN+) from the rear panel directly across your load.
- Communication Interface Connection (Optional):
- USB: Connect the USB cable from the rear panel to your computer.
- RS232 : Connect the RS232 cable from the rear panel to your computer's serial port or a USB-to-serial adapter.
- LAN : Connect an Ethernet cable from the rear panel to your network router or switch.
- Install the provided software drivers and control application from the included CD or manufacturer's web대지.
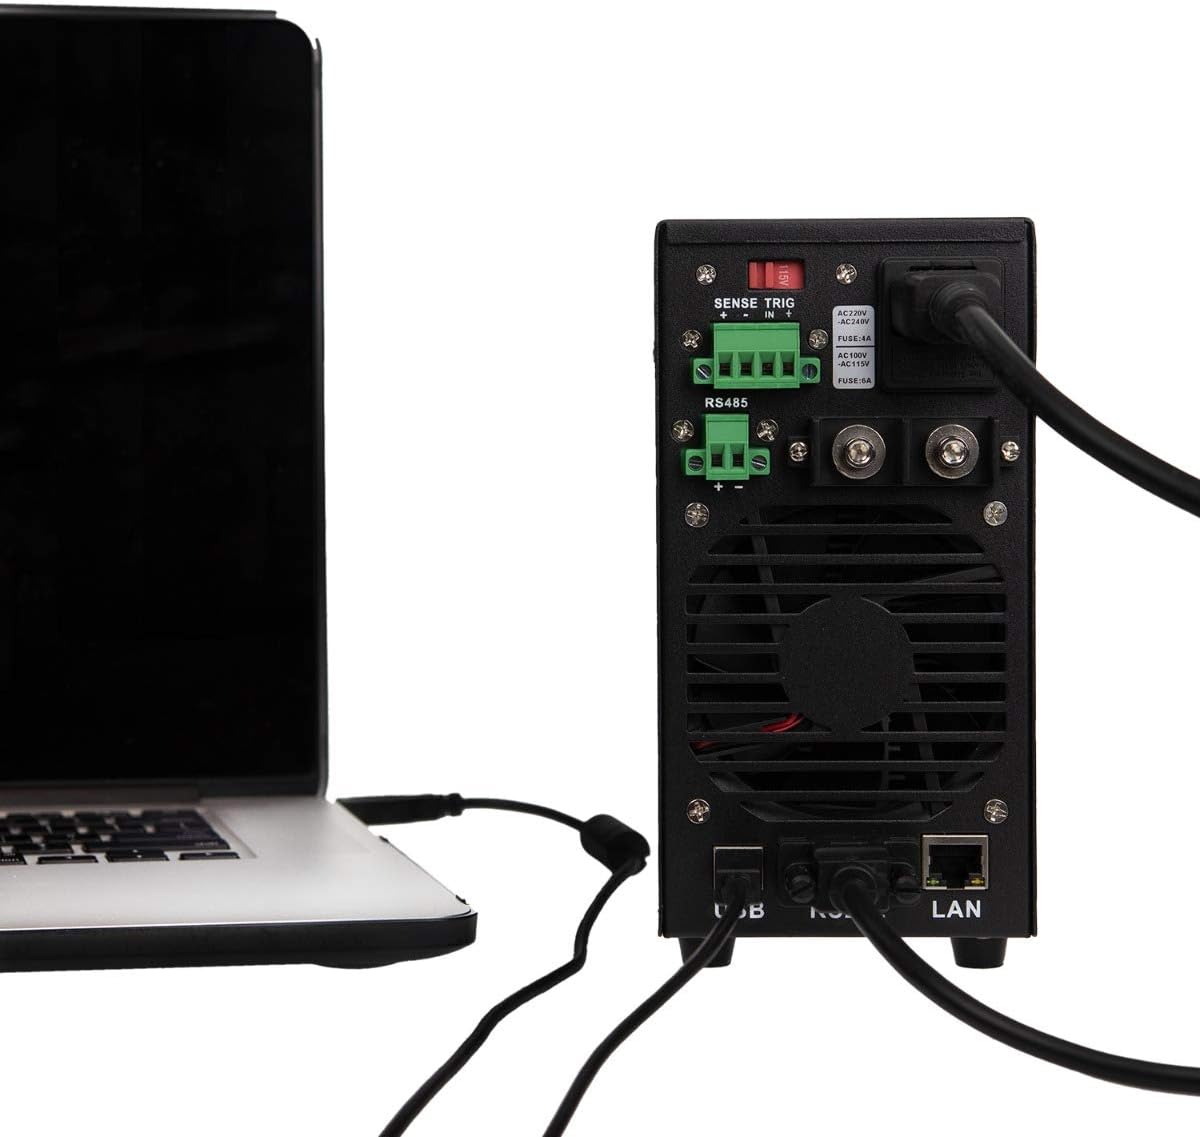
그림 4: Example of the KORAD KWR103 rear panel connected to a laptop, illustrating USB and LAN connections for remote control.
작동 지침
- 전원 켜기: Flip the power switch on the front panel to the ON position. The display will illuminate.
- 설정 볼륨tag전자 및 현재:
- 를 누르세요 VSET 볼륨 입력 버튼tage setting mode. The voltage display will flash.
- 회전하다 조정 노브 원하는 볼륨을 설정하려면tage. Press the knob to move between digits for fine adjustment.
- 를 누르세요 아이셋 button to enter current setting mode. The current display will flash.
- 회전하다 조정 노브 to set the desired current limit. Press the knob to move between digits.
- 누르다 VSET or 아이셋 again to exit setting mode, or wait a few seconds for it to exit automatically.
- 출력 제어:
- 볼륨을 설정한 후tage와 전류를 누르세요. 켜짐/꺼짐 button to enable the output. The "OUT" indicator will light up.
- 누르다 켜짐/꺼짐 again to disable the output.
- 메모리 기능(M1-M5):
- 설정 저장: 원하는 볼륨 설정tage와 전류. 둘 중 하나를 길게 누르세요. M1-M5 buttons until a beep sounds, indicating the settings are saved.
- 설정 재호출: 다음 중 하나를 짧게 누르세요. M1-M5 buttons to recall the saved settings.
- 오버볼tage Protection (OVP) and Over Current Protection (OCP):
- 를 누르세요 오비피(OVP) button to set the over-voltage protection limit. Use the 조정 노브.
- 를 누르세요 오씨피 button to set the over-current protection limit. Use the 조정 노브.
- These functions automatically shut down the output if the set limits are exceeded, protecting the load and the power supply.
- 원격 제어:
- Once the communication drivers and software are installed, you can control the power supply via USB, RS232, or LAN.
- Refer to the software manual for detailed instructions on using the PC control application.
유지
- 청소: Disconnect the power supply from the AC outlet before cleaning. Use a soft, dry cloth to wipe the exterior. Do not use abrasive cleaners or solvents.
- 통풍: Ensure the ventilation openings are clear of dust and debris. Periodically clean the fan intake/exhaust areas.
- 퓨즈 교체: If the unit does not power on, the fuse may need replacement.
- AC 전원 코드를 뽑습니다.
- Locate the fuse holder on the rear panel.
- Carefully remove the fuse holder and replace the fuse with one of the same type and rating (e.g., FUSE: 4A for AC220V, FUSE: 6A for AC110V).
- Reinsert the fuse holder and reconnect the AC power.
문제 해결
| 문제 | 가능한 원인 | 해결책 |
|---|---|---|
| 장치의 전원이 켜지지 않습니다. | No AC power; Blown fuse; Power switch off. | Check AC power connection; Replace fuse (see Maintenance); Ensure power switch is ON. |
| 출력 볼륨 없음tag전자/전류. | Output disabled; OVP/OCP triggered; Incorrect settings; Loose connections. | Press ON/OFF button; Check OVP/OCP settings; Verify voltage/current settings; Secure output connections. |
| 권tage/Current unstable. | Poor load connection; Remote sense not used or incorrectly connected; Overheating. | Check load connections; Use remote sense for critical applications; Ensure adequate ventilation. |
| 리모컨이 작동하지 않습니다. | Incorrect cable; Driver not installed; Software configuration error. | Verify correct USB/RS232/LAN cable; Install drivers; Check software settings and communication parameters. |
명세서
| 매개변수 | 값 |
|---|---|
| 모델 | KWR103 |
| 출력 볼륨tage | 0-60V |
| 출력 전류 | 0-15A |
| 출력 전력 | 300와트 |
| 권tage 해상도 | 1mV |
| 현재 해상도 | 1mA |
| 인터페이스 | LAN, USB, RS232, RS485 |
| 보호 기능 | OVP(오버 볼륨tag전자 보호(e Protection), 과전류 보호(OCP), 과열 보호(OTP) |
| 품목 무게 | 11.29파운드(약 5.12kg) |
| 패키지 크기 | 16.14 x 11.22 x 7.68인치(약 41 x 28.5 x 19.5cm) |
| 냉각 방식 | 공기 |
보증 및 지원
For warranty information and technical support, please refer to the documentation included with your purchase or contact KORAD customer service. Keep your purchase receipt as proof of purchase for warranty claims.
For the latest drivers, software, and additional support resources, please visit the official KORAD web대지.


