1. 서론
This manual provides detailed instructions for the installation, operation, and maintenance of the SINOTIMER TM919A-2 LCD Digital Programmable Timer Switch. This device is designed for automatic control of electrical appliances based on programmed time schedules, offering daily and weekly programming options.
2. 제품 특징
- Weekly 7-day programmable digital time switch.
- 여러 권tage options (5V, 12V, 24V, 110V, 220V, 85-265V). This specific model is 220V.
- Detachable battery design for backup power.
- 35mm DIN rail mounting for easy installation.
- LCD display for clear time and program view주고받음.
- 16 ON/OFF programs per day or week.
- 수동 조작 기능.
- High capacity 16A switching contact.
3. 안전 정보
WARNING: Risk of electric shock. Installation should only be performed by a qualified electrician or competent person.
- 설치나 유지관리를 하기 전에 전원이 꺼져 있는지 확인하세요.
- 최대 부하 용량인 16A를 초과하지 마십시오.
- 올바른 볼륨 확인tage supply for the specific model (220V for TM919A-2).
- 기기를 습기와 극한 온도에 두지 마세요.
4. 제품 오버view 및 구성 요소
The SINOTIMER TM919A-2 features an LCD display, control buttons, and wiring terminals for power input and load control.

그림 4.1: 앞쪽 view of the SINOTIMER TM919A-2 Digital Timer Switch, showing the LCD display, control buttons (P, D+, H+, M+, RESET, MANUAL), and wiring terminals.

그림 4.2: The timer switch with its transparent protective cover opened, revealing the control buttons for programming and manual operation.
제어 버튼:
- P(프로그램): 프로그램 설정 모드로 들어갑니다.
- D+ (낮): Adjusts day of the week or program day.
- H+ (시간): Adjusts hour or program hour.
- M+ (분): Adjusts minute or program minute.
- RESET : 모든 설정을 공장 기본값으로 재설정합니다.
- 수동: Toggles output ON/AUTO/OFF.
5. 설정 및 설치
5.1 배선도
Refer to the wiring diagram on the side of the device and the illustration below for correct connection. Ensure all connections are secure.

그림 5.1: 옆 view of the timer switch displaying the wiring diagram. Terminals 1 and 2 are for power input (L and N). Terminals 3, 4, and 5 are for the relay output (Common, Normally Open, Normally Closed).
- Terminals 1 & 2 (L, N): Connect to the main power supply (220V AC for this model).
- Terminal 3 (NO - Normally Open): Connects to the load when the timer is ON.
- 터미널 4 (COM - 공용): Connects to one side of the load and the power supply.
- Terminal 5 (NC - Normally Closed): Connects to the load when the timer is OFF (less common for typical applications).
5.2 Initial Power-up and Reset
Upon first power-up or after a long period without power, the LCD display may be blank. The internal battery provides backup for settings. If the display is unresponsive or shows garbled characters, press the 다시 놓기 button using a pointed object (e.g., a pen tip). This will clear all settings and restore the timer to its default state.
5.3 현재 시간 및 요일 설정
- 를 누르세요 P button once. The display will show the current time setting.
- 누르다 D+ 현재 요일을 설정합니다.
- 누르다 H+ 현재 시간을 설정합니다.
- 누르다 M+ 현재 분을 설정합니다.
- 를 누르세요 P button again to exit time setting mode and return to normal operation.
6. 사용 설명서
6.1 켜짐/꺼짐 주기 프로그래밍
이 타이머는 최대 16개의 켜짐/꺼짐 프로그램을 지원합니다. 각 프로그램은 켜짐 시간과 꺼짐 시간으로 구성됩니다.
- 를 누르세요 P button repeatedly until "1 ON" appears on the display. This is the first ON program.
- 누르다 D+ 이 프로그램의 날짜를 선택하세요. 개별 날짜, 평일, 주말 또는 7일 전체 중에서 선택할 수 있습니다.
- 누르다 H+ to set the desired hour for the "ON" event.
- 누르다 M+ to set the desired minute for the "ON" event.
- 누르다 P again. "1 OFF" will appear. This is the first OFF program.
- Repeat steps 2-4 to set the day(s), hour, and minute for the "OFF" event.
- 계속 누르기 P to cycle through "2 ON", "2 OFF", up to "16 ON", "16 OFF". If you do not need all 16 programs, simply press P 화면이 현재 시간으로 돌아올 때까지.
- To save and exit programming mode, press the P button until the current time is displayed.
6.2 수동 오버라이드
그만큼 수동 이 버튼을 사용하면 프로그래밍된 설정을 일시적으로 또는 영구적으로 변경할 수 있습니다.
- 누르다 수동 once: Toggles between ON/AUTO/OFF modes.
- 에: The output is continuously ON, ignoring programs.
- OFF : The output is continuously OFF, ignoring programs.
- 자동 : 타이머는 프로그래밍된 켜짐/꺼짐 주기에 따라 작동합니다. 이것이 표준 작동 모드입니다.
7. 유지관리
7.1 배터리 교체
The timer includes a detachable CR2032 lithium battery to maintain time and program settings during power outages. If the display becomes dim or resets frequently, the battery may need replacement.

그림 7.1: The timer switch shown with its battery compartment open and a CR2032 lithium battery, indicating the detachable battery design.
- Disconnect power to the timer before attempting battery replacement.
- Locate the battery compartment, typically on the side or back of the unit.
- 오래된 CR2032 배터리를 조심스럽게 제거하세요.
- 새 CR2032 배터리를 넣을 때 극성(+극이 위로 향하도록)을 확인하십시오.
- 배터리 칸을 닫습니다.
- Reconnect power and reset the current time and day if necessary.
8. 문제 해결
- 디스플레이가 비어 있습니다:
- Check power supply connections (Terminals 1 & 2).
- Ensure the internal battery is charged or replaced if old.
- 를 누르세요 다시 놓기 단추.
- 프로그램이 실행되지 않습니다.
- 타이머가 켜져 있는지 확인하세요 자동차 mode (check the display for "AUTO"). Press 수동 모드를 순환합니다.
- 현재 시간과 날짜가 올바르게 설정되어 있는지 확인하십시오.
- 원하는 날짜에 ON/OFF 프로그램이 올바르게 입력되고 활성화되었는지 확인하십시오.
- Confirm wiring to the load (Terminals 3, 4, 5) is correct.
- 타이머가 예기치 않게 재설정되었습니다:
- The internal battery may be low or depleted. Replace the CR2032 battery.
- Ensure stable power supply to the unit.
9. 사양
| 특징 | 사양 |
|---|---|
| 모델 | TM919A-2 |
| 전원 공급 장치 | 220V AC (as per model) |
| 전력 소비 | 4.5VA(최대) |
| 온도 범위 | -20°C ~ +50°C |
| 표시하다 | 액정표시장치 |
| 스위칭 접점 | 1개의 전환 스위치 |
| 프로그램 | 하루 또는 일주일에 16회 켜짐/꺼짐 |
| 히스테리시스 | 2 sec/day (at 25°C) |
| 용량 | 16A |
| 타이머 범위 | 1분부터 168시간까지 |
| 최소 간격 | 1분 |
| 블랙아웃 메모리 | 60 days (with internal battery) |
| 품목 무게 | 0.15kg(5.3온스) |
| 설치 | 35mm DIN 레일 |
| 화면 크기 | 1.2 인치 |
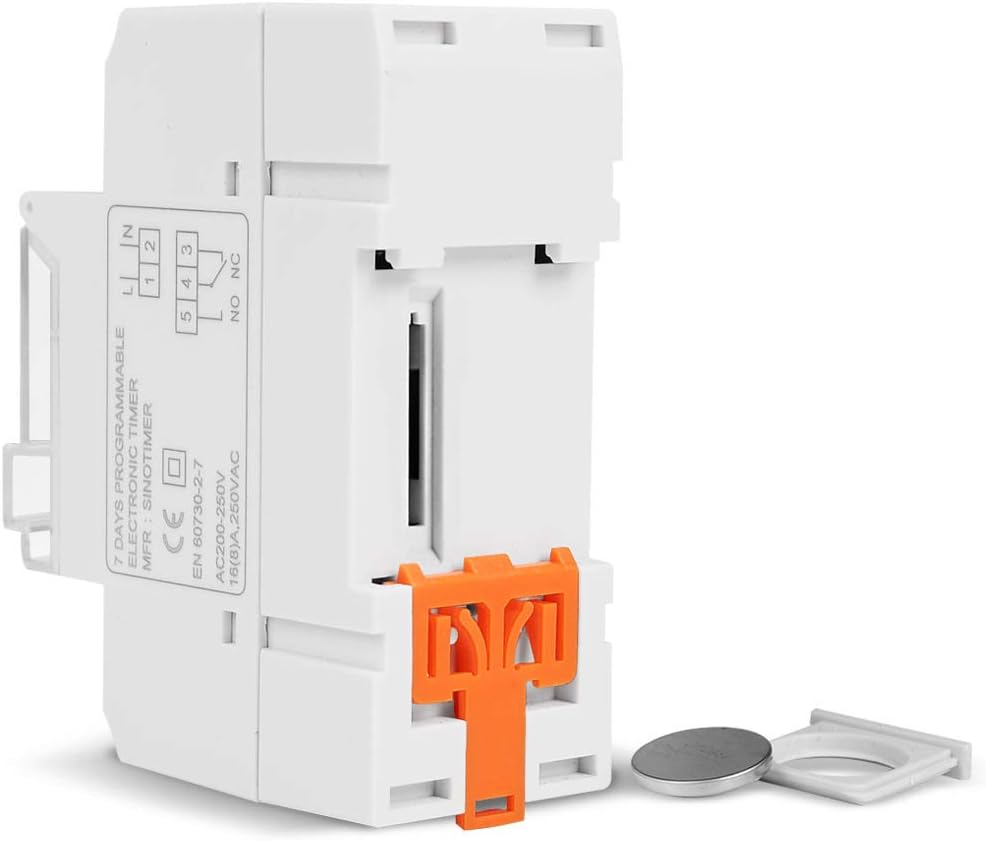
그림 9.1: Dimensional drawing of the SINOTIMER TM919A-2, showing measurements in centimeters for height, width, and depth.
10. 보증 및 지원
Specific warranty information for the SINOTIMER TM919A-2 is not provided in the product details. For warranty claims or technical support, please contact your retailer or the manufacturer directly. Keep your purchase receipt as proof of purchase.


