1. 서론
The i-tec USB-C Quattro Docking Station is designed to expand the connectivity of your USB-C enabled laptop or tablet, allowing for connection of up to four external displays, multiple USB peripherals, Gigabit Ethernet, and audio devices. It also provides up to 85W Power Delivery to charge your host device. This manual provides detailed instructions for setting up, operating, and maintaining your docking station.
2. 패키지 내용
아래 나열된 모든 품목이 패키지에 들어 있는지 확인하세요.
- i-tec USB-C Quattro Docking Station
- 전원 어댑터
- 전원 케이블
- USB-C to USB-C 케이블
- 빠른 시작 가이드

그림 2.1: Package Contents. The image displays the docking station, its power adapter, a power cable, and a quick setup guide.
3. 제품 오버view
Familiarize yourself with the ports and indicators on your i-tec USB-C Quattro Docking Station.
3.1 전면 패널

그림 3.1: Front Panel. This image shows the front of the docking station with a power button, microphone input jack, headphone output jack, one USB-C data port, and one USB 3.0 port.
- 전원 버튼: 도킹 스테이션의 전원을 켜거나 끄려면.
- 마이크 잭(3.5mm): 마이크를 연결합니다.
- 헤드폰 잭(3.5mm): 헤드폰이나 스피커를 연결합니다.
- USB-C 데이터 포트: USB-C 주변기기 연결용.
- USB 3.0 포트 : For connecting USB 3.0/2.0 peripherals.
3.2 후면 패널

그림 3.2: Rear Panel. This image displays the rear of the docking station, featuring the DC 20V power input, USB-C PD host connection, two DisplayPort outputs, two HDMI outputs, a Gigabit Ethernet (LAN) port, and four additional USB 3.0 ports.
- DC 20V 전원 입력: 포함된 전원 어댑터를 연결합니다.
- USB-C PD Host Port: Connect to your laptop/tablet for data, video, and power delivery.
- 디스플레이포트 2개: DisplayPort 케이블을 사용하여 외부 모니터를 연결하십시오.
- HDMI 2개: Connect external monitors via HDMI cables.
- GLAN (RJ-45) Port: 유선 네트워크에 연결하세요.
- USB 3.0 포트 4개: Connect USB 3.0/2.0 peripherals.
4. 설정 지침
Follow these steps to set up your i-tec USB-C Quattro Docking Station:
- 전원 연결: Connect the power adapter to the DC 20V input on the rear of the docking station, then plug the power cable into a wall outlet.
- 호스트 장치에 연결: Use the provided USB-C to USB-C cable to connect the docking station's USB-C PD Host Port to your laptop's USB-C port. Ensure your laptop's USB-C port supports DisplayPort Alternate Mode and Power Delivery for full functionality.
- 외부 디스플레이 연결: Connect your monitors to the DisplayPort and/or HDMI ports on the rear of the docking station. You can connect up to four displays simultaneously.
- 주변기기 연결: Plug your USB devices (keyboard, mouse, external drives) into the available USB 3.0 or USB-C data ports. Connect an Ethernet cable to the GLAN port for wired network access. Connect headphones/speakers and a microphone to the respective audio jacks on the front panel.
- 전원 켜기: Press the power button on the front of the docking station. Your operating system should automatically detect the connected devices.
- 드라이버 설치(필요한 경우): For optimal performance or specific features, visit www.i-tec.cz/setup to download and install any required drivers for your operating system.
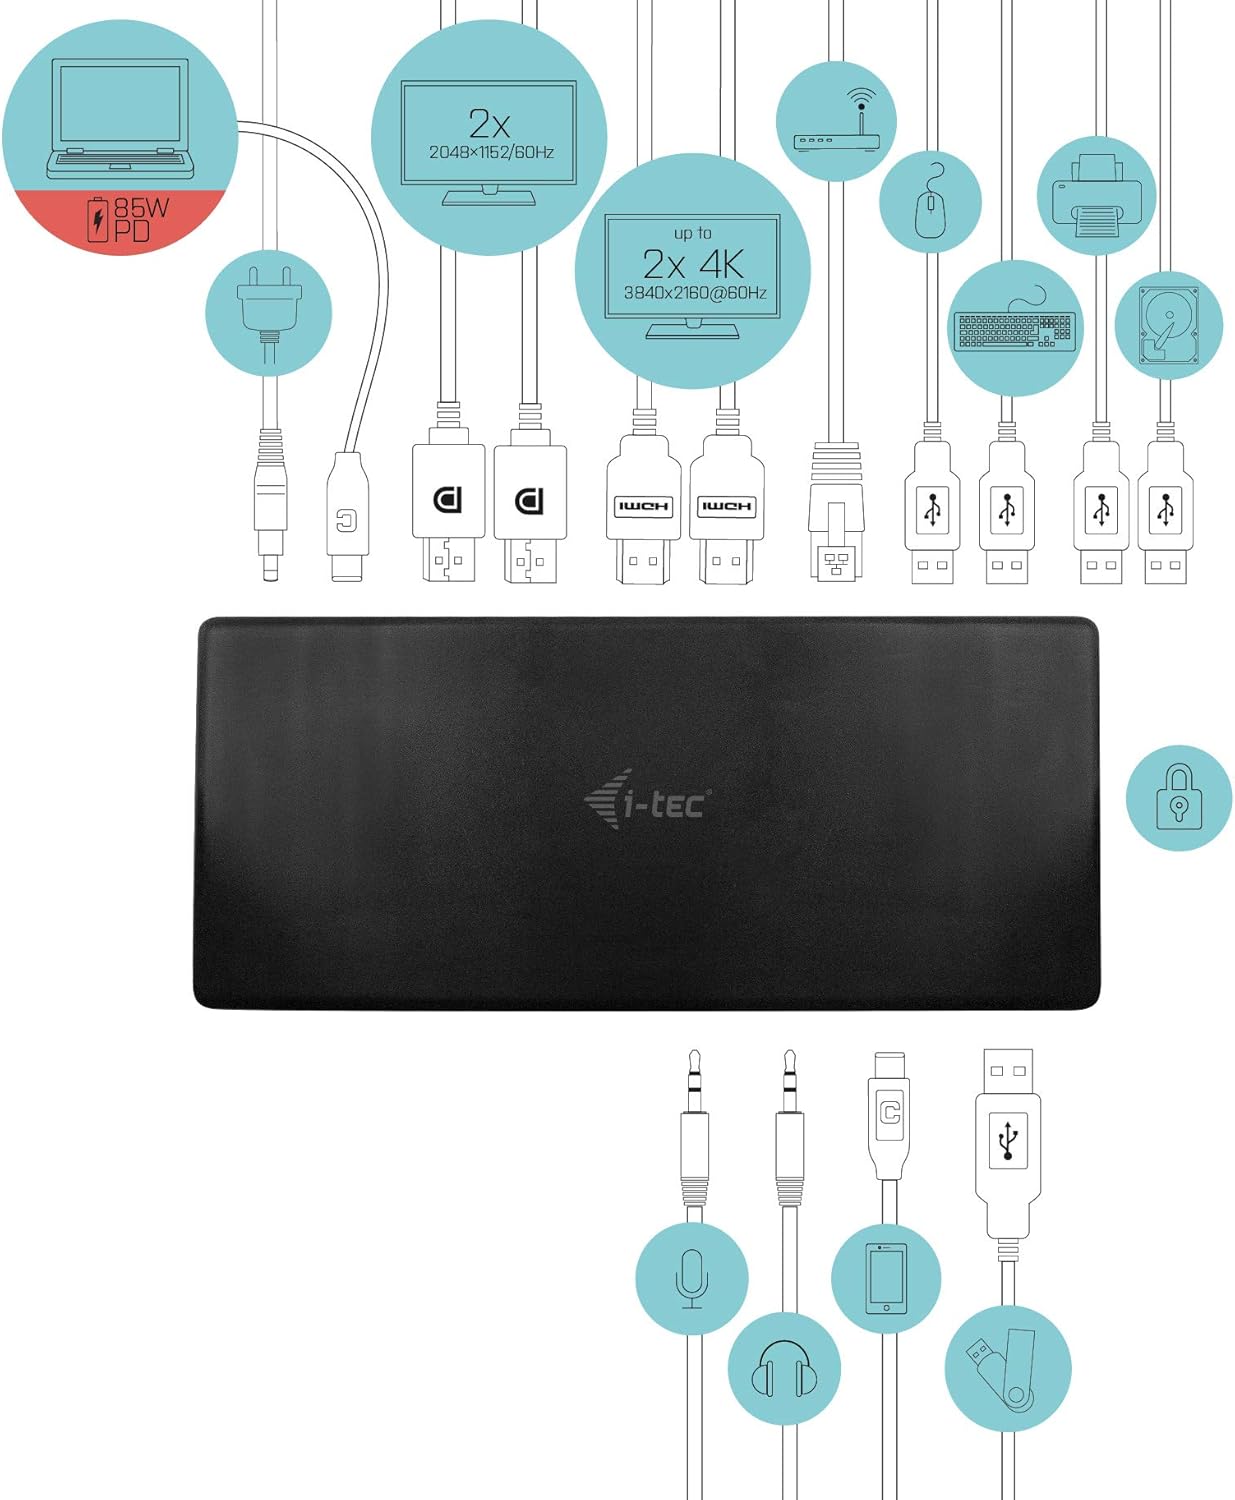
그림 4.1: Connection Diagram. This diagram shows the various connections to the docking station, including power, host laptop, multiple monitors (DisplayPort and HDMI), Ethernet, and USB peripherals like a mouse, keyboard, and external storage.
5. 사용 설명서
Once set up, your docking station provides enhanced functionality for your workspace.
5.1 다중 디스플레이 구성
The docking station supports up to four external displays. You can configure these displays in various modes (extended, mirrored) through your operating system's display settings.
- 결의안: Supports up to 2x 2048x1152@60Hz and 2x 4K/60Hz, depending on your host device's capabilities and display connections.
- 윈도우: Right-click on the desktop, select 'Display settings' to arrange and configure your monitors.
- 맥 OS : Go to 'System Preferences' > 'Displays' to adjust settings.

그림 5.1: Four-Display Setup Example. This image illustrates a workstation with a laptop connected to the docking station, driving four external monitors simultaneously, showcasing a multi-tasking environment.
5.2 전력 공급
The USB-C PD Host Port provides up to 85W of power to charge your connected laptop or tablet, eliminating the need for a separate power adapter for your host device.
5.3 USB 연결
Utilize the 5x USB 3.0 ports and 1x USB-C data port for connecting various peripherals such as external hard drives, USB flash drives, keyboards, mice, and printers. USB 3.0 ports offer high-speed data transfer.
5.4기가비트 이더넷
The GLAN RJ-45 port provides a stable and high-speed wired internet connection (10/100/1000 Mbps), which is often more reliable than Wi-Fi.
5.5 오디오 기능
Connect your headphones, speakers, or microphone to the 3.5mm audio jacks on the front panel for integrated audio input and output.

그림 5.2: Productivity Setup. This image shows a professional desk environment where the docking station facilitates a multi-monitor setup for enhanced productivity, displaying various applications and data across four screens.
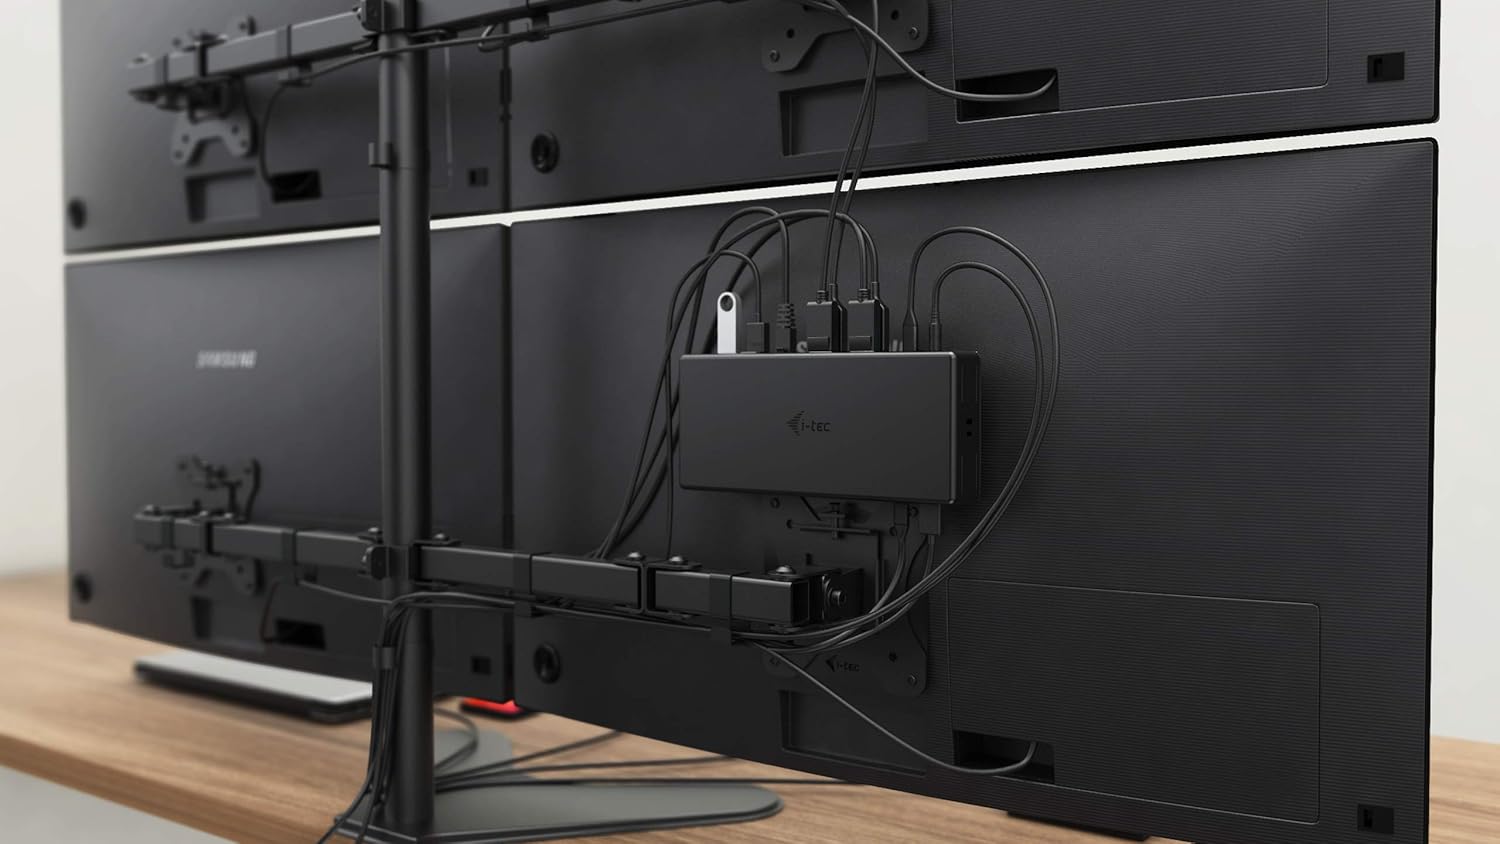
그림 5.3: VESA Mounting. The docking station is shown mounted vertically on the back of a VESA-compatible monitor, demonstrating its space-saving installation capability and organized cable routing.

그림 5.4: Connected Workstation. This image provides a close-up of the docking station on a desk, connected to a laptop via USB-C, and featuring various peripherals plugged into its front ports, including a USB drive and audio devices.
6. 유지관리
도킹 스테이션의 수명 연장 및 최적 성능 유지를 위해 다음 유지 관리 지침을 따르십시오.
- 청소: 부드럽고 마른 천을 사용하여 도킹 스테이션 외부를 닦으세요. 액체 세척제나 에어로졸은 사용하지 마세요.
- 통풍: 과열을 방지하기 위해 도킹 스테이션을 환기가 잘 되는 곳에 두십시오. 환기구를 막지 마십시오.
- 손질: 도킹 스테이션을 떨어뜨리거나 강한 충격을 가하지 마십시오.
- 환경: 기기를 극단적인 온도, 습도, 직사광선을 피하여 보관하세요.
- 케이블 관리 : Ensure cables are not excessively bent or strained to prevent damage to ports and cables.
7. 문제 해결
도킹 스테이션에 문제가 발생하면 다음의 일반적인 문제와 해결 방법을 참조하세요.
7.1 디스플레이 출력 없음
- 연결 확인: Ensure all display cables (HDMI/DisplayPort) are securely connected to both the docking station and the monitors.
- 호스트 연결: Verify the USB-C cable from the docking station is firmly connected to your laptop's USB-C port.
- 힘: Confirm the docking station is powered on and receiving power from the adapter.
- 노트북 호환성: 노트북의 USB-C 포트가 DisplayPort 대체 모드를 지원하는지 확인하세요.
- 운전자: Install the latest drivers from www.i-tec.cz/setup.
- 화면 설정: Adjust your operating system's display settings to detect and extend/mirror displays.
7.2 USB 장치가 작동하지 않음
- 다시 연결 : Disconnect and reconnect the USB device to a different port on the docking station.
- 힘: 도킹 스테이션의 전원이 켜져 있는지 확인하십시오.
- 호스트 연결: Verify the USB-C connection to your laptop.
- 전력 소비량: If connecting high-power USB devices, ensure the docking station's power adapter is correctly connected and providing sufficient power.
7.3 No Network Connection (GLAN)
- 케이블 점검: 이더넷 케이블이 도킹 스테이션과 라우터/모뎀에 제대로 연결되어 있는지 확인하십시오.
- 라우터/모뎀: 라우터/모뎀이 정상적으로 작동하는지 확인하십시오.
- 운전자: Ensure the latest network drivers are installed for the docking station.
7.4 Laptop Not Charging (Power Delivery)
- 전원 어댑터: Confirm the docking station's power adapter is correctly connected and functioning.
- USB-C 케이블: Ensure the USB-C cable connecting the dock to your laptop supports Power Delivery.
- 노트북 호환성: Verify your laptop's USB-C port supports Power Delivery input.
8. 사양
| 특징 | 세부 사항 |
|---|---|
| 모델 번호 | C31QUATTRODOCKPDUK |
| 상표 | 아이텍 |
| 제품 치수 | 10 x 2 x 2.7인치(25.4 x 5.08 x 6.86cm) |
| 품목 무게 | 10.2kg(0.29온스) |
| 하드웨어 인터페이스 | DisplayPort, Ethernet, HDMI, USB, USB 3.0, USB Type C |
| 호환 장치 | Laptop, Monitor, Tablet with USB-C (DisplayPort Alt Mode & Power Delivery support recommended) |
| 총 USB 포트 | 6 (5x USB 3.0, 1x USB-C Data) |
| 총 HDMI 포트 | 2 |
| 전체 DisplayPort | 2 |
| 이더넷 | 기가비트 이더넷 (RJ-45) |
| 오디오 잭 | 1x Microphone (3.5mm), 1x Headphone (3.5mm) |
| 전력 공급 | Up to 85W to host device |
| 색상 | 검은색 |
| 운영 체제 | Windows 10, macOS, Android, Linux |
9. 보증 정보
The i-tec USB-C Quattro Docking Station is covered by a manufacturer's warranty. Please refer to the warranty card included in your package or visit the official i-tec web자세한 보증 약관은 해당 사이트를 참조하세요. 보증 청구를 위해 구매 증빙 자료를 보관하세요.
10. 고객 지원
For further assistance, technical support, or to download the latest drivers and firmware, please visit the official i-tec support web대지:
You may also find helpful resources and FAQs on the product's dedicated setup page: www.i-tec.cz/setup


