1. 서론
This manual provides essential information for the proper installation, operation, and maintenance of your Lowrance Active Imaging 3-In-1 Transducer (Model: 000-14489-001). This transducer is designed to enhance your marine electronics system by providing detailed sonar imaging capabilities. Please read this manual thoroughly before installation and use.
2. 안전 정보
부상 및 장비 손상을 방지하기 위해 다음 안전 수칙을 준수하십시오.
- Always disconnect power to the marine electronics system before installing or servicing the transducer.
- Ensure all connections are secure and waterproof to prevent electrical shorts or corrosion.
- Mount the transducer in a location where it will not interfere with boat operation or pose a hazard to swimmers.
- Avoid exposing the transducer to extreme temperatures or harsh chemicals.
3. 패키지 내용
설치를 시작하기 전에 모든 구성 요소가 있는지 확인하세요.
- Lowrance Active Imaging 3-In-1 Transducer
- 선미 장착 브래킷
- 장착 하드웨어(나사, 와셔, 너트)
- 설치 템플릿(포함된 경우)
4. 설정 및 설치
The Lowrance Active Imaging 3-In-1 Transducer is designed for transom mounting. Proper placement is crucial for optimal performance.
4.1 설치 위치
Select a location on the transom that is:
- Free from obstructions (e.g., propellers, strakes, other transducers).
- In an area of smooth water flow, minimizing turbulence.
- 설치 및 유지보수가 용이합니다.
4.2 물리적 설치
- Position the transom mount bracket on the selected location. Ensure the bottom of the transducer will be slightly below the hull line when deployed.
- Mark the drill holes using the bracket as a template.
- Drill pilot holes. Apply marine sealant to prevent water intrusion.
- Secure the transom mount bracket to the boat using the provided mounting hardware.
- Attach the transducer to the bracket. Adjust the angle so the transducer face is parallel to the waterline.

그림 1: 각진 view of the Lowrance Active Imaging 3-In-1 Transducer with its transom mount bracket.

그림 2: 옆 view of the transducer, illustrating its profile and mounting position.
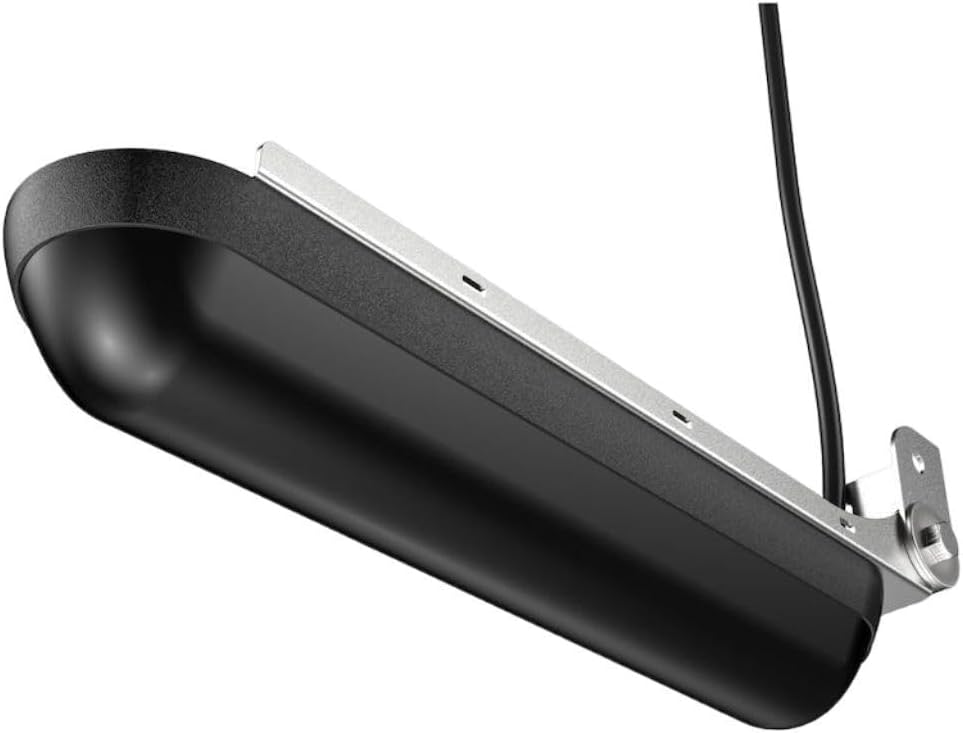
그림 3: 맨 아래 view of the transducer, showing the sonar elements.
4.3 전기 연결
Route the transducer cable to your compatible Lowrance display unit (e.g., HDS LIVE, HDS Carbon, Elite Ti2). The transducer features a 9-Pin connection. Ensure the connector is fully seated and the locking collar is tightened to create a waterproof seal.
5. 사용 설명서
The Active Imaging 3-In-1 Transducer combines multiple sonar technologies to provide a comprehensive view 수중 환경의.
5.1 Sonar Frequencies and Modes
- Med/High CHIRP: 기존 소나 기능을 제공합니다 views for fish arches and bottom tracking.
- SideScan: 넓고 고해상도의 화면을 제공합니다. view구조물과 물고기가 보트 양옆으로 몰려듭니다.
- DownScan: 사진과 같은 이미지를 제공합니다 view보트 바로 아래에 구조물과 물고기가 있습니다.
Refer to your Lowrance display unit's manual for detailed instructions on selecting and optimizing these sonar modes.
6. 유지관리
정기적인 유지보수는 트랜스듀서의 최적 성능과 수명 연장을 보장합니다.
- 청소: Periodically clean the transducer face with mild soap and water to remove marine growth, dirt, or oil. Avoid abrasive cleaners or solvents.
- 점검: 변환기 케이블에 절단, 꼬임 또는 손상이 있는지 정기적으로 점검하십시오. 장착 브래킷이 헐거워지거나 부식되었는지 확인하십시오.
- 겨울철 : 동결된 환경에서 작동하는 경우 변환기가 얼음 형성에 노출되지 않도록 주의하세요.얼음 형성은 손상을 일으킬 수 있습니다.
7. 문제 해결
If you experience issues with your transducer, consider the following common problems and solutions:
| 문제 | 가능한 원인 | 해결책 |
|---|---|---|
| No Sonar Reading | Loose connection, power issue, transducer not submerged. | Check cable connections, verify power to display unit, ensure transducer is in water. |
| Poor or Intermittent Imaging | Air bubbles, marine growth, incorrect mounting angle, electrical interference. | Clean transducer face, adjust mounting angle, check for sources of electrical noise, reposition transducer if necessary. |
| SideScan/DownScan Not Working | Incorrect display unit settings, damaged transducer element. | Verify sonar settings on your display unit. If problem persists, contact support. |
For persistent issues, consult your Lowrance display unit's manual or contact Lowrance customer support.
8. 사양
- 모델: 000-14489-001
- 유형: Active Imaging 3-In-1 Transducer
- 주파수: Med/High CHIRP, SideScan, DownScan
- 연결: 9핀
- 장착 유형: 트랜섬 마운트
- 치수: 약 8 x 6 x 4cm(20.3 x 15.2 x 10.2인치)
- 무게: 약 3.66kg(1.66파운드)
- 호환 단위: HDS LIVE, HDS Carbon, Elite Ti2 series
9. 보증 및 지원
This Lowrance Active Imaging 3-In-1 Transducer (Model: 000-14489-001) is covered by a 90일 한정 보증 구매일로부터. 이 보증은 정상적인 사용 하에서 재료 및 제조상의 결함을 포함합니다.
For warranty claims, technical support, or further assistance, please refer to the official Lowrance web사이트를 방문하거나 고객 서비스 부서에 문의하세요. 보증 확인을 위해 구매 증빙 자료를 보관하세요.


