1. 서론
The DIGITUS DN-DVR-1 wall mounting housing is designed to securely protect your video surveillance system, including DVR and NVR devices, from unauthorized access. This versatile cabinet is suitable for various applications in network, safety, sound, radio, or general cabling environments. It features flexible mounting options for both 19-inch compatible and non-compatible devices, along with integrated solutions for monitor mounting and power distribution.
주요 특징은 다음과 같습니다.
- Lockable, swiveling front door with a 90° doorstop mechanism for easy access and security.
- Integrated 482.6 mm (19”) mounting bracket inside the door, specifically for DVR devices.
- Adjustable mounting with rubber dampers to accommodate DVR devices that are not 482.6 mm (19”) installable, ensuring a secure fit and protection.
- A 482.6 mm (19”) 2U holder for socket strip (PDU) mounting on the upper inside, facilitating power management.
- A 12” screen fixation bracket on the inner rear wall for monitor integration.
- Multiple cable entries on each side for organized and efficient cable management.
2. 패키지 내용
Please verify that all items listed below are included in your package. If any components are missing or damaged, contact your supplier immediately.
- 1x Wall Mounting Housing (DN-DVR-1)
- 1x Installation Set (screws, cage nuts, washers)
- 2x Keys for the front door lock
3. 설정 및 설치
Follow these steps for proper installation of your DIGITUS DVR NVR Wall Mounting Housing.
3.1 벽면 장착
- 위치 선택: Choose a suitable wall location that can support the weight of the housing and its contents. Ensure adequate ventilation and accessibility.
- 드릴링 지점 표시: Hold the housing against the wall at the desired height and use a pencil to mark the positions for the mounting holes on the rear panel. Alternatively, use the provided drilling template if available.
- 드릴 구멍: Drill holes at the marked positions using an appropriate drill bit for your wall type. Insert wall anchors if necessary.
- 안전한 주택: Align the housing with the drilled holes and secure it to the wall using the screws and washers from the installation set. Ensure the housing is level and firmly attached.
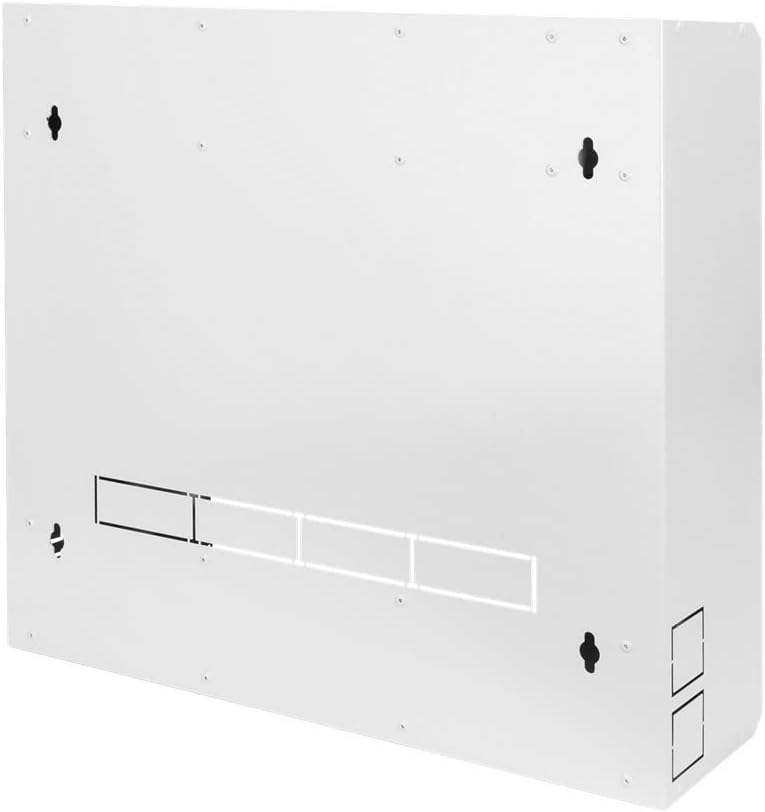
그림 3.1: 후면 view of the housing with wall mounting points and cable entries.
3.2 Internal Device Mounting
The housing offers multiple options for mounting your DVR/NVR devices and accessories.
- 19-inch Device Mounting: For 482.6 mm (19”) compatible DVR/NVR devices, utilize the dedicated mounting bracket located inside the front door. Secure your device using appropriate rack screws and cage nuts.

그림 3.2: 내부 view with 19-inch mounting bracket on the door.
- Non-19-inch Device Mounting: For DVR/NVR devices that are not 19-inch compatible, use the adjustable mounting plate with rubber dampers. Position your device on the plate and secure it using the provided dampers to prevent movement and protect against vibration.

그림 3.3: 내부 view with adjustable mounting plate and monitor mount points.

Figure 3.4: Close-up of adjustable mounting with rubber damp어.
- 모니터 장착: A 12-inch monitor can be fixed to the inner rear wall using the designated bracket. Ensure your monitor is compatible with this mounting standard.
- Power Distribution Unit (PDU) Mounting: Attach a 482.6 mm (19”) 2U socket strip (PDU) to the holder located on the upper inside of the housing. This provides convenient power access for your installed components.

Figure 3.5: 2U holder for socket strip mounting.
3.3 케이블 관리
Utilize the multiple cable entries located on each side of the housing to route and organize your cables. This helps maintain a tidy installation and improves airflow.
4. Operating the Housing
The DIGITUS DVR NVR housing is designed for straightforward operation.
4.1 내부 구성 요소 접근
To access the internal components, unlock the front door using the provided key. The door swivels open and features a 90° doorstop mechanism to hold it in place during maintenance or configuration.

그림 4.1: 전면 view 주택의.
4.2 Securing the Housing
After accessing or performing work inside the housing, ensure the front door is securely closed and locked to protect your equipment from unauthorized access.
5. 유지관리
Regular maintenance ensures the longevity and optimal performance of your DIGITUS DVR NVR housing.
- 청소: Periodically wipe the exterior surfaces with a soft, dry cloth. For stubborn dirt, a slightly damp 천을 사용하여 세척한 후 건조시키세요. 연마성 세척제나 용제는 사용하지 마세요.
- 점검: Annually inspect all mounting screws and connections to ensure they remain tight and secure. Check the door hinges and lock mechanism for smooth operation.
- 통풍: Ensure that the ventilation slots on the housing are not obstructed to allow for proper airflow and prevent overheating of internal components.
6. 문제 해결
This section addresses common issues you might encounter with the DVR NVR housing.
- 문제: 문이 제대로 닫히거나 잠기지 않습니다.
해결책: Check for any obstructions around the door frame or hinges. Ensure the housing is mounted level. Inspect the lock mechanism for damage. - 문제: Device inside is loose or vibrating.
해결책: If using the adjustable mounting plate, ensure the rubber dampers are correctly positioned and tightened around the device. If using 19-inch mounting, verify all rack screws are securely fastened. - 문제: Overheating of internal components.
해결책: Ensure all ventilation slots are clear of dust and obstructions. Verify that internal components are not blocking airflow. Consider adding a small fan if the environment is particularly warm or if high-heat components are installed.
7. 사양
| 특징 | 사양 |
|---|---|
| 상표 | 디지투스 |
| 모델 번호 | DN-DVR-1 |
| 재료 | 금속 |
| 색상 | 회색 |
| 품목 무게 | 26.3파운드(약 11.93kg) |
| 제품 크기(D x W x H) | 23.62" x 22.83" x 7.48"(약 60cm x 58cm x 19cm) |
| Rack Units (Internal) | 2U (for PDU mounting) |
| Monitor Mount Compatibility | 12인치 |
| 도어 메커니즘 | Lockable, swiveling with 90° doorstop |
8. 보증 및 지원
For warranty information and technical support, please refer to the documentation provided with your purchase or visit the official Digitus web사이트. 보증 청구에 대비해 구매 증빙 자료로 구매 영수증을 보관하세요.


