1. 서론
This manual provides detailed instructions for the installation, operation, and maintenance of your Nilight ZH409 20-Inch 420W Triple Row LED Light Bar. Please read this manual thoroughly before installation and use to ensure proper function and safety.
2. 안전 정보
- 전기 작업을 수행하기 전에 항상 차량의 배터리를 분리하세요.
- 모든 배선 연결이 안전하고 적절하게 절연되어 단락을 방지하세요.
- 차량 운행 중 떨어지지 않도록 라이트 바를 단단히 장착하세요.
- 조명 막대가 켜져 있을 때는 직접 쳐다보지 마십시오. 눈의 피로나 손상을 초래할 수 있습니다.
- 공공 도로에서 보조 조명을 사용하기 전에 해당 지역의 관련 규정을 확인하십시오.
3. 패키지 내용
모든 품목이 들어 있고 손상되지 않았는지 확인하려면 패키지를 확인하세요.
- 1 x Nilight ZH409 20-Inch LED Light Bar
- 1 x Heavy Duty Off-Road Wiring Harness
- 마운팅 브래킷 및 하드웨어

Image: Contents of the Nilight ZH409 package, including the LED light bar, wiring harness, and mounting accessories.
4. 사양
| 특징 | 사양 |
|---|---|
| 모델 | ZH409 |
| 치수(길이 x 너비 x 높이) | 20인치 길이 x 3인치 너비 x 3인치 높이 |
| 왓tage | 420 와트 |
| 명도 | 42000루멘 |
| 권tage | 30 볼트 |
| 방수율 | IP67 |
| 재료 | Aluminum Alloy Housing, PC Lens |
| 빔 패턴 | Triple Row Flood Spot Combo |
| 수명 | 30,000시간 이상 |
치수

Image: Detailed dimensions of the 20-inch LED light bar and its mounting components.
5. 설정 및 설치
The Nilight ZH409 LED Light Bar comes with an adjustable mounting bracket and a heavy-duty wiring harness for straightforward installation.
5.1 라이트 바 장착
- Identify a suitable mounting location on your vehicle that provides clear light projection and secure attachment points.
- Attach the adjustable mounting brackets to the light bar using the provided screws, washers, and nuts.
- 원하는 위치에 라이트 바를 놓고 브래킷을 고정할 드릴 포인트를 표시합니다.
- Drill pilot holes and securely fasten the light bar to the vehicle using appropriate hardware. The brackets allow for flexible adjustment of the light bar's angle.
Image: Illustration of the adjustable mounting bracket for flexible positioning.
5.2 라이트 바 배선
The included wiring harness simplifies the electrical connection. It typically includes a relay, an in-line fuse, and a toggle switch.
- Connect the light bar's power connector to the corresponding connector on the wiring harness.
- Connect the positive (+) wire from the harness to the positive terminal of your vehicle's battery.
- Connect the negative (-) wire from the harness to the negative terminal of your vehicle's battery or a suitable ground point on the chassis.
- Route the toggle switch to a convenient location within the vehicle's cabin. Ensure the wiring is secured and protected from heat, sharp edges, and moving parts.
- The in-line blade fuse provides overcurrent protection. Ensure it is correctly installed in its water-resistant holder.
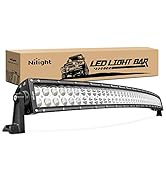
Image: General wiring diagram for the light bar and harness.

Image: The included toggle switch for controlling the light bar.
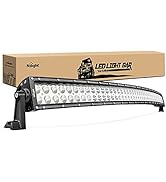
Image: The in-line blade fuse for circuit protection.
5.3 설치 비디오 가이드
Video: An official Nilight video demonstrating the installation process for the 20-inch LED light bar with wiring harness.
6. 사용 설명서
Once properly installed, operate the Nilight ZH409 LED Light Bar using the installed toggle switch. Press the switch to turn the light bar ON or OFF.
6.1 Beam Pattern
The light bar features a triple row flood spot combo beam pattern, providing both wide area illumination (flood) and focused long-distance light (spot) for comprehensive visibility.
Image: Representation of the light bar's wide and focused beam pattern.
6.2 Brightness Demonstration
Video: An official Nilight video demonstrating the brightness and beam pattern of the LED light bar in various scenarios.
7. 유지관리
- 청소: Regularly clean the lens with a soft cloth and mild soap to maintain optimal light output. Avoid abrasive cleaners that could scratch the lens.
- 검사: Periodically check all mounting hardware and electrical connections for tightness and corrosion. Tighten any loose fasteners.
- 배선: Inspect the wiring harness for any signs of wear, fraying, or damage. Replace damaged components immediately.
- 방수: The light bar has an IP67 waterproof rating. While designed for harsh conditions, avoid directing high-pressure water jets directly at the seals for extended periods.
8. 문제 해결
| 문제 | 가능한 원인 | 해결책 |
|---|---|---|
| 라이트바가 켜지지 않아요 | 전원이 안 들어옴, 퓨즈 단선, 연결 불량, 스위치 고장. | Check battery connections, inspect the in-line fuse and replace if blown, ensure all wiring connections are secure, test the switch for functionality. |
| Light output is dim or flickers | 낮은 볼륨tag예: 접지 불량, 배선 손상. | 차량 용량 확인tage, ensure a clean and secure ground connection, inspect wiring for damage. |
| 렌즈 내부의 습기 | 봉인 손상. | 도움이 필요하면 고객 지원팀에 문의하세요. |
9. 보증 및 지원
Nilight ZH409 LED 라이트 바에는 다음이 포함되어 있습니다. 2년 보증, as indicated in the product description. For warranty claims, technical support, or any inquiries, please contact Nilight customer service through their official channels or visit the Amazon의 Nilight Store.


