1. 서론
Thank you for choosing the ZIPRO Boost Exercise Bike. This manual provides essential information for the safe and effective assembly, operation, and maintenance of your new fitness equipment. Please read this manual thoroughly before first use and keep it for future reference.
2. 안전 정보
- 운동 프로그램을 시작하기 전에 의사와 상담하십시오.
- 사용하기 전에 모든 부품이 단단히 고정되어 있는지 확인하세요.
- 작동 중에는 어린이와 애완동물을 장비에 가까이 두지 마십시오.
- 운동용 자전거를 평평하고 안정적인 표면에 놓으십시오.
- 적절한 운동복과 신발을 착용하세요.
- 최대 사용자 체중 제한인 120kg을 초과하지 마십시오.
- 실신, 현기증, 통증을 느끼면 즉시 운동을 중단하세요.
3. 패키지 내용
Before assembly, verify that all components are present and undamaged:
- 메인 프레임
- 전면 및 후면 안정기
- 페달(왼쪽 및 오른쪽)
- 시트포스트와 안장
- 핸들바 기둥 및 핸들바
- 운동 컴퓨터
- 조립 하드웨어(볼트, 와셔, 너트)
- 조립 도구 (렌치, 육각 렌치)
- 사용자 설명서
4. 조립 설명서
올바른 조립을 위해 다음 단계를 따르십시오. 일부 단계에서는 두 사람이 함께 작업하는 것이 좋습니다.
- 안정 장치를 부착하세요: 제공된 볼트와 와셔를 사용하여 앞뒤 안정 장치를 본체 프레임에 고정하십시오. 볼트와 와셔가 단단히 조여졌는지 확인하십시오.
- 페달 설치: 왼쪽(L) 페달과 오른쪽(R) 페달을 확인하십시오. 왼쪽 페달은 시계 반대 방향으로, 오른쪽 페달은 시계 방향으로 조입니다. 단단히 조이십시오.
- 시트포스트와 안장을 장착하세요: Insert the seat post into the main frame and adjust to the desired height. Attach the saddle to the seat post and secure it.
- 핸들바 포스트 부착: 핸들바 기둥을 본체 프레임에 삽입하십시오.
- Install Handlebars and Computer: Attach the handlebars to the handlebar post. Connect the sensor wires from the main frame to the exercise computer. Mount the computer onto the handlebar post.

Figure 4.1: Detailed assembly diagram for the ZIPRO Boost Exercise Bike.

그림 4.2: 폭발 view of the exercise bike components, illustrating how parts fit together during assembly.
5. 사용 설명서
5.1 저항 조정
The ZIPRO Boost features an 8-level magnetic resistance system. To adjust the resistance, turn the tension control knob located below the computer display. Turn clockwise to increase resistance (harder) and counter-clockwise to decrease resistance (easier).

Figure 5.1: The resistance adjustment knob, showing levels 1 through 8.
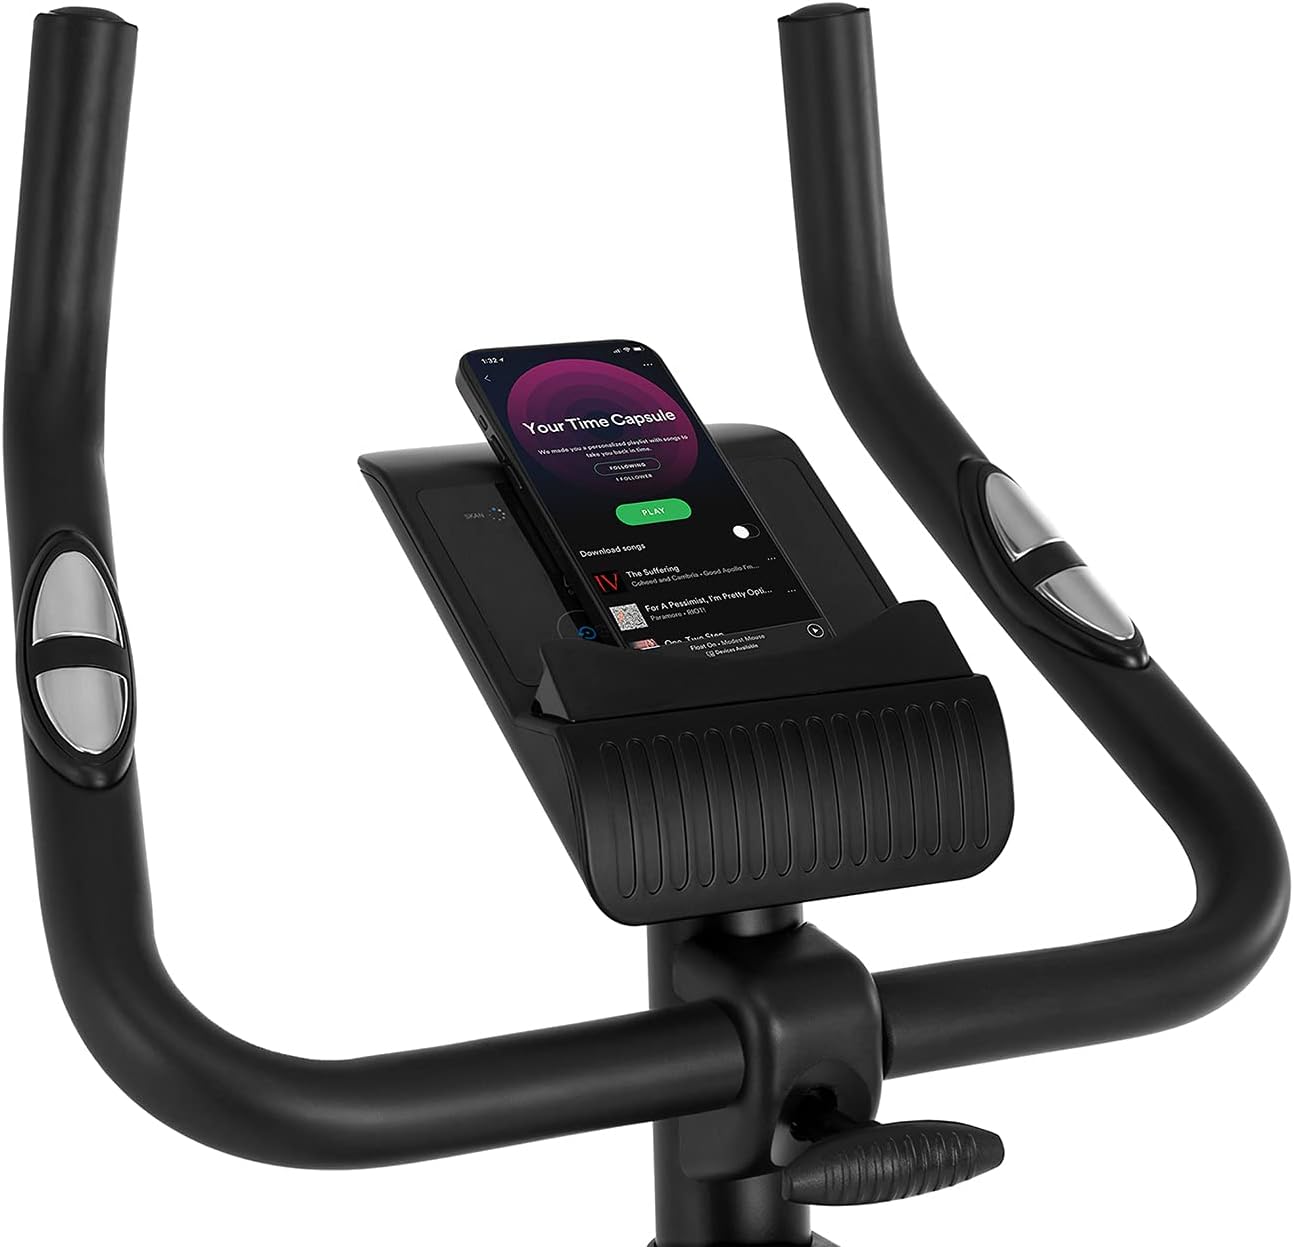
Figure 5.2: Demonstrating how to adjust the magnetic resistance using the tension control knob.
5.2 안장 및 핸들바 조정
Proper adjustment of the saddle and handlebars ensures comfort and effective training.
- 안장 높이: Loosen the adjustment knob on the seat post, raise or lower the saddle to your desired height (ensure a slight bend in your knee at the bottom of the pedal stroke), and tighten the knob securely.
- Saddle Horizontal Position: Loosen the knob beneath the saddle to slide it forward or backward for optimal positioning relative to the pedals. Tighten securely.
- 핸들바 높이: Loosen the adjustment knob on the handlebar post, raise or lower the handlebars to a comfortable position, and tighten the knob securely.
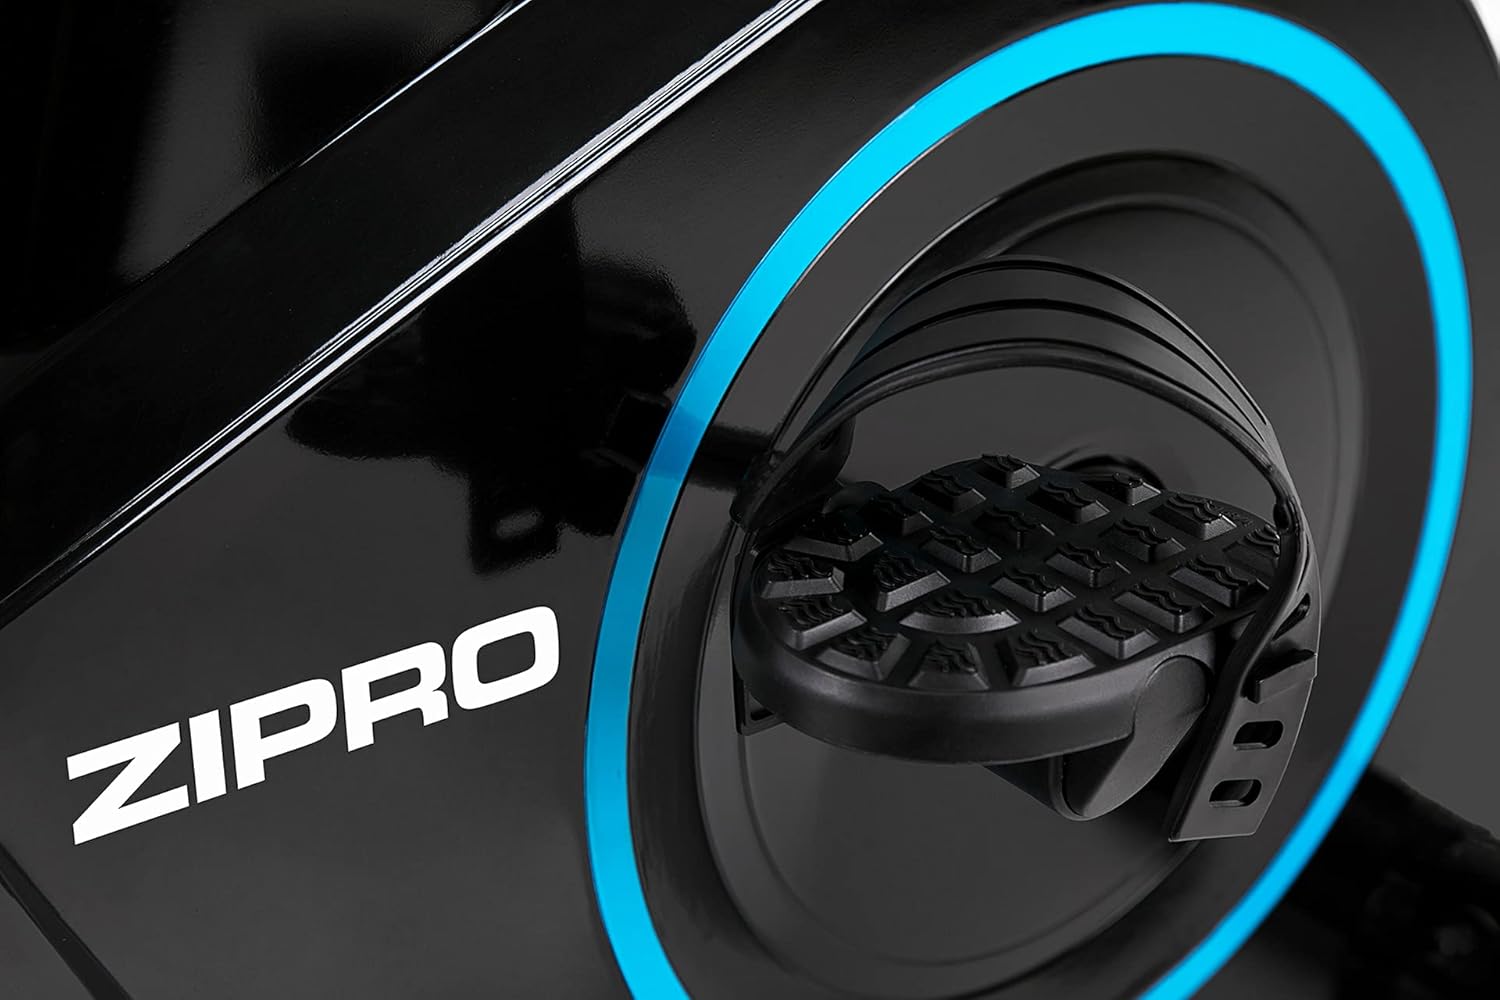
Figure 5.3: Adjusting the saddle's vertical position for user comfort.
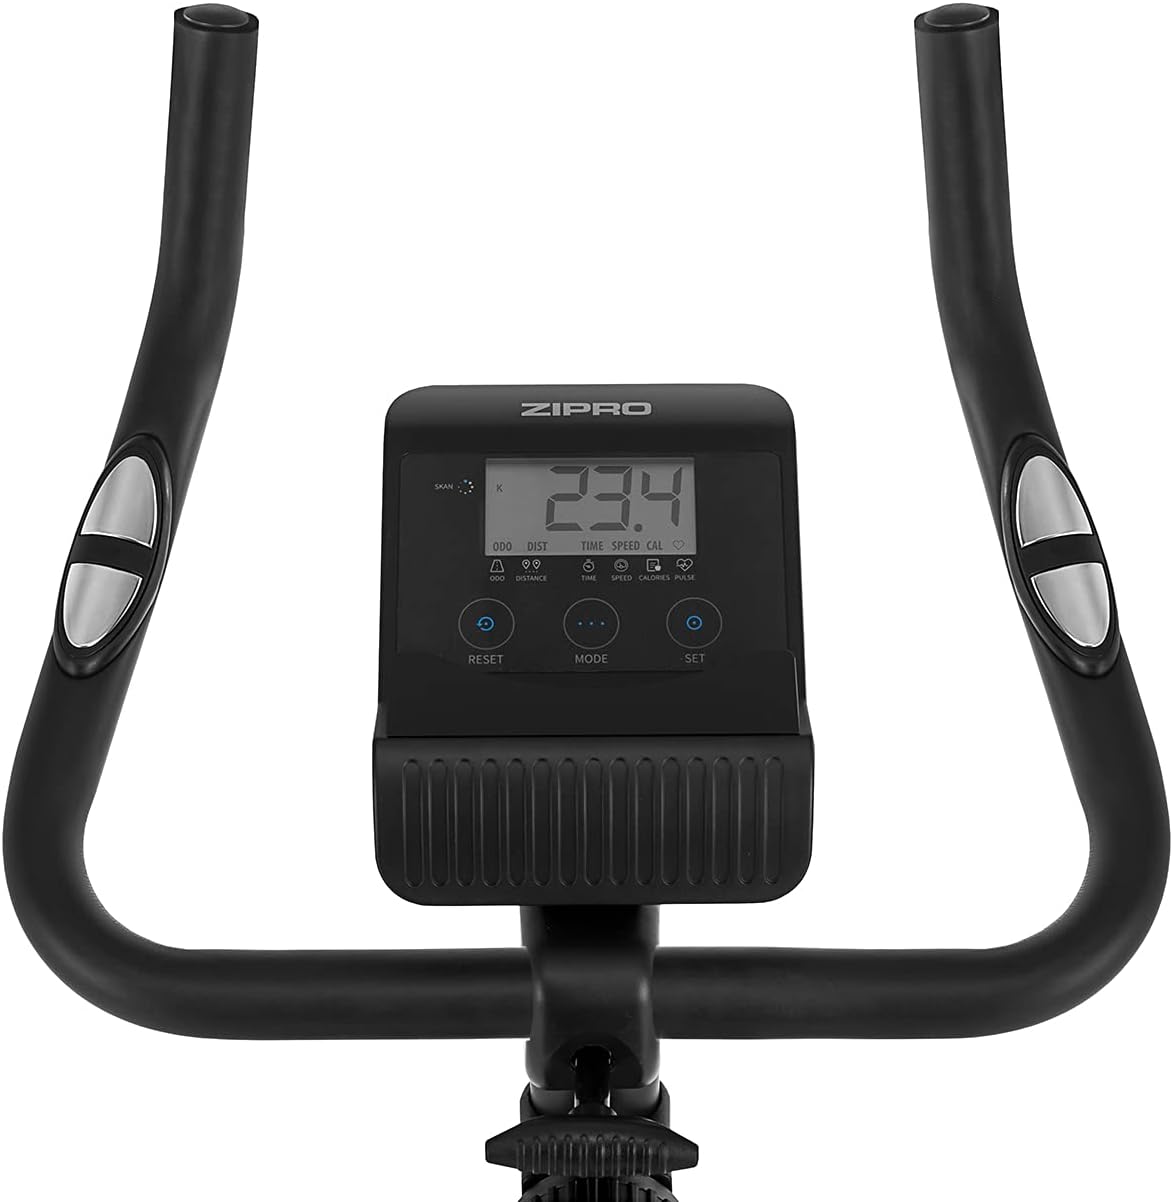
Figure 5.4: Adjusting the saddle's horizontal position for optimal riding posture.
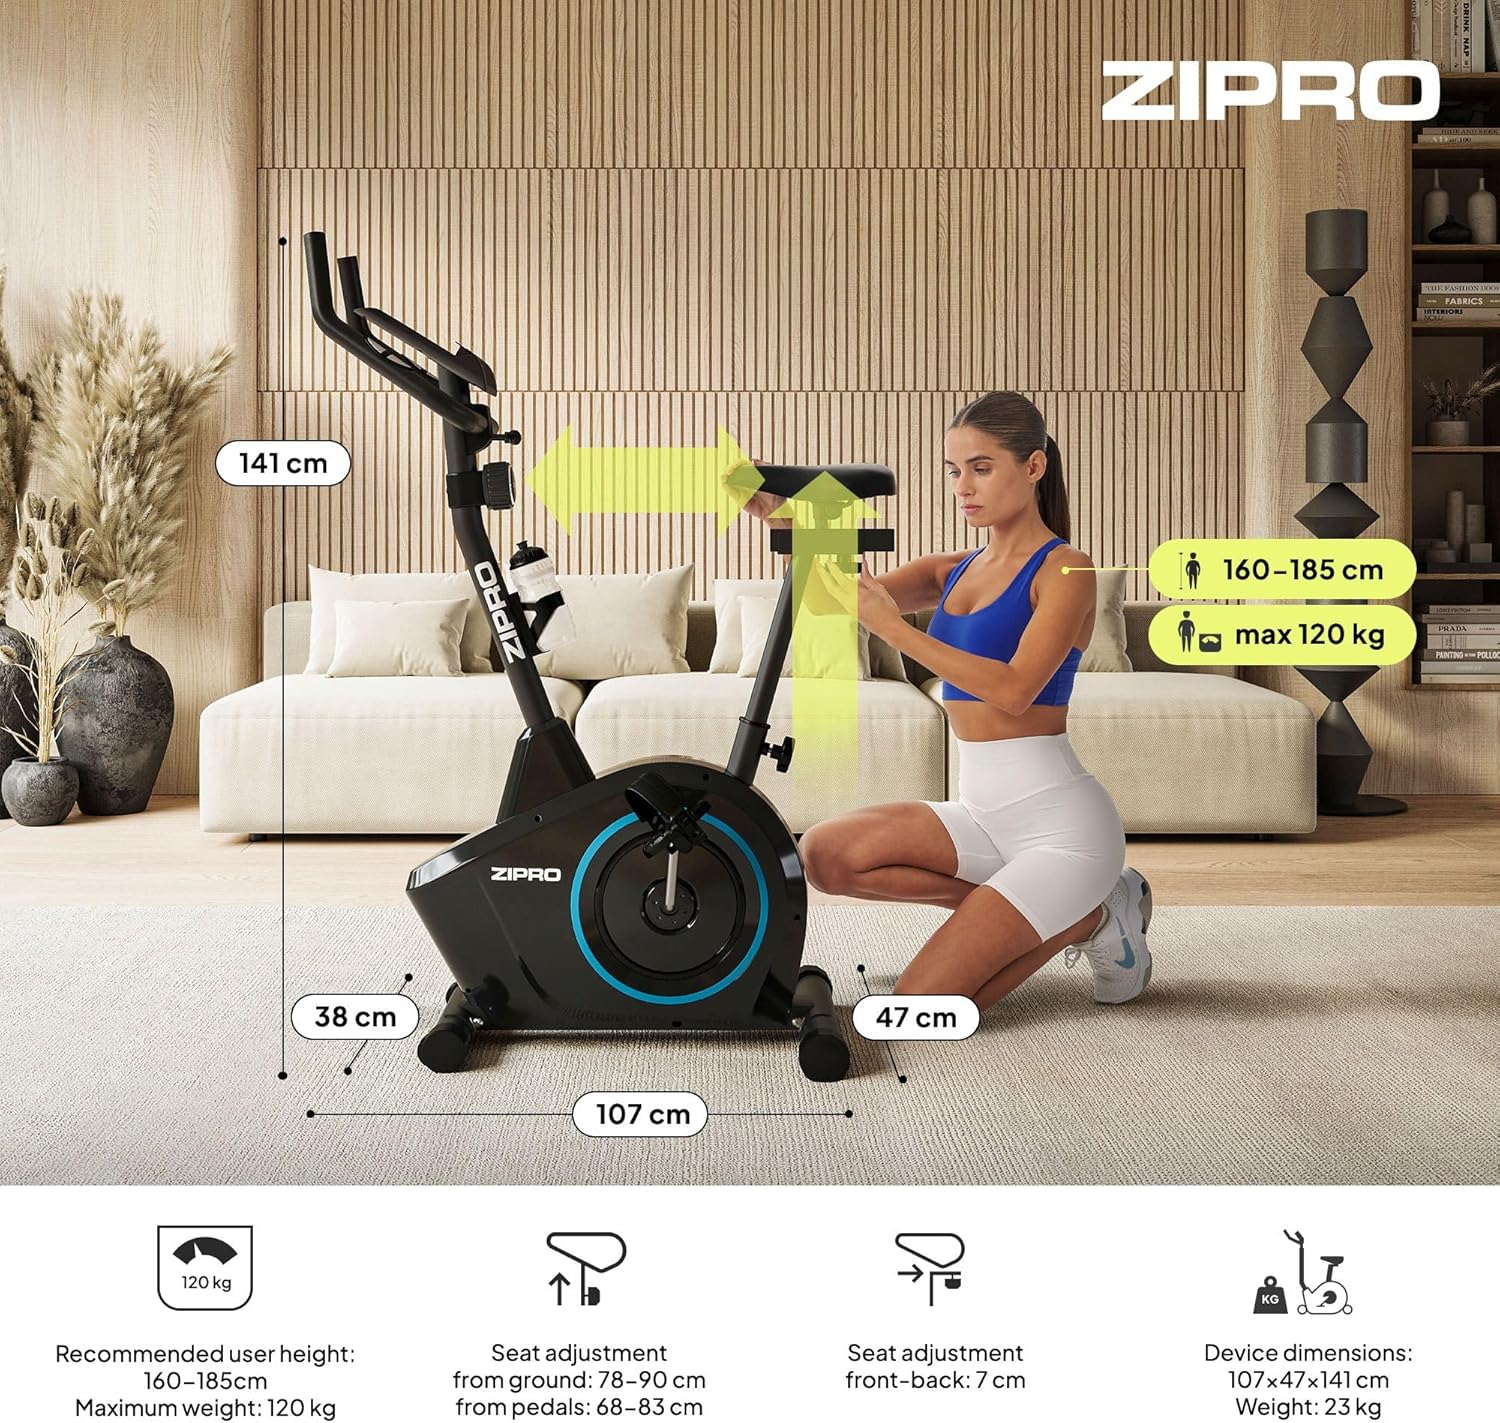
Figure 5.5: Adjusting the handlebar height to suit different user preferences and workout styles.
5.3 Computer Functions
The integrated computer tracks your workout data. It measures time, distance, speed, calories burned, and pulse (via sensors in the handlebar). The SCAN function cycles through all data alternately on the screen.
- MODE 버튼: Press to select the display function (Time, Speed, Distance, Calories, Odometer, Pulse).
- 리셋 버튼: Press and hold to clear all current workout data (Time, Distance, Speed, Calories).
- 설정 버튼: Used to set target values for Time, Distance, or Calories.
- 맥박 센서: Grip the metal plates on the handlebars to measure your heart rate.
- Mobile Device Shelf: A convenient shelf is provided above the computer for your smartphone or tablet.

Figure 5.6: The exercise computer display with MODE, RESET, and SET buttons.

그림 5.7: 이상view of the computer display and integrated pulse sensors.

Figure 5.8: The integrated shelf designed to hold a mobile device like a tablet during workouts.
6. 유지관리
정기적인 유지 관리는 운동용 자전거의 수명 연장과 안전한 작동을 보장합니다.
- 청소: 광고로 자전거를 닦으십시오amp 사용 후에는 천으로 닦아 땀과 먼지를 제거하세요. 연마성 세제는 사용하지 마세요.
- 연결 확인: 주기적으로 모든 볼트, 너트 및 나사가 단단히 조여져 있는지 확인하십시오. 필요한 경우 조이십시오.
- 매끄럽게 하기: 자기 저항 시스템은 일반적으로 유지 보수가 필요 없습니다. 움직이는 부품(예: 페달 축)에서 삐걱거리는 소리가 나면 실리콘계 윤활유를 소량 발라주십시오.
- 저장: When not in use, store the bike in a dry, cool place away from direct sunlight. The integrated transport wheels allow for easy movement.

Figure 6.1: The exercise bike features transport wheels for easy relocation after use.
7. 문제 해결
| 문제 | 가능한 원인 | 해결책 |
|---|---|---|
| 컴퓨터 화면이 작동하지 않습니다 | Loose cable connection; Dead batteries | Check all cable connections to the computer; Replace batteries (if applicable). |
| 저항 변화 없음 | 저항 케이블이 분리되었거나 손상되었습니다. | Check the resistance cable connection to the tension knob and the main unit. |
| 삐걱거리거나 갈리는 소리 | Loose parts; Lack of lubrication | Check and tighten all bolts and nuts; Apply silicone lubricant to moving parts if necessary. |
| 사용 중 불안정함 | Bike not on a level surface; Loose stabilizers | Ensure the bike is on a flat surface; Adjust leveling caps on stabilizers; Tighten stabilizer bolts. |
8. 사양
| 특징 | 사양 |
|---|---|
| 모델 | 979536 |
| 치수(길이 x 너비 x 높이) | 73 x 48 x 137cm |
| 제품 무게 | 23kg |
| 최대 사용자 무게 | 120kg |
| 저항 시스템 | Magnetic, 8-level manual adjustment |
| 드라이브 시스템 | 벨트 |
| 컴퓨터 기능 | Time, Distance, Speed, Calories, Pulse (Heart Rate) |
| 재료 유형 | 플라스틱, 금속 |
| Power Source (Computer) | 배터리 구동 |
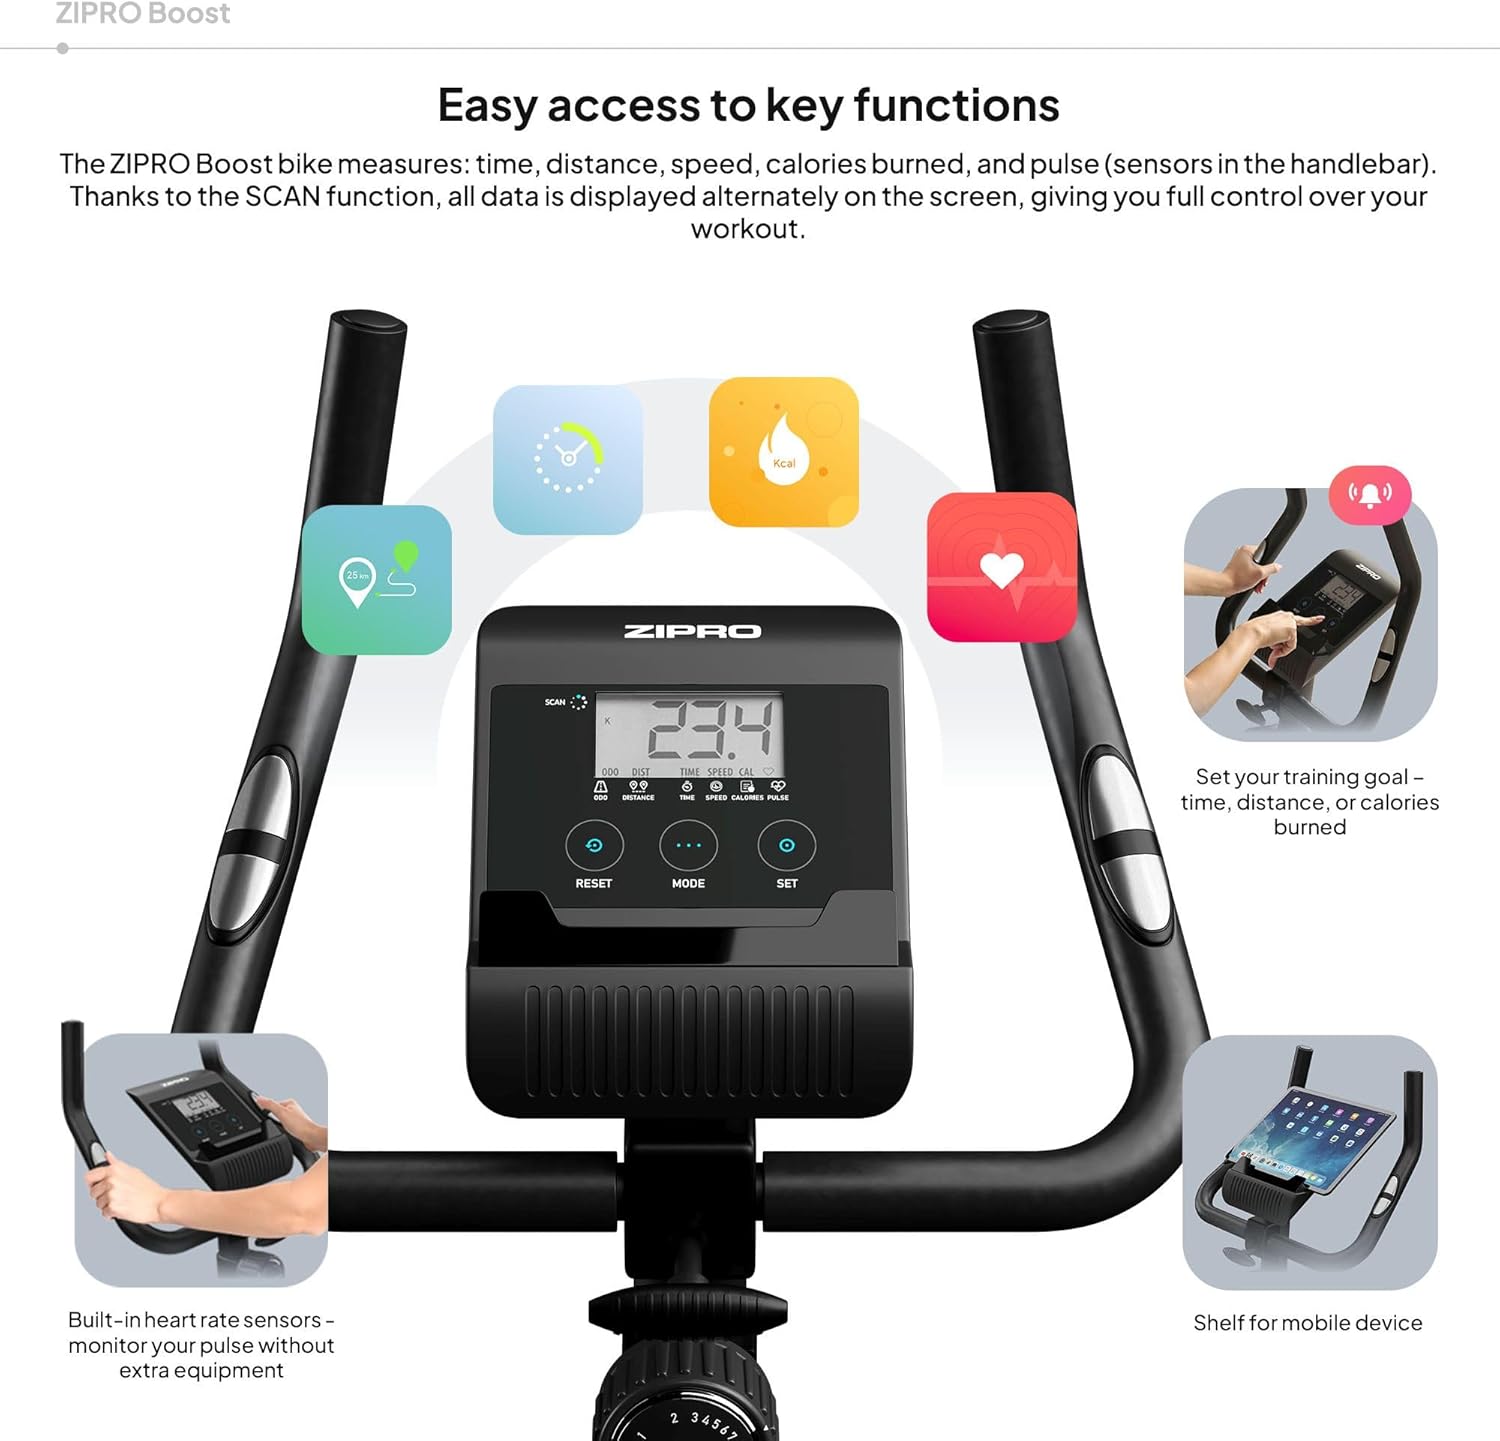
Figure 8.1: Key dimensions and user specifications for the exercise bike.
9. 보증 및 지원
Your ZIPRO Boost Exercise Bike comes with a standard manufacturer's warranty. Please refer to the warranty card included in your package for specific terms and conditions. For technical support, spare parts, or any inquiries not covered in this manual, please contact ZIPRO customer service through their official web제품을 구매한 사이트 또는 소매업체.