1. 서론
This manual provides essential instructions for the safe and effective use of your DT321B Digital Multimeter. This portable device is designed for measuring AC/DC voltage, DC current, resistance, and includes features for diode testing, continuity, battery testing, and transistor (hFE) measurements. Please read this manual thoroughly before operation and retain it for future reference.
2. 안전 정보
화재, 감전 또는 부상의 위험을 줄이기 위해 이 멀티미터를 사용할 때는 항상 기본적인 안전 수칙을 준수하십시오.
- 볼륨을 적용하지 마십시오tag측정기의 최대 허용치를 초과하는 전류 또는 전기 신호.
- 측정을 시작하기 전에 테스트 리드가 양호한 상태이고 제대로 연결되어 있는지 확인하십시오.
- Never use the multimeter if it appears damaged or if the test leads are damaged.
- 볼륨 작업 시 주의하세요tag30V AC RMS, 42V 피크 또는 60V DC 이상입니다. 이러한 볼륨tag이것은 충격 위험을 초래합니다.
- 저항이나 연속성을 측정하기 전에 항상 테스트 대상 회로의 전원을 차단하십시오.
- Do not operate the multimeter in explosive atmospheres.
- 정확한 측정값을 얻으려면 배터리 부족 표시가 나타나면 배터리를 교체하세요.
3. 제품 오버view
The DT321B Digital Multimeter features a clear LCD display and a rotary switch for selecting various measurement functions. Input jacks are provided for connecting test leads.

그림 3.1: 전면 view of the DT321B Digital Multimeter with key components labeled. The display shows numerical readings, the hold button freezes the current reading, and the rotary switch selects measurement functions. The '10A' jack is for high current measurements, 'COM' is the common ground, and 'VΩmA' is for voltage, 저항 및 저전류 측정.
The multimeter includes a blue backlight for improved visibility in low-light conditions and a data hold function to freeze the displayed reading.
4. 설정
4.1 배터리 설치
The DT321B Digital Multimeter requires two 1.5V batteries (Type 7, typically AAA) for operation. To install or replace batteries:
- 멀티미터가 꺼져 있는지 확인하세요.
- 장치 뒷면에서 배터리 덮개를 찾으세요.
- 고정 나사를 풀고 덮개를 제거하십시오.
- Insert the two 1.5V batteries, observing the correct polarity (+ and -) as indicated inside the compartment.
- 배터리 칸 덮개를 다시 덮고 나사로 고정합니다.
5. 사용 설명서
Before making any measurements, ensure the test leads are securely plugged into the correct input jacks.

Figure 5.1: The DT321B Multimeter with test probes connected. The black probe is connected to the 'COM' (common) jack, and the red probe is connected to the 'VΩmA' jack for most voltage, 저항 및 저전류 측정.
5.1 DC Vol 측정tage (V–)
- Insert the red test lead into the 'VΩmA' jack and the black test lead into the 'COM' jack.
- 회전 스위치를 원하는 DC Vol로 설정하세요.tage (V–) range (e.g., 200m, 2, 20, 200, 1000V). If the voltage is unknown, start with the highest range and work downwards.
- 측정할 부품이나 회로에 테스트 프로브를 연결하십시오.
- vol을 읽어보세요tagLCD 디스플레이의 e 값.
5.2 AC Vol 측정tage (V∼)
- Insert the red test lead into the 'VΩmA' jack and the black test lead into the 'COM' jack.
- 회전 스위치를 원하는 AC Vol로 설정하세요.tage (V∼) range (e.g., 200, 750V).
- 측정할 부품이나 회로에 테스트 프로브를 연결하십시오.
- vol을 읽어보세요tagLCD 디스플레이의 e 값.
5.3 직류 전류 측정 (A–)
주의: To avoid damage to the multimeter or the circuit, never connect the test leads in parallel across a voltage source when measuring current. Always connect in series.
- For currents up to 200mA, insert the red test lead into the 'VΩmA' jack. For currents up to 10A, insert the red test lead into the '10A MAX' jack. The black test lead always goes into the 'COM' jack.
- Set the rotary switch to the desired DC Current (A–) range (e.g., 200u, 2m, 20m, 200m, 10A).
- Open the circuit where current is to be measured and connect the multimeter in series with the circuit.
- LCD 디스플레이의 현재 값을 읽습니다.
5.4 저항 측정 (Ω)
주의: Ensure the circuit under test is completely de-energized before measuring resistance.
- Insert the red test lead into the 'VΩmA' jack and the black test lead into the 'COM' jack.
- Set the rotary switch to the desired Resistance (Ω) range (e.g., 200, 2k, 20k, 200k, 2M).
- 측정할 부품에 테스트 프로브를 연결하십시오.
- LCD 디스플레이에서 저항값을 읽으세요.
5.5 다이오드 테스트
- Insert the red test lead into the 'VΩmA' jack and the black test lead into the 'COM' jack.
- Set the rotary switch to the diode symbol (→|).
- 빨간색 프로브를 다이오드의 애노드에, 검은색 프로브를 캐소드에 연결하십시오. 디스플레이에 순방향 전압이 표시됩니다.tag전자 드롭.
- Reverse the probes. The display should show 'OL' (open loop) for a good diode.
5.6 연속성 테스트
- Insert the red test lead into the 'VΩmA' jack and the black test lead into the 'COM' jack.
- Set the rotary switch to the continuity symbol (♫).
- Connect the test probes across the circuit or component. If continuity exists (resistance below a certain threshold), the buzzer will sound.
5.7 Battery Testing (1.5V / 9V)
- Insert the red test lead into the 'VΩmA' jack and the black test lead into the 'COM' jack.
- Set the rotary switch to the '1.5V BATT' or '9V BATT' position.
- 빨간색 프로브를 배터리의 양극 단자에, 검은색 프로브를 음극 단자에 연결하십시오.
- 배터리 볼륨 읽기tag디스플레이에 e.
5.8 트랜지스터(hFE) 테스트
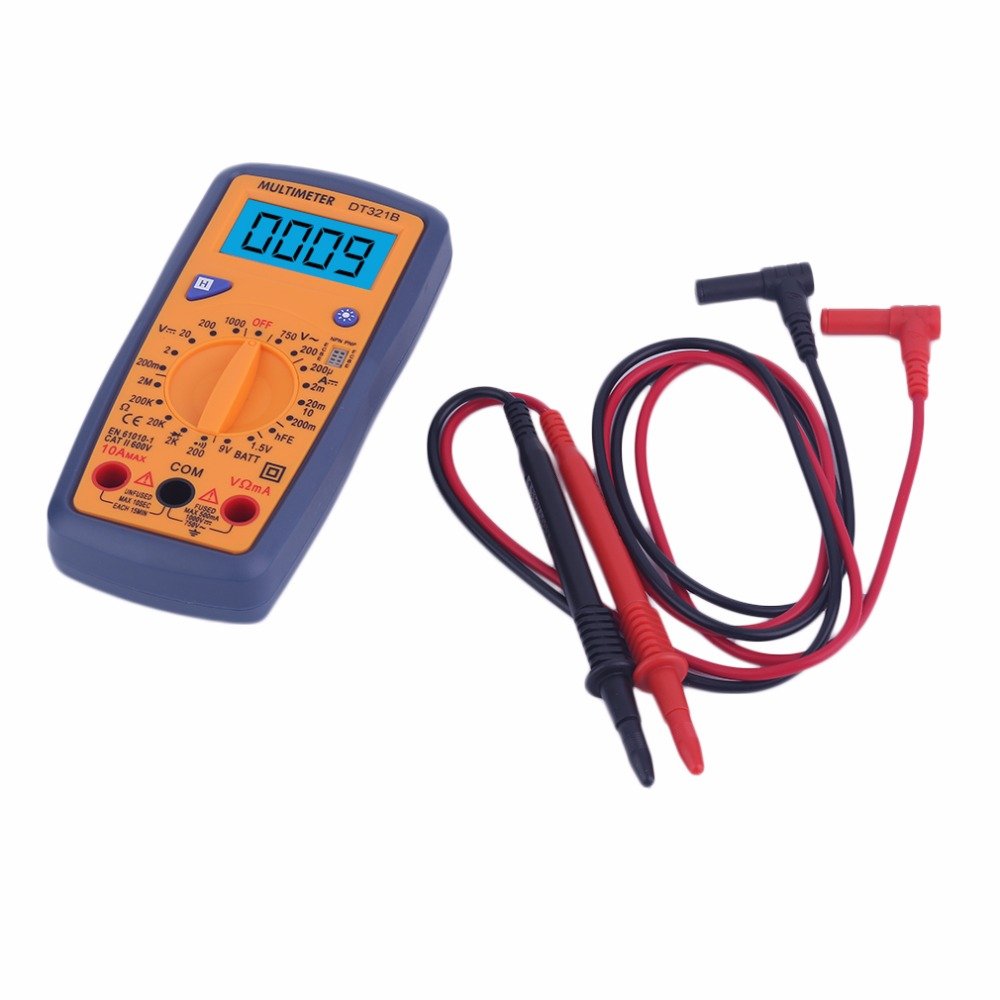
Figure 5.2: The DT321B Multimeter in use, with an inset showing a transistor being tested. The multimeter can measure the hFE (current gain) of NPN and PNP transistors.
- 회전 스위치를 'hFE' 위치로 설정하십시오.
- Identify the NPN or PNP type of the transistor.
- Insert the transistor leads (Emitter, Base, Collector) into the corresponding sockets in the 'hFE' test socket on the multimeter.
- LCD 디스플레이에서 hFE 값을 읽으십시오.
5.9 데이터 홀드 기능
Press the 'Hold' button to freeze the current reading on the display. Press it again to release the hold function and resume live readings.
5.10 백라이트 기능
The multimeter features a blue backlight. Press the backlight button (often integrated with the 'Hold' button or a separate button with a light symbol) to turn the backlight on or off for improved visibility.
6. 유지관리
6.1 청소
광고로 케이스를 닦으세요amp cloth and a mild detergent. Do not use abrasives or solvents. Ensure the multimeter is completely dry before use.
6.2 배터리 교체
When the low battery symbol appears on the display, replace the batteries as described in Section 4.1. Remove batteries if the multimeter is not used for extended periods to prevent leakage.
7. 문제 해결
- 화면이 아예 안 나오거나 아주 희미하게 나옵니다. 배터리 설치 상태와 충전 상태를 점검하십시오. 필요한 경우 배터리를 교체하십시오.
- 잘못된 판독: Ensure the rotary switch is set to the correct function and range. Check test lead connections. Verify the circuit under test is properly prepared (e.g., de-energized for resistance).
- 'OL' (과부하)이 표시됨: The measured value exceeds the selected range. Switch to a higher range or check for an open circuit.
- No continuity buzzer: Ensure the multimeter is in continuity mode and the circuit is closed.
8. 사양
| 측정 | 범위 | 정확성 |
|---|---|---|
| DC 볼륨tage | 200mV, 2V, 20V, 200V, 1000V | ±0.5% |
| AC 볼륨tage | 200V, 750V | ±1.0% |
| 직류 전류 | 200uA, 2mA, 20mA, 200mA, 10A | ±1.8% |
| 저항 | 200Ω, 2kΩ, 20kΩ, 200kΩ, 2MΩ | ±1.0% |
일반 사양:
- LCD 화면 크기: 45x23mm
- 제품 크기: 160x76x32mm
- 전원 공급 장치: 2 x 1.5V batteries (Type 7 / AAA)
- 낮은 볼륨tage Symbol Display: 예
- 과부하 보호: 예
- Diode Detection: 예
- On-off Detection & Buzzer: 예
- 배터리 용량 감지: 1.5V / 9V
- Transistor Detection (hFE): 예
- 데이터 보존: 예
- 백라이트 디스플레이: 예
9. 보증 및 지원
Specific warranty and support information for the DT321B Digital Multimeter is not available in the provided product details. Please refer to the retailer or manufacturer's website for any applicable warranty terms or customer support contacts.


