1. 서론
구매해주셔서 감사합니다asing the American Audio WM-419 4-Channel UHF Handheld Wireless Microphone System. This system is designed to provide high-quality, reliable wireless audio for various applications, including PA systems, karaoke, mobile entertainment, schools, and houses of worship. This manual provides essential information for the proper setup, operation, and maintenance of your WM-419 system.
Please read this manual thoroughly before operating the unit to ensure optimal performance and to prevent damage.
2. 패키지 내용
아래 나열된 모든 구성품이 패키지에 포함되어 있는지 확인하세요.
- 1 x WM-419 Wireless Receiver Unit
- 휴대용 무선 마이크 4개
- 마이크 클립 4개
- AA 배터리 8개 (마이크용)
- 수신기용 전원 어댑터 1개
- 1 x 1/4" 오디오 케이블
- 사용 설명서 (본 문서)
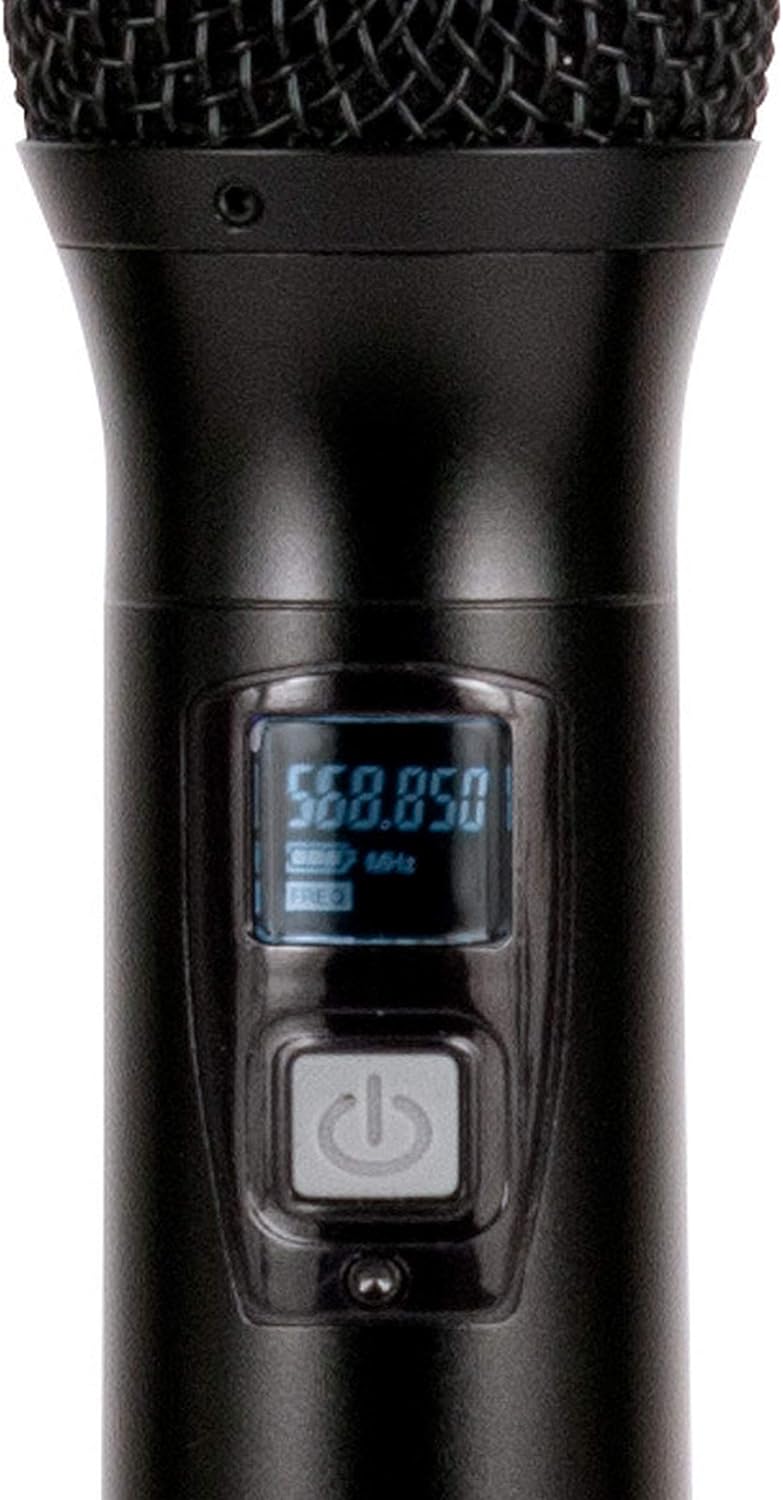
그림 2.1: Included components of the WM-419 system. This image displays the receiver, four handheld microphones, four detachable antennas, eight AA batteries, a power adapter, and a 1/4" audio cable, along with four microphone clips.
3. 주요 특징
- 4-Channel UHF Wireless Handheld Microphone System
- Intelligent Frequency Autoscan with IR Synchronization
- Individual Volume Control for each microphone channel on the receiver
- XLR Audio Output for each microphone channel
- 50 Channels Available per Receiver (200 total channels)
- 16-Bit Pilot Technology to assist with eliminating frequency interference
- Wireless Range: Up to 300 feet / 90 meters (line of sight)
- Microphone Battery Life: 6-10 hours (with included AA batteries)
- OLED Screen on Handheld MIC Transmitters
4. 설정 가이드
4.1 수신기 배치
Place the WM-419 receiver on a stable, flat surface, away from strong electromagnetic interference sources. Ensure there is adequate ventilation around the unit. For optimal signal reception, position the receiver's antennas vertically and ensure they are not obstructed.

그림 4.1: 앞쪽 view of the WM-419 receiver with microphones. This image shows the receiver unit with its four antennas extended, and the four handheld microphones resting on top, illustrating the compact design.
4.2 수신기 연결
- 전원 연결: Connect the included power adapter to the DC 12-15V input on the rear panel of the receiver. Plug the adapter into a suitable power outlet.
- 오디오 출력: Connect the receiver to your PA system, mixer, or amplifier using the XLR audio outputs for individual microphone channels (Balanced A, B, C, D) or the AF MIX OUT (1/4" unbalanced) for a combined output.

그림 4.2: Rear panel connections of the WM-419 receiver. This image highlights the DC power input, four balanced XLR outputs (A, B, C, D), and a mixed 1/4" audio output, along with the antenna connections.
4.3 Installing Batteries in Microphones
Each handheld microphone requires two AA batteries. Ensure correct polarity when inserting the batteries.
- Unscrew the bottom cap of the microphone to reveal the battery compartment.
- Insert two AA batteries, observing the polarity markings (+/-).
- 바닥 캡을 다시 단단히 조여주세요.

그림 4.3: Four handheld microphones. This image displays the four individual handheld microphones, each featuring an OLED display and power button, ready for battery installation and use.
5. 사용 설명서
5.1 전원 켜기/끄기
- 수화기: Press the POWER button on the front panel of the receiver to turn it on or off.
- 마이크: Press and hold the power button on each handheld microphone for a few seconds to turn it on or off. The OLED screen will illuminate when powered on.
5.2 Frequency Synchronization (IR Sync)
The WM-419 features Intelligent Frequency Autoscan and IR Synchronization for easy setup.
- Turn on the receiver and the desired microphone.
- 수화기에서 버튼을 누르세요 주사 button for the channel you wish to set. The receiver will automatically scan for an available clear frequency.
- Once a frequency is found, the display will show "SYNC". Position the IR window of the microphone (usually near the bottom of the display) close to the IR sensor on the receiver (located near the channel display).
- 를 누르세요 세트 button on the receiver for that channel. The frequency information will be transmitted to the microphone via infrared. The microphone's display should show the same frequency as the receiver, indicating successful synchronization.
- Repeat this process for each microphone.

그림 5.1: Receiver front panel detail. This image provides a close-up view of the receiver's illuminated OLED displays for each channel, showing frequency information, signal strength, and individual volume controls.

그림 5.2: Microphone OLED display. A detailed view of one handheld microphone's OLED screen, showing the current frequency and battery indicator, along with the power/mute button.
5.3 볼륨 조절
Each channel on the receiver has an independent volume control knob. Adjust these knobs to achieve the desired audio level for each microphone.
5.4 Muting Microphones
A short press of the power button on the handheld microphone will mute/unmute the microphone. The OLED display will indicate the mute status.
6. 유지관리
- 청소: Use a soft, dry cloth to clean the surfaces of the receiver and microphones. Do not use abrasive cleaners or solvents.
- 배터리 교체: Replace microphone batteries when the low battery indicator appears on the microphone's OLED screen or when audio quality degrades. Always use fresh AA batteries.
- 저장: 장시간 사용하지 않을 때는 배터리 누수를 방지하기 위해 마이크에서 배터리를 분리해 두십시오. 시스템을 서늘하고 건조한 곳에 보관하십시오.
7. 문제 해결
| 문제 | 가능한 원인 | 해결책 |
|---|---|---|
| 마이크에서 소리가 나지 않음 | Microphone not powered on; Batteries dead; Microphone not synchronized; Receiver volume too low; Output cable disconnected. | Ensure microphone is on; Replace batteries; Perform IR sync; Increase receiver channel volume; Check audio cable connections to mixer/PA. |
| 간섭/정적 | Nearby electronic devices; Other wireless systems on same frequency; Obstructions between mic and receiver; Receiver too far from microphone. | Move receiver away from interference sources; Perform Autoscan and re-sync to a clear frequency; Ensure line of sight; Reduce distance between mic and receiver. |
| 짧은 무선 범위 | Antennas not properly positioned; Obstructions; Low microphone battery. | Ensure antennas are vertical and unobstructed; Minimize physical barriers; Replace microphone batteries. |
| 마이크 표시가 작동하지 않습니다 | Dead batteries; Microphone not powered on. | Replace batteries; Press and hold power button to turn on. |
8. 사양
| 특징 | 세부 사항 |
|---|---|
| 모델명 | American Audio WM-419 |
| 마이크 폼 팩터 | 마이크 시스템 (핸드헬드형) |
| 채널 수 | 4 (50 channels available per receiver, 200 total) |
| 연결 기술 | UHF Wireless, XLR |
| 전원 | Receiver: AC Adapter; Microphones: 2 x AA Batteries (per mic) |
| Battery Life (Microphones) | 6-10시간 |
| 무선 범위 | Up to 300 feet / 90 meters (line of sight) |
| 신호 대 잡음 비율 | 70데시벨 |
| 소음 수준 | 85데시벨 |
| 제품 크기 (수신기) | 22 x 14 x 6 인치 |
| 품목 무게 | 9파운드 |
| 색상 | 검은색 |
| 호환 장치 | PA System, Karaoke Machine |
| 특징 | Volume Control (individual channel) |
| 극성 패턴 | 단방향 |
9. 보증 및 지원
For warranty information and technical support, please contact ADJ Products directly or visit their official web사이트. 보증 청구에 대비해 구매 증빙 자료로 구매 영수증을 보관하세요.
제조업체: ADJ 제품
상표: 형용사
Web대지: www.adj.com
10. 안전 정보
경고: 이 제품은 납을 포함한 화학 물질에 노출될 수 있으며, 이는 캘리포니아 주에서 암, 선천적 기형 또는 기타 생식 기능 손상을 유발하는 것으로 알려져 있습니다. 자세한 내용은 다음으로 이동하십시오. www.P65Warnings.ca.gov.
- 본 제품을 비나 습기에 노출시키지 마십시오.
- 덮개를 제거하지 마십시오. 내부에는 사용자가 수리할 수 있는 부품이 없습니다. 수리는 자격을 갖춘 전문가에게 맡기십시오.
- 적절한 환기를 유지하세요. 환기구를 막지 마세요.
- 장치와 함께 제공된 전원 어댑터만 사용하십시오.
- 현지 규정에 따라 배터리를 책임감 있게 폐기하세요.


