소개
This manual provides comprehensive instructions for the Antec VSK10 Micro-ATX computer case. Please read this manual carefully before installation to ensure proper setup and optimal performance of your system.
제품 끝view
The Antec VSK10 is a Micro-ATX case designed for efficient system building, offering a balance of functionality and compact design. It supports Micro-ATX and ITX motherboards and provides various features for component installation and cooling.
주요 특징:
- Motherboard Support: Up to Micro-ATX
- Cooling: Supports up to 4 x 140mm fans and 280mm radiator (front), 1 x 120mm fan (rear, included)
- Drive Bays: 2 x 3.5" HDD (compatible with 2 x 2.5" SSD), 2 x 2.5" SSD
- 확장 슬롯: 4
- Front I/O: 2 x USB 3.0 Ports
- Material: SPCC + Plastic

이미지 설명: 각진 앞면 view of the Antec VSK10 Micro-ATX computer case, showcasing its sleek black design and front panel.
설정 및 설치
This section details the steps required to install your components into the Antec VSK10 case. Ensure your system is powered off and unplugged before beginning installation.
1. 사건 준비
Remove the side panels by unscrewing the thumbscrews located at the rear of the case. Gently slide the panels backward and lift them off. This provides access to the interior for component installation.
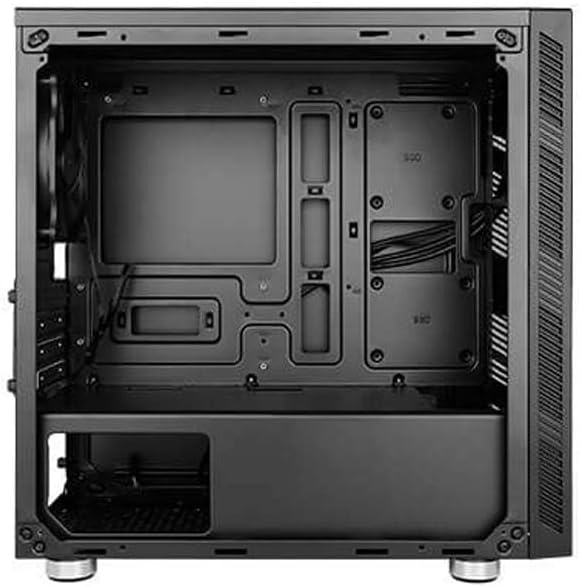
이미지 설명: 내부 view of the Antec VSK10 Micro-ATX case, showing the motherboard tray, drive bays, and power supply shroud. Cable routing cutouts are visible.
2. 마더보드 설치
Align your Micro-ATX or ITX motherboard with the pre-installed standoffs inside the case. Carefully place the motherboard onto the standoffs and secure it using the provided screws. Ensure the I/O shield is installed in the rear opening before securing the motherboard.
3. 전원 공급 장치 설치
Install the power supply unit (PSU) into the dedicated compartment at the bottom rear of the case. Ensure the PSU fan faces the bottom ventilation opening for optimal airflow. Secure the PSU with screws from the rear of the case.

이미지 설명: 후면 외관 view of the Antec VSK10 case, showing the I/O shield cutout, four expansion slots, the rear fan mount, and the power supply mounting area at the bottom.
4. 드라이브 설치
The VSK10 case supports both 3.5" HDDs and 2.5" SSDs:
- 3.5" HDD / 2.5" SSD: Install drives into the removable drive cage located beneath the PSU shroud. Follow the instructions for your specific drive type to secure it within the cage.
- 2.5인치 SSD: Dedicated mounting points are available on the motherboard tray for 2.5" SSDs. Secure these drives directly to the tray using screws.
5. 확장 카드 설치
Remove the necessary expansion slot covers from the rear of the case corresponding to your expansion card (e.g., graphics card). Insert your expansion card into the motherboard's PCIe slot and secure it with a screw.
6. 팬 및 라디에이터 설치
The VSK10 offers flexible cooling options:
- 앞쪽: Supports 2 x 140mm or 3 x 120mm intake fans, or a 280mm radiator.
- 뒤쪽: Includes 1 x 120mm exhaust fan.
- 맨 위: 120mm 팬 2개 또는 140mm 팬 2개를 지원합니다.
Ensure fans are oriented correctly for optimal airflow (typically intake at the front, exhaust at the rear and top).

이미지 설명: 전면 외관 view of the Antec VSK10 case, featuring a brushed black finish and a side intake vent for airflow.
7. 케이블 관리
Utilize the cable routing cutouts and tie-down points located behind the motherboard tray to manage and organize your cables. Effective cable management improves airflow and the overall aesthetic of your build.
작동 지침
전면 패널 I / O
The front panel provides convenient access to essential ports and controls for your system.
- 전원 버튼: Press to power on or power off the system.
- 재설정 버튼: 시스템을 다시 시작하려면 누르세요.
- USB 3.0 포트(x2): 고속 데이터 전송을 위해 USB 3.0 호환 장치를 연결하세요.
- 오디오 잭: 헤드폰과 마이크를 연결하세요.

이미지 설명: 각진 view of the Antec VSK10 case, highlighting the top panel with front I/O ports including two USB 3.0 ports and audio jacks, alongside the power and reset buttons.
유지
Regular maintenance helps ensure the longevity and optimal performance of your PC components and the case itself.
- 먼지 필터: The VSK10 includes dust filters to prevent dust buildup. Regularly clean these filters by removing and washing them with water, or by using compressed air. Ensure they are completely dry before reinstallation.
- 내부 청소 : Periodically open the case and use compressed air to remove dust from internal components such as fans, heatsinks, and graphics cards. Avoid touching components directly.
- 케이블 정리 상태 점검: Ensure cables remain neatly routed and do not obstruct airflow or interfere with fan operation.
문제 해결
This section addresses common issues you might encounter during or after system assembly.
- 시스템 전원이 켜지지 않음:
- Check all power connections, including the PSU to the wall outlet, PSU to motherboard (24-pin and CPU 8-pin), and front panel power switch header.
- Ensure the PSU switch at the rear is in the 'ON' position.
- 디스플레이 출력 없음:
- Verify that the monitor is connected to the graphics card (or motherboard integrated graphics, if applicable) and is powered on.
- Reseat the graphics card and RAM modules firmly into their slots.
- 과열:
- 케이스 팬이 모두 제대로 회전하고 최적의 공기 흐름을 위해 올바른 방향으로 설치되어 있는지 확인하십시오.
- Clean dust filters and internal components to remove any dust buildup.
- Verify the CPU cooler is properly seated and making good contact with the CPU.
- USB 포트가 작동하지 않음:
- Check if the front panel USB 3.0 header is correctly connected to the corresponding header on the motherboard.
명세서
The following table details the technical specifications of the Antec VSK10 Micro-ATX Case.
| 특징 | 사양 |
|---|---|
| 모델명 | VSK10 |
| 케이스 유형 | 마이크로 ATX 케이스 |
| 마더보드 지원 | Micro-ATX, ITX |
| 재료 | SPCC + 플라스틱 |
| Drive Bays (Internal) | 2 x 3.5" HDD (compatible with 2 x 2.5" SSD), 2 x 2.5" SSD |
| 확장 슬롯 | 4 |
| 전면 팬 지원 | 2 x 140mm 또는 3 x 120mm |
| 후면 팬 지원 | 1x120mm(포함) |
| 탑 팬 지원 | 2 x 120mm 또는 2 x 140mm |
| 전면 라디에이터 지원 | 최대 280mm |
| 후면 라디에이터 지원 | 최대 120mm |
| 전면 I / O 포트 | USB 3.0 포트 2개, 오디오 입/출력 |
| 최대 GPU 길이 | 350mm (XNUMXmm) |
| 최대 CPU 쿨러 높이 | 160mm (XNUMXmm) |
| 최대 PSU 길이 | 160mm (XNUMXmm) |
| 제품 크기(LxWxH) | 17 x 10 x 9인치(약 432 x 254 x 229mm) |
| 품목 무게 | 8.14파운드(약 3.7kg) |
보증 및 지원
For detailed warranty information, terms, and conditions, please refer to the official Antec website or the warranty card included with your product. For technical support or further assistance, please visit the Antec support page or contact their customer service department. Keep your proof of purchase for any warranty claims.


