1. 서론
The Waveshare 7-inch HDMI LCD (H) is a high-resolution (1024x600) IPS capacitive touch screen display designed for versatile applications. It features an HDMI interface and supports a wide range of mini-PCs, desktop computers, and game consoles. This manual provides detailed instructions for setup, operation, and maintenance of your display.

The Waveshare 7-inch HDMI LCD (H) is a capacitive touch screen display with a 1024x600 IPS panel.
2. 특징
- 7-inch IPS display with 1024x600 hardware resolution, configurable up to 1920x1080 via software.
- Capacitive five-point touch functionality (when used as a computer monitor).
- HDMI interface for video input.
- Supports popular mini-PCs including Raspberry Pi (4, 3, 2, 1 B+, B, A+), Jetson Nano, BB Black, and Banana Pi.
- Driver-free operation with Raspbian, Ubuntu, Kali, Retropie, and WIN10 IOT on Raspberry Pi.
- Driver-free operation with Windows 10/8.1/8/7 as a computer monitor.
- Compatible with game consoles such as Microsoft XBOX360 and Nintendo Switch.
- Multi-language OSD menu for power management, brightness, and contrast adjustment.
- 3.5mm audio jack and speaker connector for HDMI audio output.
- Supports VGA input (requires a separate VGA cable, not included).
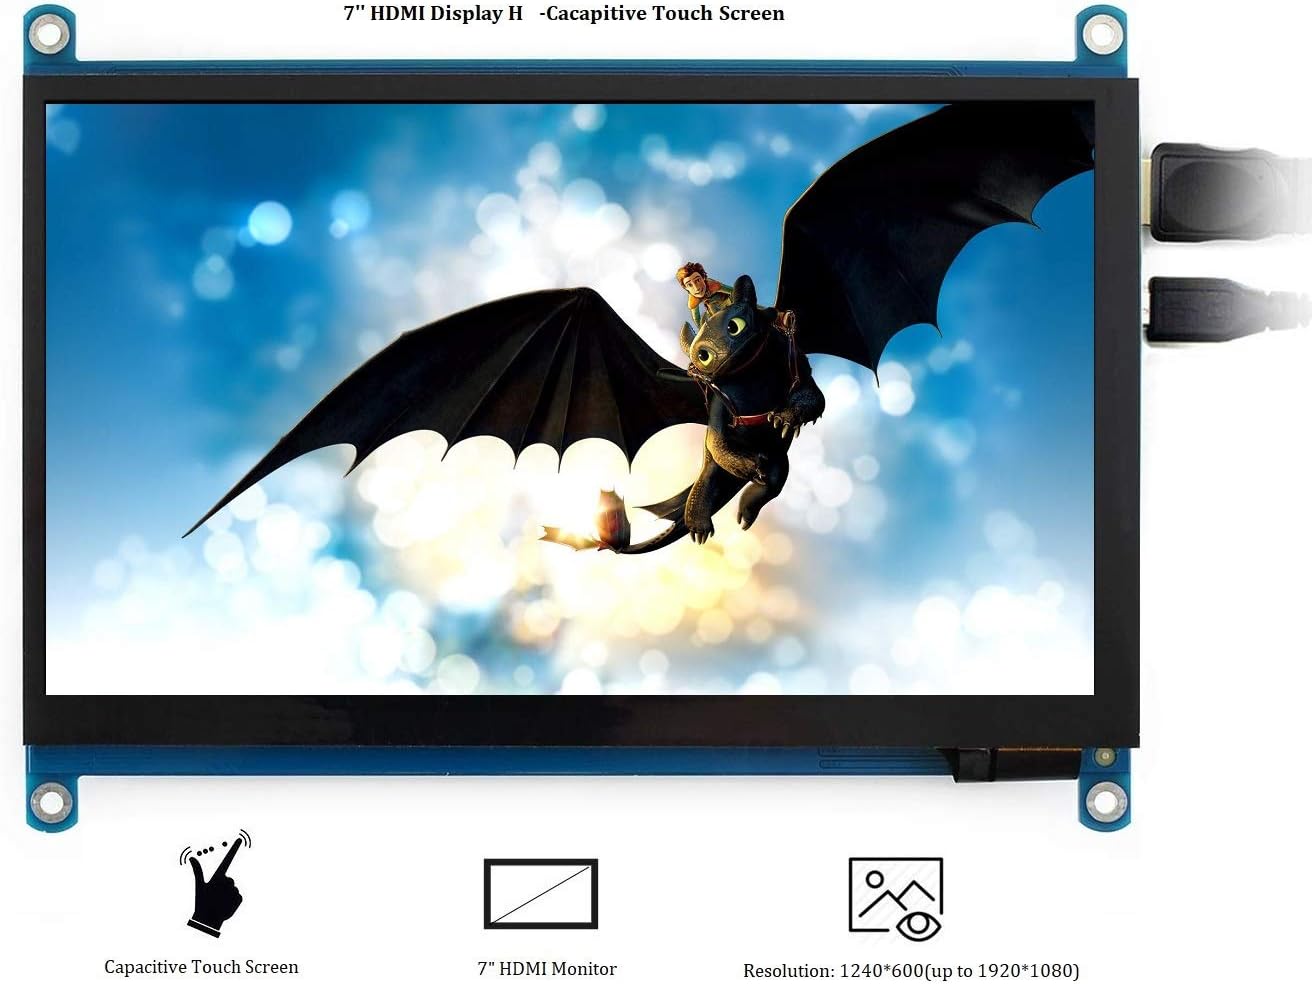
This image highlights the key features: capacitive touch functionality, its role as an HDMI monitor, and its native 1024x600 resolution, configurable up to 1920x1080.
3. 패키지 내용
패키지에 모든 품목이 들어 있는지 확인하세요.
- 7inch HDMI LCD (H) x1
- HDMI 케이블 x1
- HDMI to Micro HDMI Adapter x1
- USB type A plug to micro B plug cable x1
- Quick start sheet x1
4. 제품 오버view포트 및 버튼

This diagram labels the various ports and control buttons: HDMI input, Touch USB port, Power Only USB port, 3.5mm Audio Jack (HP), VGA input, Speaker connector, and OSD menu buttons (Power, Menu, Up/Left, Down/Right, Exit).
포트:
- HDMI : For video input from your device.
- 만지다: Micro USB port for touch functionality and power supply.
- 전원 전용: Micro USB port for power supply only, if touch is not required or powered separately.
- HP (3.5mm Audio Jack): 오디오 출력용.
- VGA : For VGA video input (requires separate cable).
- 스피커: Connector for external speakers.
제어 버튼:
- 힘: Turns the LCD display on or off.
- 메뉴: Opens the OSD menu. Also functions as 'OK' within the menu.
- 위쪽/왼쪽: Navigation button for OSD menu.
- Down/Right: Navigation button for OSD menu.
- 출구: Exits the OSD menu. Also functions as 'Return' within the menu.
5. 설정 지침
5.1 일반 연결
- Connect the display to your device (e.g., mini-PC, computer, game console) using the provided HDMI cable.
- For touch functionality and power, connect the USB type A to micro B cable from your device's USB port to the 'Touch' micro USB port on the display.
- Alternatively, if touch is not needed or powered separately, you can use the 'Power Only' micro USB port for power.
- If using external speakers, connect them to the 'Speaker' interface on the display board.

The display connected to a Raspberry Pi, demonstrating its use as a mini-PC monitor. Note: Raspberry Pi is not included.
5.2 Raspberry Pi Setup
When used with Raspberry Pi, the display supports Raspbian, Ubuntu, Kali, Retropie, and WIN10 IOT operating systems without requiring additional drivers. Ensure your Raspberry Pi's operating system is up-to-date for optimal performance.
5.3 Computer Monitor Setup
As a computer monitor, the display supports Windows 10/8.1/8/7 with five-point touch functionality, requiring no additional drivers.
5.4 Game Console Connection
The display is compatible with popular game consoles like Microsoft XBOX360 and Nintendo Switch. Please note that due to limitations of game console operating systems, the touch function is generally unavailable when connected to game consoles.

The back of the display board showing the speaker connector. Speakers (8Ω 5W) are sold separately and are not included.
6. 사용 설명서
6.1 OSD 메뉴 탐색
Use the control buttons on the side of the display to navigate and adjust settings:
- 를 누르세요 메뉴 화면 메뉴(OSD)를 여는 버튼입니다.
- 사용하세요 위쪽/왼쪽 그리고 철저한 메뉴 옵션을 탐색하는 버튼입니다.
- 를 누르세요 메뉴 button again to confirm a selection (functions as 'OK').
- 를 누르세요 출구 button to go back or exit the OSD menu.
6.2 전원 관리
To reduce power consumption when the display is idle for an extended period, press the 힘 button to turn off the LCD display.
6.3 Brightness and Contrast Adjustment
Within the OSD menu, you can find options to adjust the display's brightness and contrast settings to suit your view환경 설정.
7. 호환성
The Waveshare 7-inch HDMI LCD (H) offers broad compatibility:
- Mini-PCs: Raspberry Pi (all models), Jetson Nano, BB Black, Banana Pi.
- Operating Systems (with Raspberry Pi): Raspbian, Ubuntu, Kali, Retropie, WIN10 IOT (driver-free).
- 데스크톱 컴퓨터: Windows 10/8.1/8/7 (driver-free, five-points touch).
- 게임 콘솔: Microsoft XBOX360, Nintendo Switch.

Technical drawing showing the physical dimensions of the display in millimeters, along with icons indicating compatibility with Raspberry Pi, Windows systems, XBOX360, PS4, and Nintendo Switch.
8. 사양
| 특징 | 사양 |
|---|---|
| 화면 크기 | 7 인치 |
| 하드웨어 해상도 | 1024 x 600 픽셀 |
| 구성 가능한 해상도 | Up to 1920 x 1080 Pixels |
| 패널 유형 | IPS |
| 터치타입 | Capacitive, Five-points (PC monitor mode) |
| 종횡비 | 16시 9분 |
| 비디오 입력 | HDMI, VGA |
| 오디오 출력 | 3.5mm Audio Jack, Speaker Connector |
| 품목 무게 | 9.6 온스 |
| 패키지 크기 | 8.11 x 6.42 x 2.13 인치 |
9. 문제 해결
- 디스플레이 없음/검은 화면: Ensure all cables (HDMI, USB for power) are securely connected. Verify the power source is adequate.
- 터치 기능이 작동하지 않습니다: For PC use, ensure the 'Touch' USB port is connected to your computer. For game consoles, touch functionality is typically not supported.
- Image Scaling Issues (Raspberry Pi): If the display shows incorrect scaling, you may need to manually adjust the resolution settings in your Raspberry Pi's configuration files. Refer to Raspberry Pi documentation for specific instructions.
- 오디오 없음: Confirm that HDMI audio output is enabled on your source device. If using external speakers, ensure they are correctly connected to the speaker interface.
- Display Turns Off Unexpectedly: Check power connections. If the display is idle, it might be in power-saving mode; press the 'Power' button to reactivate.
10. 유지관리
- 청소: 부드럽고 보풀 없는 천으로 화면을 닦으세요. 잘 지워지지 않는 얼룩은 가볍게 두드려 닦아주세요.amp천에 물이나 화면에 안전한 세척제를 묻혀 닦아주세요. 강한 화학 물질은 피하세요.
- 손질: Handle the display with care to avoid physical damage. Avoid dropping or applying excessive pressure to the screen.
- 저장: 디스플레이는 직사광선과 극한 온도 변화를 피해 서늘하고 건조한 곳에 보관하십시오.
11. 보증 및 지원
For warranty information and technical support, please refer to the Waveshare official web웹사이트를 방문하거나 판매점에 문의하세요. 보증 청구를 위해 구매 증빙 자료로 구매 영수증을 보관하세요.