1. 제품 오버view
The Progress Lighting Gulliver Collection P350117-141 is a four-light semi-flush convertible fixture. This fixture features an airy design with arching details and a dual-toned frame in a Galvanized finish with antique white accents. Its design complements various interior styles including Rustic, Modern Farmhouse, Urban Industrial, and Coastal settings. This fixture can be installed as a semi-flush mount or converted to a hanging fixture.
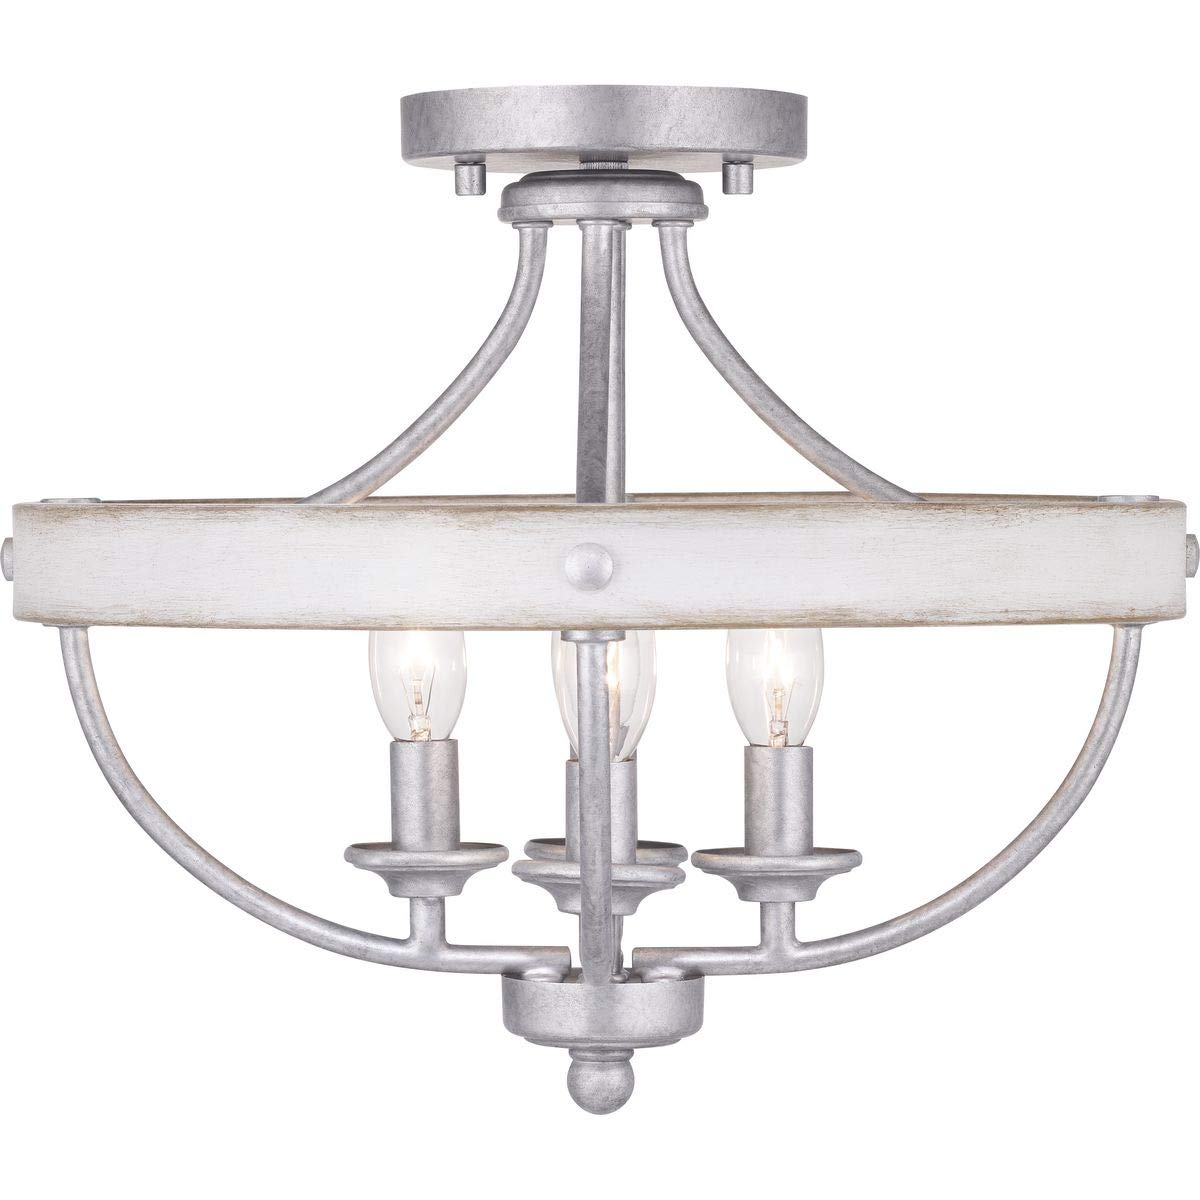
Figure 1: Progress Lighting Gulliver Collection Four-Light Semi-Flush Convertible Fixture.
Understanding Fixture Types
이 비디오는 이상을 제공합니다view of close-to-ceiling lighting trends, including flush mount and semi-flush mount fixtures, which can help in understanding the application of your Gulliver fixture.
Video 1: Close to Ceiling Lighting Trends by Progress Lighting. This video explains the differences and applications of flush mount and semi-flush mount ceiling light fixtures, providing context for the Gulliver Collection's design.
2. 안전 정보
Before beginning installation, carefully read and understand these instructions. Failure to do so may result in electric shock, fire, or other injuries that could be fatal or cause property damage. All wiring must be performed by a qualified electrician in accordance with national and local electrical codes.
- 경고: Disconnect power at the main circuit breaker or fuse box before installation or servicing.
- 주의: Risk of electric shock. Ensure the electrical supply is turned off before handling the fixture.
- 권장되는 와트를 초과하지 마십시오tag전자는 전구용입니다.
- 파손을 방지하기 위해 유리 부품을 조심스럽게 다루십시오.
3. 패키지 내용
Verify that all components are present before proceeding with installation. If any parts are missing or damaged, contact customer service.
- Light Fixture Assembly
- Mounting Hardware Kit (mounting strap, outlet box screws, mounting screws, wire connectors)
- Canopy/Cover Plate
- 지침서
4. 설치
필요한 도구 (포함되지 않음)
- Phillips 헤드 스크루 드라이버
- 납작한 스크루 드라이버
- 전선 스트리퍼
- 펜치
- 전기 테이프
- 안전 안경
설치 단계
- 전원 끄기: Locate the circuit breaker or fuse box that supplies power to the fixture location. Turn off the power completely.
- 마운팅 준비: Attach the mounting strap to the outlet box using the provided outlet box screws. Ensure the mounting strap is securely fastened.
- 배선: Connect the fixture's electrical wires to the corresponding household wires using the wire connectors. Connect the black wire (live) to the black wire, the white wire (neutral) to the white wire, and the bare copper or green wire (ground) to the household ground wire. Secure all connections with electrical tape.
- 마운트 고정 장치: Carefully lift the fixture and align it with the mounting strap. Secure the fixture to the mounting strap using the mounting screws.
- 전구 설치: Insert four E12 Candelabra base bulbs (not included) into the sockets. Do not exceed 60 watts per bulb.
- 복원력 : Once installation is complete and all connections are secure, restore power at the main circuit breaker or fuse box.
Converting to a Hanging Fixture
This fixture is designed to be convertible. If you wish to install it as a hanging fixture, refer to the detailed instructions provided in the package for chain length adjustment and secure hanging methods. This typically involves attaching a chain to the fixture and canopy, and adjusting the length to achieve the desired hanging height.

Figure 2: Dimensional drawing of the Gulliver Collection fixture.
5. 운영
Once installed and powered, the fixture operates like any standard ceiling light. Use your wall switch or dimmer (if installed) to turn the light on and off. Ensure compatible E12 Candelabra base bulbs are used for optimal performance.

Figure 3: Close-up of bulb sockets.
6. 유지관리
청소
To clean the fixture, ensure the power is turned off. Use a soft, dry cloth to wipe down the metal and glass surfaces. Avoid abrasive cleaners or solvents, as these can damage the finish.
전구 교체
Always turn off the power before replacing bulbs. Allow bulbs to cool before touching them. This fixture requires four E12 Candelabra base bulbs, with a maximum wattage of 60 watts per bulb. Using bulbs with higher wattag이는 과열을 일으켜 기기를 손상시키거나 화재 위험을 초래할 수 있습니다.
7. 문제 해결
| 문제 | 가능한 원인 | 해결책 |
|---|---|---|
| 불이 켜지지 않습니다 | 고정 장치에 전원이 공급되지 않음 느슨한 배선 연결 결함이 있는 전구 | 회로 차단기/퓨즈를 확인하세요 모든 배선 연결이 단단히 되어 있는지 확인하십시오 (전원을 끄십시오). 전구 교체 |
| 불빛이 깜빡인다 | 느슨한 전구 잘못된 전구 유형 느슨한 배선 연결 호환되지 않는 디머 스위치 | 전구를 조이십시오 Ensure E12 Candelabra base, 60W max bulbs are used 배선 연결 상태를 확인하십시오 (전원 끄기). Consult an electrician to check dimmer compatibility |
8. 사양
| 특징 | 세부 사항 |
|---|---|
| 상표 | 진행 조명 |
| 모델 번호 | P350117-141 |
| 고정물 유형 | 세미 플러시 컨버터블 |
| 색상 | Gray (with antique white accents) |
| 재료 | 합금강, 유리 |
| 제품 치수 | 15.25인치 길이 x 15.25인치 너비 x 12.63인치 높이 |
| 광원의 수 | 4 |
| 전구베이스 | E12 촛대 |
| 최대 와트tag전구당 e | 60 와트 |
| 권tage | 120 볼트 |
| 마무리 유형 | 아연 도금 |
| 실내/실외 사용 | 실내 |
| 조립이 필요합니다 | 예 |
| 품목 무게 | 6.28 파운드 |
9. 보증 및 지원
이 프로그레스 라이팅 조명기구는 보증 대상입니다. 1년 한정 보증. This warranty guarantees your satisfaction with your purchase and includes professional after-sales customer service support. For warranty claims or technical assistance, please contact Progress Lighting customer service.
보증 확인을 위해 구매 증빙서류를 보관하세요.


