1. 서론
This user manual provides comprehensive instructions for the Waveshare 4.3-inch Capacitive Touch Screen LCD. This display is designed for versatility, offering compatibility with various devices including Raspberry Pi, Jetson Nano, and Windows PCs. It features an 800x480 resolution IPS panel with capacitive touch functionality, making it suitable for a wide range of applications from embedded systems to desktop extensions.

Image: The Waveshare 4.3-inch Capacitive Touch Screen LCD, showcasing its compact size and touch interface.
2. 패키지 내용물
Verify that all items listed below are included in your package. If any items are missing or damaged, please contact Waveshare support.

Image: Contents of the Waveshare 4.3-inch LCD package, including the display, HDMI cable, USB cable, and adapters.
- 4.3inch HDMI LCD (B)
- HDMI 케이블
- USB Type A to Micro B Cable
- HDMI to Micro HDMI Adapter
- HDMI-HDMI 어댑터
- Screws pack (for mounting)
3. 사양 및 특징
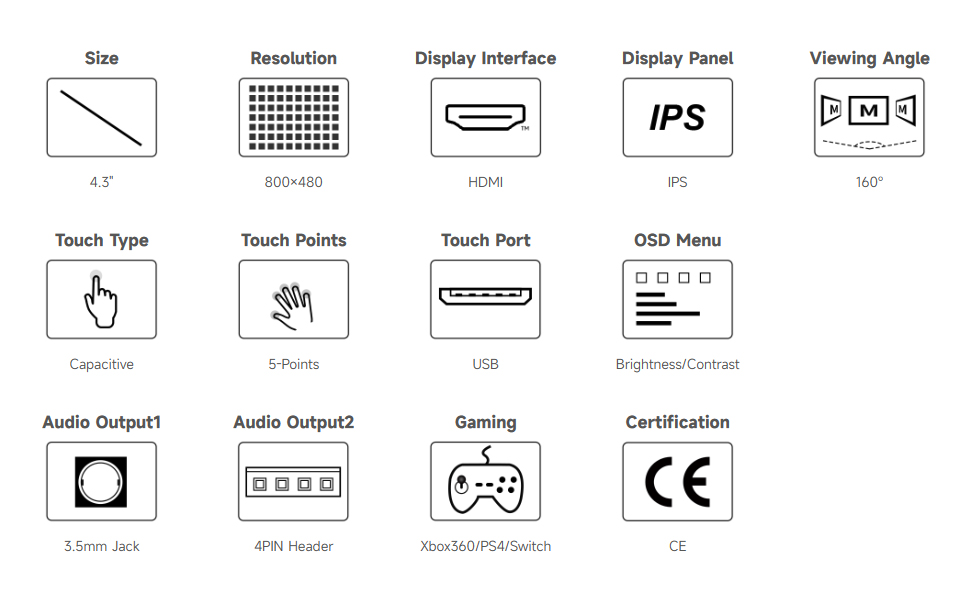
Image: Detailed specifications and features of the 4.3-inch HDMI Touch Display.
| 특징 | 설명 |
|---|---|
| 화면 크기 | 4.3인치 |
| 해결 | 800 × 480 hardware resolution |
| 디스플레이 패널 | IPS |
| View잉 각도 | 160° |
| 터치타입 | Capacitive, 5-points touch (depending on OS) |
| 터치 포트 | USB |
| 디스플레이 인터페이스 | HDMI |
| 오디오 출력 | 3.5mm Jack, 4PIN Header (for speaker connection) |
| OSD 메뉴 | Multi-language, for power management, brightness/contrast adjustment, etc. |
| 전원 입력 | 5V 직류 |
4. Device and System Support
The display offers broad compatibility with various computing platforms:

이미지: 이상view of compatible devices and operating systems, including Raspberry Pi, Jetson Nano, and Windows PCs.
- 라즈베리 파이: 모든 버전의 라즈베리 파이를 지원합니다.
- Supports Raspberry Pi OS, 5-points touch, driver free.
- Ubuntu/Kali/WIN10 IoT를 지원하며, 단일 터치 방식으로 작동하고 드라이버 설치가 필요 없습니다.
- Retropie를 지원하며, 별도의 드라이버 설치가 필요 없습니다.
- 젯슨 나노: 우분투 지원, 단일 터치 방식, 드라이버 설치 불필요
- PC: Supports Windows 11 / 10 / 8.1 / 8 / 7, 5-points touch, driver free.
- 게임 콘솔: Supports Xbox360, PS4, Switch (Display and Sound Only).
5. 설정 및 연결
Follow these steps to connect your Waveshare 4.3-inch LCD to your device. Connection methods may vary slightly depending on your host device.
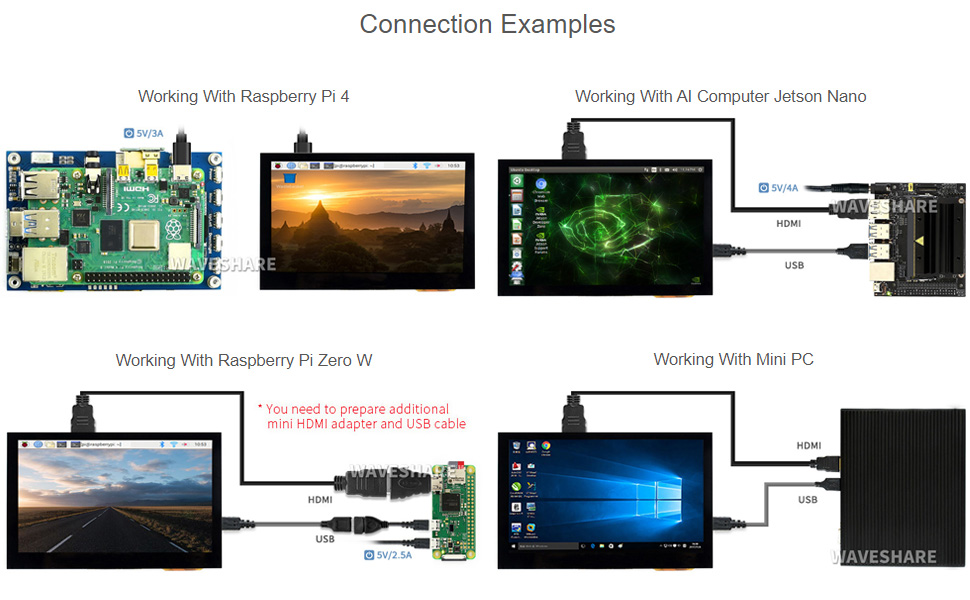
이미지: 시각적 examples of connecting the display to Raspberry Pi 4, Raspberry Pi Zero W, Jetson Nano, and a Mini PC.
5.1. 일반적인 연결 단계
- Connect the HDMI port of the display to the HDMI output of your host device using the provided HDMI cable or adapter.
- Connect the USB touch port of the display to a USB port on your host device using the provided USB cable. This provides power to the display and enables touch functionality.
- Ensure your host device is powered on. The display should automatically detect the video signal and power on.
5.2. Specific Connection Notes
- 라즈베리 파이 4의 경우: Use the provided HDMI to HDMI cable and USB cable. The display can be powered directly from the Raspberry Pi's USB port.
- For Raspberry Pi Zero W: An additional Mini HDMI to HDMI adapter and USB cable may be required (not included in standard package).
- For Jetson Nano / Mini PC: Connect via HDMI for video and USB for touch and power. Ensure adequate power supply for the Jetson Nano (e.g., 5V/4A).
6. 사용 설명서
6.1. 터치 컨트롤
The display features a capacitive touch screen supporting up to 5-points touch, depending on the operating system. No additional drivers are typically required for touch functionality on supported systems.
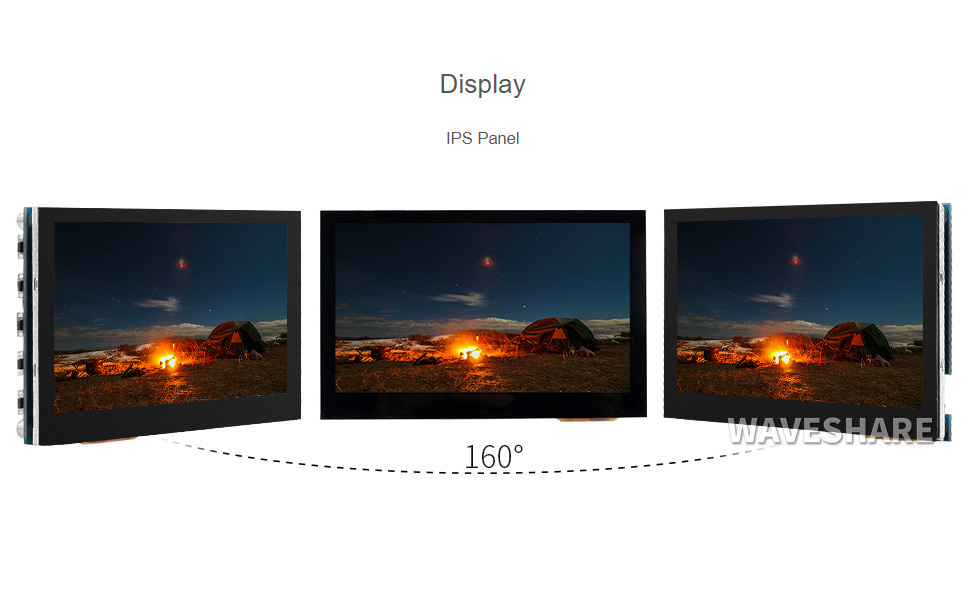
Image: Demonstration of touch control on the display, showing interaction with a graphical user interface.
6.2. OSD 메뉴 탐색
The On-Screen Display (OSD) menu allows for various adjustments to the display settings. Use the physical buttons on the side of the display to navigate the OSD menu.
- 메뉴 버튼: OSD 메뉴로 진입하거나 선택 사항을 확인합니다.
- Up/Left Button: Navigates up or left in the menu, or increases a value.
- Down/Right Button: Navigates down or right in the menu, or decreases a value.
- 돌아가기/종료 버튼: Goes back to the previous menu or exits the OSD menu.
- 전원 버튼: 디스플레이를 켜거나 끕니다.
Common OSD settings include brightness, contrast, color temperature, aspect ratio, and input source selection.
6.3. 게임
The display can be used with game consoles like Xbox360, PS4, and Nintendo Switch for display and sound output. Connect the console via HDMI.
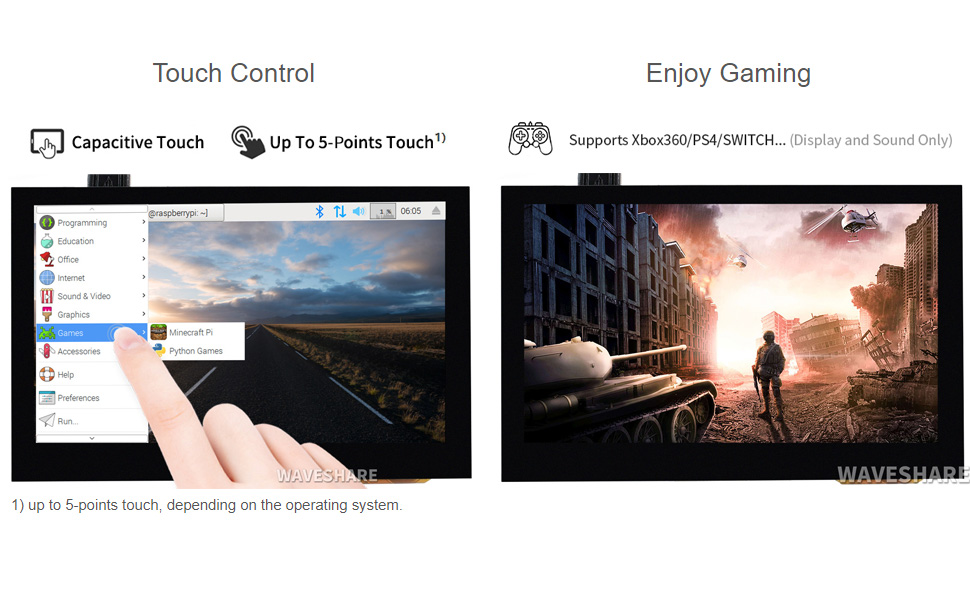
Image: The display showing a game, demonstrating its capability for gaming applications.
7. 외관 및 치수
Refer to the diagram below for the physical layout and dimensions of the display board, including port locations and button functions.

Image: Technical diagram showing the dimensions (in mm) and labeled components of the 4.3-inch HDMI LCD (B) board.
| 아니요. | 요소 |
|---|---|
| 1 | 터치 포트 |
| 2 | 스피커 헤더 |
| 3 | Audio jack (HP) |
| 4 | HDMI 포트 |
| 5 | 전원 입력 |
| 6 | 전원 버튼 |
| 7 | 메뉴 버튼 |
| 8 | Up/Left button |
| 9 | Down/Right button |
| 10 | 돌아가기/나가기 버튼 |
Dimensions: Approximately 106.1mm (width) x 67.8mm (height).
8. 문제 해결
- 디스플레이 없음 / 검은색 화면:
- Ensure the HDMI cable is securely connected to both the display and the host device.
- Verify the host device is powered on and outputting video.
- Check the power connection to the display. The display requires 5V power, typically supplied via the USB connection.
- If using Raspberry Pi, ensure the
config.txtfile is correctly configured for the display resolution (800x480). Refer to Waveshare's online user manual for specificconfig.txt설정.
- 터치가 작동하지 않습니다:
- Ensure the USB cable is connected from the display's touch port to a USB port on your host device.
- For some Linux distributions (e.g., older versions of Ubuntu/Kali), specific drivers or calibration might be needed, though it's generally driver-free. Refer to Waveshare's online resources.
- On Windows, ensure touch screen drivers are correctly installed (usually automatic).
- Flickering / Unstable Display:
- Ensure the power supply to the host device and the display is stable and sufficient.
- 다른 HDMI 케이블을 사용해 보세요.
- 오디오 없음:
- Ensure the 3.5mm audio jack or speaker header is correctly connected.
- Verify that the audio output is selected correctly on your host device (e.g., HDMI audio output).
- Note that the display's built-in audio output quality may be basic; external speakers are recommended for better sound.
For more detailed troubleshooting and specific software configurations, please refer to the official Waveshare online user manual: 사용 설명서 (PDF).
9. 보증 및 지원
Waveshare products are designed for reliability and performance. For warranty information and technical support, please visit the official Waveshare web사이트를 방문하거나 고객 서비스에 직접 문의하세요.
- 웨이브쉐어 공식 스토어: Visit Waveshare Store on Amazon
- 온라인 사용자 매뉴얼: PDF 사용자 가이드 다운로드
- 연락하다: Refer to the Waveshare website for contact details for technical support and customer service.
10. Product Certification
This product is HDMI Certified, ensuring compliance with HDMI standards for high-definition multimedia interfacing.

Image: Certificate indicating HDMI certification for the adapter, issued to Shenzhen Weixue Electronics Co. Ltd.
For verification of the HDMI certification, please visit the official HDMI Licensing Administrator website and use the provided QR code or link: HDMI Certification Verification.