1. 서론
The SilverStone RM21-304 is a high-performance 2U rackmount server chassis designed for professional storage environments. This manual provides detailed instructions for the proper setup, operation, and maintenance of your RM21-304 chassis to ensure optimal performance and longevity.
Key features include hard drive trays compatible with 2.5" or 3.5" drives, a fan assembly with motherboard support for up to Micro-ATX form factor, and flexible mounts for various power supply types (2U single/redundant server, PS2 ATX). The design also incorporates ergonomic, tool-less rail designs for simplified rack integration.
2. 안전 정보
경고:
- 부품을 설치하거나 제거하기 전에 항상 전원을 차단하십시오.
- Wear anti-static wrist straps to prevent electrostatic discharge (ESD) damage.
- Ensure proper grounding of the chassis and all connected equipment.
- Do not operate the chassis with the cover removed in a production environment.
- Refer to component manuals for specific installation requirements.
3. 패키지 내용
설치를 진행하기 전에 모든 구성 요소가 있는지 확인하세요.
- SilverStone RM21-304 Chassis
- Accessory Kit (screws, standoffs, etc.)
- 빠른 시작 가이드(이 문서)
- Optional: Sliding Rail Kit (if purchased separately)

Figure 3.1: Included accessory kit with various screws for different components.
4. 설정 및 설치
4.1 섀시 준비
Before installing components, ensure the chassis is placed on a stable, flat surface. Remove the top cover by unscrewing the retaining screws at the rear of the chassis.

그림 4.1: 내부 view of the RM21-304 chassis, showing fan assembly and drive bays.
4.2 마더 보드 설치
- Install the I/O shield into the chassis rear panel.
- Align the Micro-ATX motherboard with the standoffs inside the chassis.
- 액세서리 키트에 포함된 적절한 나사를 사용하여 마더보드를 고정하십시오.
4.3 Drive Installation (2.5" / 3.5" Drives)
The RM21-304 supports both 2.5" and 3.5" drives in its hot-swappable drive bays.
- Open the latch on the drive tray.
- Insert the 2.5" or 3.5" drive into the tray and secure it with screws.
- Slide the populated drive tray into an available drive bay until it clicks into place.

Figure 4.2: Close-up of a drive tray being inserted into the chassis.
4.4 전원 공급 장치 설치
The chassis accommodates 2U single/redundant server or PS2 (ATX) power supplies. Install the power supply according to its manufacturer's instructions, securing it to the chassis rear panel.
4.5 연결 케이블
Connect all necessary cables, including power, SATA, and front panel connectors (USB, power/reset buttons, LED indicators) to the motherboard and drives.
Video 4.1: Demonstrates how to connect cables to the motherboard and install the sliding rail. This video is provided by CICHENG INC, a seller.
Video 4.2: Illustrates the process of connecting cables within the chassis to the motherboard and installing the rail. This video is provided by CICHENG INC, a seller.
4.6 Optional: Sliding Rail Installation
For easy rack integration, optional sliding rails can be installed. Follow the instructions below to attach the rails to the chassis and the server rack.
- Separate the inner rail from the outer rail by pressing the release tab.
- Attach the inner rails to the sides of the RM21-304 chassis using the provided screws.
- Attach the outer rails to the server rack posts, ensuring proper alignment and spacing.
- Slide the chassis with the inner rails into the outer rails mounted on the rack until it locks securely.
Video 4.3: Detailed guide on how to install the sliding rail with the chassis and cabinet. This video is provided by CICHENG INC, a seller.
5. 사용 설명서
5.1 전원 켜기/끄기
Press the power button on the front panel to turn the server on. To power off, perform a graceful shutdown through the operating system, then press the power button if necessary.
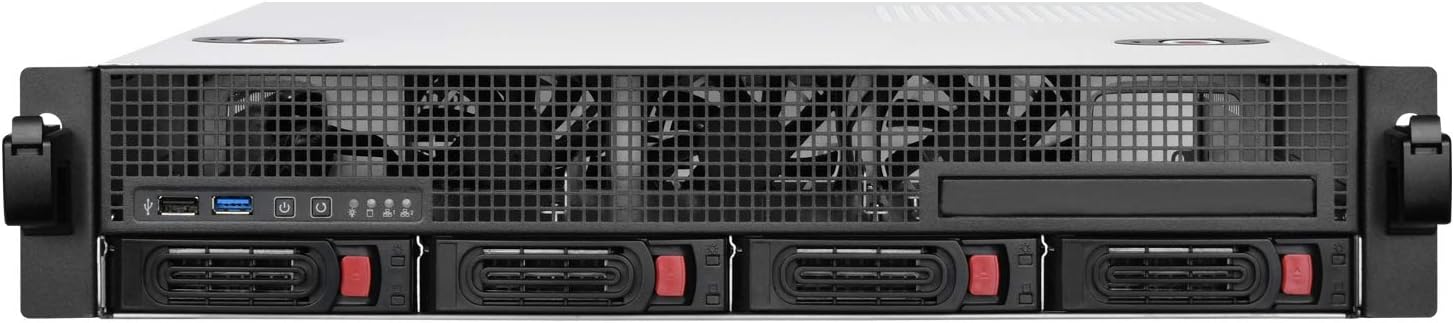
Figure 5.1: Front panel of the RM21-304, highlighting power/reset buttons and USB ports.
5.2 LED 표시등
The front panel features LED indicators for system status:
- 녹색 LED : 전원 표시등.
- 파란색 LED: Data activity indicator for drives.
- Other LEDs may indicate network activity or system warnings, depending on motherboard configuration.
Video 5.1: Explains the meaning of the Green LED (Power) and Blue LED (Data) indicators on the chassis. This video is provided by CICHENG INC, a seller.
6. 유지관리
6.1 청소
Regularly clean the chassis exterior with a soft, dry cloth. For internal cleaning, disconnect power and use compressed air to remove dust from fans and components. Ensure all dust filters are clean to maintain optimal airflow.
6.2 팬 유지 관리
The chassis features a fan assembly for cooling. Periodically check the fans for dust buildup and ensure they are spinning freely. Replace any noisy or malfunctioning fans promptly.

그림 6.1: 내부 view showing the fan assembly within the chassis.
7. 문제 해결
- 전원 없음: Check all power connections, including the power supply unit (PSU) and wall outlet. Verify the power button is functioning.
- 시스템이 부팅되지 않음: Ensure all internal components (motherboard, RAM, CPU, drives) are correctly seated and connected. Check for any POST error codes or beeps from the motherboard.
- 과열: Verify all fans are operational and free of obstructions. Ensure proper airflow within the rack and server room. Clean dust filters.
- Drive Detection Issues: Check SATA data and power connections to the drives. Ensure drives are properly seated in their trays.
8. 사양
| 특징 | 세부 사항 |
|---|---|
| 상표 | 실버스톤 |
| 모델 번호 | SST-RM21-304 |
| 폼 팩터 | 2U 랙마운트 |
| 치수(길이x너비x높이) | 16.93 x 3.48 x 18.9 인치 |
| 무게 | 21.5파운드 |
| 재료 | 금속 |
| 마더보드 지원 | 마이크로 ATX |
| 드라이브 베이 | Compatible with 2.5" or 3.5" Drives |
| 전원 공급 지원 | 2U Single/Redundant Server, PS2 (ATX) |
| 냉각 | Fan Assembly Included |
9. 보증 및 지원
For warranty information and technical support, please refer to the official SilverStone web사이트를 방문하거나 고객 서비스 부서에 문의하세요. 보증 청구를 위해 구매 증빙 자료를 보관하세요.
온라인 리소스:
- SilverStone Official Web대지: www.silverstonetek.com
- Product Page (RM21-304): Amazon 제품 페이지


