1. 서론
This manual provides comprehensive instructions for the operation, maintenance, and troubleshooting of the OBDSTAR X300 DP PAD PLUS, also known as the X300 Key Master DP Plus. This device is a powerful diagnostic tool designed for automotive professionals, offering advanced functions for immobilizer systems, special vehicle functions, and ECU management.
2. 제품 오버view 및 기능
The OBDSTAR X300 DP PAD PLUS is an advanced automotive diagnostic and key programming tool. It features an 8.0-inch touchscreen and an Android 5.1.1 operating system, providing a user-friendly interface for various automotive tasks.
주요 특징:
- Built-in VCI Box: Enhances communication stability and eliminates concerns about losing an external VCI.
- 8-inch Touchscreen and Back Bracket Design: Offers an improved user experience with a large display and convenient stand for hands-free operation. The device can be charged directly via the OBD interface.
- 3-in-1 P001 Programmer: Includes EEPROM adapter, RFID adapter, and Key Renew adapter for comprehensive key programming capabilities.
- 강력한 기능: Supports IMMO (Immobilizer), Adjustment, Diagnosis, and a wide range of Special Functions including Oil Reset, ABS, Battery Matching, ECU Programming, EPB, Throttle Programming, Airbag Reset, TPMS, Steering Angle Reset, OBDII, DPF, Injector Code, Suspension Matching, Gear Learning, CVT Learning, EEPROM, Key Renewing, and ECU Cloning.
- ECU Clone Function: Allows for direct duplication of ECU data, enabling replacement of new or used ECUs without online matching or dismantling.
- Switch Activation Function: Facilitates testing and verification of vehicle instruments or audio systems, reducing the need for multiple startup platforms.
제품 구성 :

그림 2.1: 앞쪽 view of the OBDSTAR X300 DP PAD PLUS diagnostic tablet, showing its 8-inch touchscreen display with various application icons.
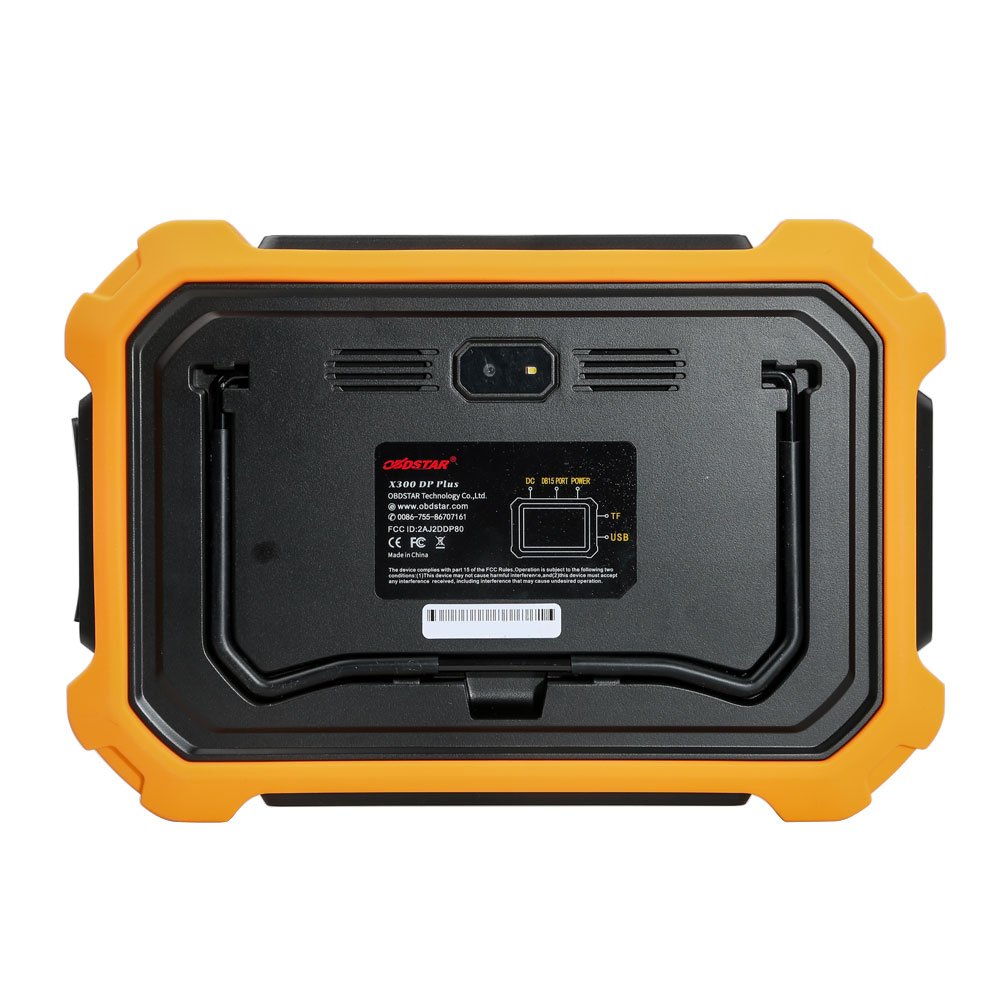
그림 2.2: 뒤쪽 view of the OBDSTAR X300 DP PAD PLUS, highlighting the built-in VCI box, power input, TF card slot, and USB port.
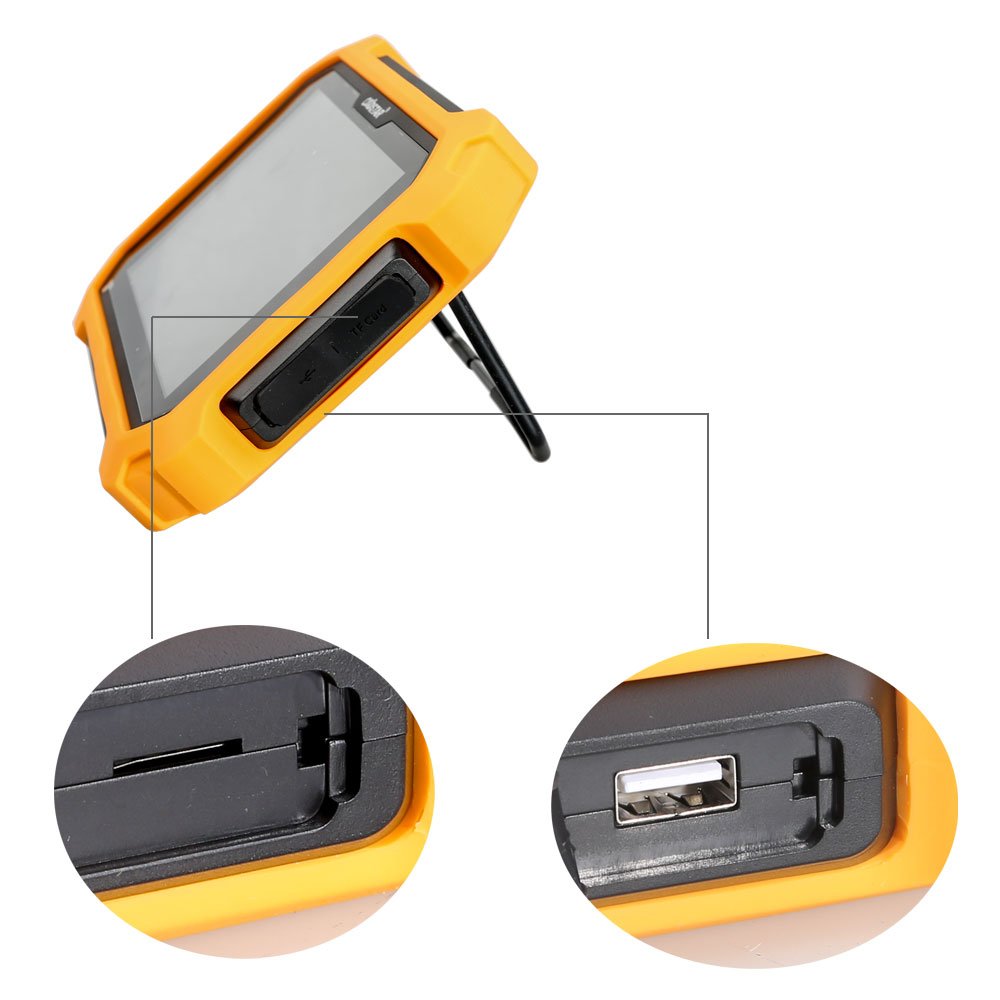
그림 2.3: 옆 view of the OBDSTAR X300 DP PAD PLUS, showing the TF card slot and USB port with a pull-out stand.

그림 2.4: The OBDSTAR RT100 Remote Tester, used for checking remote key frequencies and infrared signals.

그림 2.5: The OBDSTAR C002 circuit board, part of the P001 programmer, used for specific programming tasks.

그림 2.6: The OBDSTAR C001 circuit board, another component of the P001 programmer, designed for various programming functions.

그림 2.7: The OBDSTAR X300 DP PAD PLUS kit displayed open in its carrying case, showing the main unit and various cables and adapters.

그림 2.8: The durable carrying case for the OBDSTAR X300 DP PAD PLUS, designed for protection and portability.

그림 2.9: 완전한 view of all components included with the OBDSTAR X300 DP PAD PLUS, including the main unit, cables, adapters, and programmers.
3. 설정 가이드
- 짐 풀기: Carefully remove all components from the packaging. Verify that all items listed in the product overview 존재합니다.
- 초기 청구 : Connect the device to a power source using the provided adapter or directly via the vehicle's OBD-II port for initial charging. Ensure the device is fully charged before first use.
- 전원 켜기: Press and hold the power button to turn on the device. The Android operating system will boot up.
- 네트워크 연결 : Connect the device to a Wi-Fi network to enable software updates and online functions. Navigate to "Settings" and select "Wi-Fi" to configure.
- 소프트웨어 업데이트: It is recommended to perform a software update upon first use to ensure the latest features and vehicle coverage. Access the "Upgrade" icon on the main screen.
- 액세서리 연결: Connect necessary adapters (e.g., P001 programmer, C001/C002 circuit boards) and cables as required for specific diagnostic or programming tasks.
4. 사용 설명서
The OBDSTAR X300 DP PAD PLUS operates through a touch-based interface. Below are general steps for common operations:
4.1. Vehicle Diagnosis
- 차량에 연결: Plug the OBD-II cable into the vehicle's diagnostic port and connect the other end to the X300 DP PAD PLUS.
- Select "Diag Program": On the main screen, tap the "Diag Program" icon.
- 차량 선택: Choose the vehicle manufacturer, model, and year from the menu.
- 시스템 검사: Select the desired diagnostic function (e.g., Read DTCs, Clear DTCs, Live Data, Actuation Test) and follow the on-screen prompts.
4.2. IMMO (Immobilizer) Functions
- Access IMMO: From the main menu, select the "IMMO" function.
- 기능 선택: Select the specific IMMO operation, such as "Key Programming," "Remote Programming," "EEPROM," or "Renew Key."
- 프롬프트를 따르십시오: The device will guide you through the necessary steps, which may include connecting the P001 programmer or other adapters.
4.3. 특수 기능
The device supports numerous special functions for vehicle maintenance and service resets.
- Access Special Functions: Navigate to the "Special Functions" section from the main menu.
- 서비스를 선택하세요: Choose the required service reset or special function (e.g., Oil/Service Reset, EPB, TPMS, Battery Matching).
- 실행하다: 화면의 지시에 따라 선택한 기능을 수행하세요.
4.4. ECU Clone
This function allows for the duplication of ECU data, facilitating ECU replacement.
- Select ECU Clone: Choose the "ECU Clone" option.
- Identify ECU: Follow prompts to identify the original ECU.
- 데이터 읽기: The device will read all data from the original ECU.
- 데이터 쓰기: Write the copied data to the new or used ECU. This process is designed to be non-dismantling and can often be done via OBD.
5. 유지관리
- 청소: 부드럽고 마른 천을 사용하여 기기를 닦으세요. 연마성 세척제나 용제는 사용하지 마세요.
- 저장: Store the device in its protective carrying case in a cool, dry place when not in use. Avoid extreme temperatures.
- 소프트웨어 업데이트: Regularly check for and install software updates via Wi-Fi to ensure optimal performance, expanded vehicle coverage, and new features.
- 배터리 관리 : To prolong battery life, avoid fully discharging the battery frequently. Charge the device regularly, especially if stored for extended periods.
- 케이블 검사: Periodically inspect all cables and connectors for signs of wear or damage. Replace damaged components immediately.
6. 문제 해결
| 문제 | 가능한 원인 | 해결책 |
|---|---|---|
| 장치의 전원이 켜지지 않습니다. | 배터리 부족; 전원 버튼을 충분히 오래 누르지 않음; 기기 오작동. | 기기를 최소 30분 동안 충전하세요. 전원 버튼을 5~10초 동안 길게 누르세요. 문제가 지속되면 고객 지원팀에 문의하세요. |
| 차량에 연결할 수 없습니다. | Loose OBD-II connection; Vehicle ignition off; Damaged cable; Incompatible vehicle protocol. | Ensure cable is securely connected. Turn vehicle ignition to ON position. Try a different OBD-II cable if available. Verify vehicle compatibility. |
| 소프트웨어 업데이트에 실패했습니다. | Unstable Wi-Fi connection; Insufficient storage; Server issues. | Ensure strong Wi-Fi signal. Clear some storage space if needed. Try updating again later. |
| Functions not working for specific car model. | Software not updated; Specific model not supported; Incorrect procedure. | Ensure software is up to date. Consult the official OBDSTAR vehicle coverage list. Review the operating instructions for the specific function. |
7. 기술 사양
- 운영 체제: 안드로이드 5.1.1
- CPU: Exynos4418 Dual Core ARM Cortex A9 1.4GHz
- 배터리: 3700mA, rechargeable polymer lithium battery
- 확장 메모리 카드: 32G 마이크로 SD(TF) 카드 지원
- 메모리 용량 : 1GB
- 저장 용량: 32GB
- 액정표시장치: 8.0 인치
- LCD 해상도: 1280*800
- 터치 스크린: 정전식 터치스크린
- 카메라: 5 mega rear view 카메라
- 와이파이: 지원됨
- 작동 온도: -10℃ ~ 55℃ (14℉ ~ 131℉)
- 보관 온도: -20℃ ~ 70℃ (-4°F ~ 158°F)
- 무게: 약 1.0kg(2.2파운드)
- 차원: 254mm*174mm*35mm (10 in * 6.85 in * 1.38 in)
8. 보증 및 지원
OBDSTAR products typically come with a manufacturer's warranty. For specific warranty terms and conditions, please refer to the warranty card included with your product or visit the official OBDSTAR web사이트. 구매 증빙 자료로 구매 영수증을 보관하세요.
For technical support, software updates, or service inquiries, please contact OBDSTAR customer service or your authorized dealer. You may also find additional resources and FAQs on the official OBDSTAR web대지: www.obdstar.com.
When contacting support, please have your product model (X300 DP PAD2) and serial number ready.


