1. 소개 및 이상view
This manual provides essential information for the proper installation, operation, and maintenance of your COMTEC HDR360G 360-degree drive recorder. Please read this manual thoroughly before using the product to ensure safe and effective operation.

Image 1.1: The COMTEC HDR360G 360-Degree Drive Recorder unit.
2. 주요 특징
2.1. 360-Degree All-Direction Recording
The HDR360G records 360 degrees in all directions: front, back, left, and right. This ensures comprehensive coverage, capturing not only frontal accidents but also rear-end collisions, aggressive driving incidents, and close calls from the sides and rear.
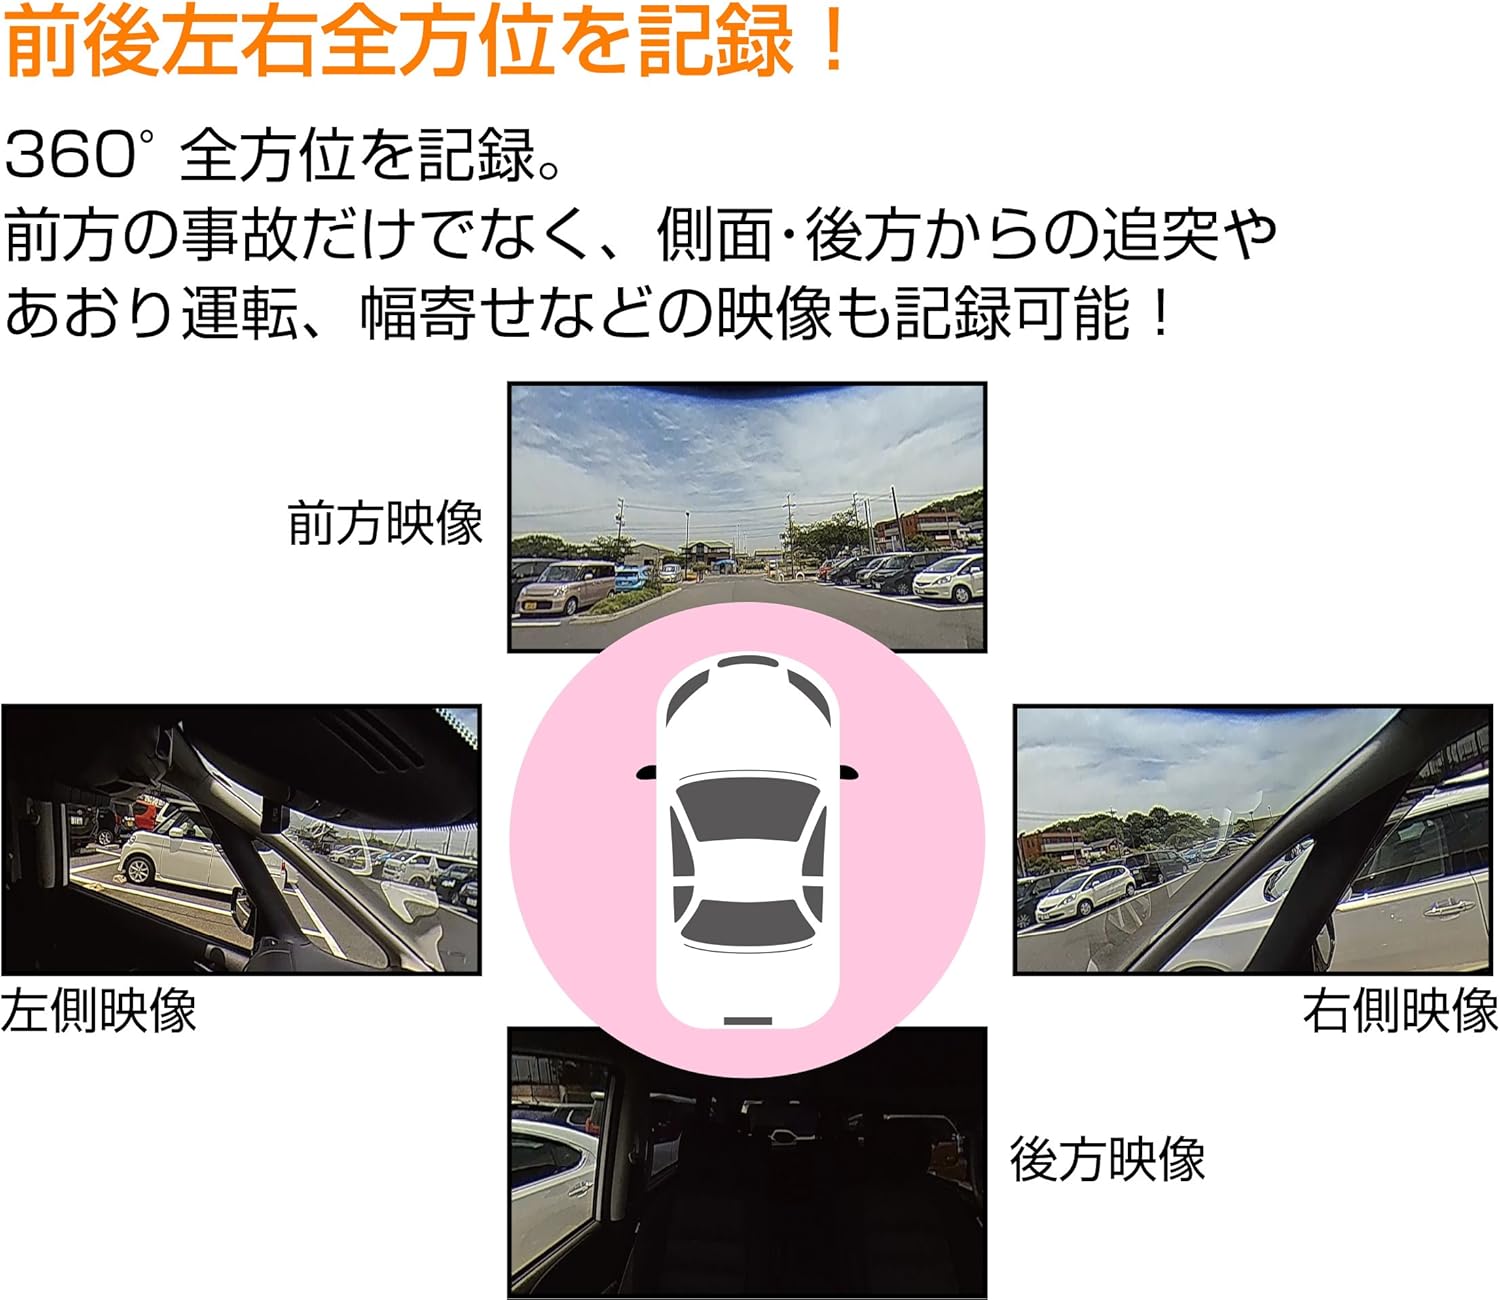
Image 2.1: Visual representation of the 360-degree recording area, covering front, left, right, and rear perspectives around the vehicle.
2.2. Wide Vertical Field of View (240°)
The device features a vertical field of view of 240 degrees, exceeding 180 degrees. This wide vertical angle ensures that traffic lights, which were often difficult to capture with conventional 360-degree drive recorders, are now clearly recorded.

Image 2.2: Diagram illustrating the 240-degree vertical field of view, highlighting its ability to capture objects high above the vehicle.
2.3. Two-Split Recording Display
The HDR360G supports a two-split recording function that displays 360-degree footage side-by-side on the device's LCD. This allows for easy checking of front, side, and rear footage directly on the unit without the need for dedicated view어 소프트웨어.

Image 2.3: The dashcam's screen displaying footage in a two-split format, showing both front and side view동시에.
2.4. Parking Surveillance Function
When equipped with the optional parking surveillance direct wiring cord (HDROP-14), the device continues 360-degree recording for up to 12 hours even with the engine off. It detects impacts and records footage before and after the event, protecting your vehicle while parked.
2.5. Discreet Installation
The product is designed for direct fixation to the front windshield, allowing for a discreet and clean installation that does not obstruct the driver's view.
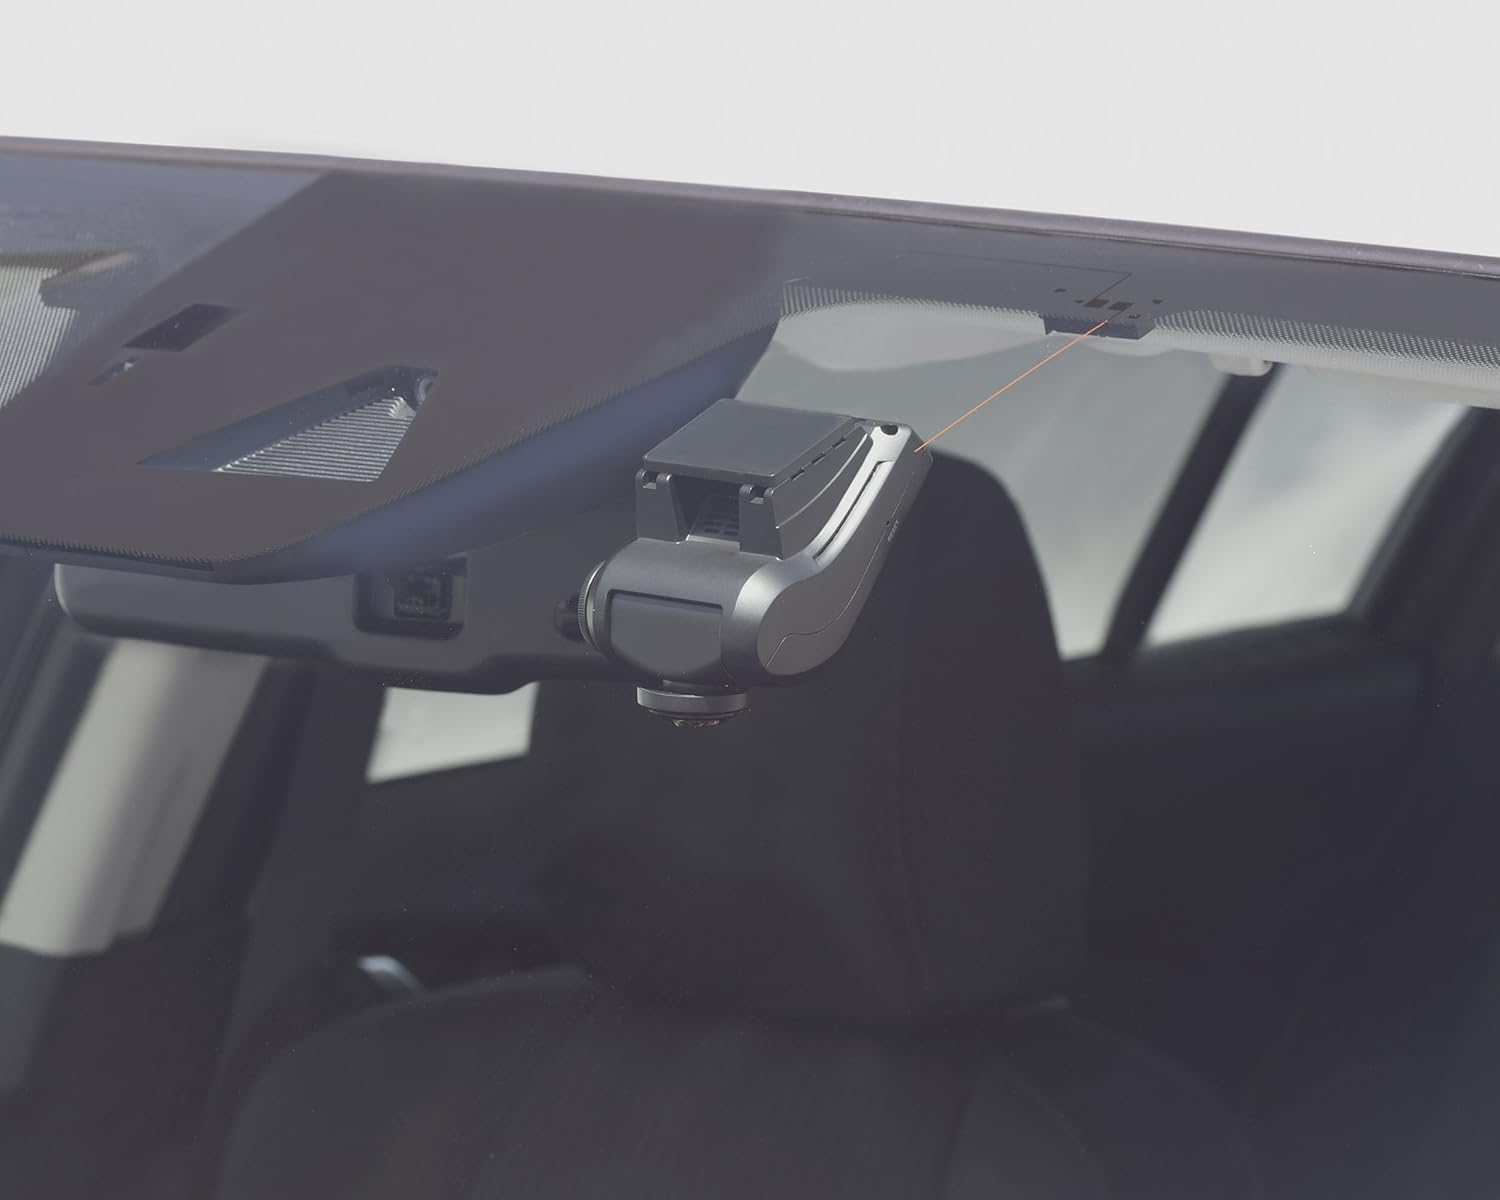
Image 2.4: The COMTEC HDR360G dashcam installed on a car's front windshield, showing its compact and unobtrusive placement.
2.6. WDR(광역 동적 범위)
The WDR function performs image correction to reduce whiteout and black crush, making the recording strong against backlighting conditions. This feature cannot be turned off.
2.7. LED Traffic Light Compatibility
The HDR360G records reliably even with different power frequencies used in Eastern and Western Japan, ensuring consistent performance with LED traffic lights nationwide.
2.8. 향상된 야간 시야
Equipped with a large 1/2.5-inch image sensor, the device records clearer images than previous models. This larger sensor also significantly improves brightness during night recordings.
2.9. Three Recording Functions
- Constant Recording: 레코드 푸tage continuously from engine ON to engine OFF. Recording duration varies based on settings and microSDHC card capacity. Older file카드 용량이 가득 차면 데이터가 자동으로 덮어쓰여집니다.
- 임팩트 레코딩: When the built-in G-sensor detects an impact, the device automatically saves the footage as impact recording data. This data is protected from being overwritten by constant recording.
- 수동 녹음: Pressing a dedicated switch allows you to record footage at any desired moment. This footage is also saved as manual recording data and protected from overwriting.
2.10. Safety Functions for Recorded Footage
- 백업 기능: In case of power loss due to an accident, the built-in supercapacitor prevents file corruption and protects the recorded footage.
- SD Card Check Function: The device checks the microSDHC card at startup. If the card is damaged, an abnormality is displayed on the LCD, preventing missed recordings due to faulty storage.
2.11. GPS 기능
Equipped with GPS, the HDR360G records your vehicle's driving speed and location information along with the video data. Date and time information is automatically corrected by GPS, eliminating the need for manual settings.
2.12. Dedicated View어 소프트웨어
The included microSDHC card contains dedicated viewer software. This software allows you to review recorded data on your computer, including video, audio, and G-sensor information. With GPS, you can also display your vehicle's driving trajectory on Google Maps and check driving speed. Recorded data can be converted to video or still images and saved to your computer. Footage recorded with round settings can be viewed in three patterns (Round, 16:9, Panorama) using the view어 소프트웨어.
3. 설정
3.1. 패키지 내용
설치하기 전에 모든 구성 요소가 있는지 확인하세요.
- HDR360G Main Unit
- 장착 브래킷
- Cigar Plug Power Cable (for 12V/24V vehicles)
- Dedicated microSDHC Card (16GB, Class 10)
- 사용 설명서 (본 문서)
3.2. 설치 위치
Install the main unit directly onto the front windshield, ensuring it does not obstruct the driver's view or interfere with airbags. Choose a location that allows for a clear view of the road and easy access to controls.
3.3. 전원 연결
Connect the cigar plug power cable to your vehicle's cigar lighter socket. Ensure the cable is routed safely and does not interfere with driving. For parking surveillance, the optional direct wiring cord (HDROP-14) is required and should be installed by a qualified technician.
3.4. microSDHC Card Insertion
Insert the dedicated microSDHC card into the card slot on the main unit. Ensure it is inserted correctly until it clicks into place.
4. 사용 설명서
4.1. 초기 시작
Once connected to power and the engine is started, the device will automatically power on and begin constant recording. The LCD will display the current view 그리고 녹화 상태.
4.2. 메뉴 탐색
Use the buttons on the device (MENU, OK, UP, DOWN) to navigate through settings and playback options. Refer to the on-screen prompts for specific functions.
4.3. Playback on Device
In the menu, select 'Playback' to review 기록된 footage. You can switch between different recording modes (constant, impact, manual) and view the two-split display.
4.4. 수동 녹음
Press the designated manual recording button to instantly save a segment of footage as manual recording data.
4.5. Parking Surveillance Activation
If the optional parking surveillance direct wiring cord is installed, the parking surveillance mode will activate automatically when the engine is turned off. The device will monitor for impacts and record accordingly.
5. 유지관리
5.1. microSDHC Card Management
Regularly format the microSDHC card to maintain optimal recording performance and prevent data corruption. Formatting can be done through the device's menu. It is recommended to format the card at least once a month.
5.2. Cleaning the Lens and Unit
Gently wipe the camera lens and the main unit with a soft, dry cloth. Avoid using abrasive cleaners or solvents, as they may damage the device.
5.3. 펌웨어 업데이트
Check the COMTEC official website periodically for firmware updates. Keeping your device's firmware up-to-date ensures the best performance and access to new features.
6. 문제 해결
6.1. 장치 전원이 켜지지 않음
- Check if the power cable is securely connected to both the device and the vehicle's power source.
- Ensure the vehicle's power source (e.g., cigar lighter socket) is functioning correctly.
6.2. Recording Issues / SD Card Error
- If an SD card error message appears, try formatting the microSDHC card through the device's menu.
- If formatting does not resolve the issue, the microSDHC card may be damaged and require replacement. Use a Class 10 microSDHC card (8GB to 32GB recommended).
- Ensure the microSDHC card is inserted correctly.
6.3. GPS Not Receiving Signal
- 장치에 명확한 내용이 있는지 확인하십시오. view of the sky, away from obstructions like metal tinting or other electronic devices that might interfere with the signal.
- It may take a few minutes for the GPS to acquire a signal after startup, especially in new locations.
6.4. 야간 화질 저하
- Ensure the windshield area in front of the camera lens is clean and free from dirt or smudges.
- While the device has enhanced night vision, extreme low-light conditions may still affect clarity.
7. 사양
| 카메라 센서 | 1/2.5인치 CMOS 센서 |
| 유효 픽셀 | Max 3.4 Million Pixels |
| Lens Angle (Horizontal) | 360° |
| Lens Angle (Vertical) | 240° |
| F-값 | 1.8 |
| 렌즈 소재 | 유리 |
| 파워볼tage | 직류12V/24V |
| 최대 전류 소비 | Normal: Under 400mA / Supercapacitor Charging: Under 900mA |
| 작동 온도 | -10°C ~ 60°C |
| 프레임 속도 | 29.1fps (LED signal compatible) |
| GPS | 예 |
| 기록 매체 | microSDHC card (8GB-32GB, Class 10 recommended) |
| G센서 | Yes (0.1G to 1.0G adjustable in 0.1G increments) |
| LCD 크기 | 2.4인치 |
| 본체 크기 (가로 x 세로 x 두께) | 66mm x 110mm x 52mm |
| 무게 | 146g |
| 녹화 해상도 | 1856x1856 (Round setting) |
7.1. Approximate Recording Times (16GB microSDHC card)
- Round Setting: Approximately 90 minutes
- Two-Split Setting: Approximately 100 minutes
8. 보증 및 지원
8.1. 제품 보증
The COMTEC HDR360G comes with a 3년 제품 보증 from the date of purchase. This warranty covers manufacturing defects. Consumable parts are excluded from this warranty. Please retain your proof of purchase for warranty claims.
8.2. Noise Countermeasures
This product incorporates noise countermeasures to minimize interference with digital terrestrial broadcasting reception and car navigation GPS reception (according to COMTEC standards).
8.3. 연락처 정보
For technical support, warranty claims, or inquiries, please refer to the contact information provided on the official COMTEC web사이트 또는 구매 시 포함된 문서를 참조하세요.


