소개
Thank you for choosing the Genius GLT-85.4D 4-Channel Class-D Car Amplifier. This compact, high-performance amplifier is designed to deliver exceptional audio quality and power efficiency for your vehicle's sound system. This manual provides essential information for proper installation, operation, and maintenance of your amplifier. Please read it thoroughly before attempting installation or use.
안전 정보
설치 및 작동 중에는 항상 다음 안전 예방 조치를 준수하세요.
- Disconnect the vehicle's negative battery terminal before any electrical work to prevent short circuits.
- Ensure all wiring is properly insulated to prevent damage and electrical hazards.
- 마운트하다 amplifier securely in a dry, well-ventilated area, away from direct sunlight, heat sources, and moisture.
- 본 설명서에 명시된 대로 전원, 접지 및 스피커 연결에는 적절한 굵기의 전선을 사용하십시오.
- 작동하지 마십시오 amplifier if it is damaged or malfunctioning. Refer to the troubleshooting section or seek professional assistance.
- 유지하다 amp아이들에게서 멀리 떨어져 있습니다.
패키지 내용
패키지에 모든 품목이 들어 있는지 확인하세요.
- Genius GLT-85.4D 4-Channel Amp리퍼
- 장착 하드웨어(나사)
- 사용 설명서 (본 문서)
제품 끝view
The Genius GLT-85.4D is a compact 4-channel Class-D amplifier designed for high efficiency and powerful audio output. Its nanotechnology and SMD components contribute to its small size and robust performance.
Amp리파이어 탑 View

이 이미지는 상단을 보여줍니다 view of the Genius GLT-85.4D amplifier, highlighting its compact design and the "GENIUS AUDIO" branding along with the model number "GLT-85.4D" and "1000wMax" power rating.
Control Panel Layout (Input Side)
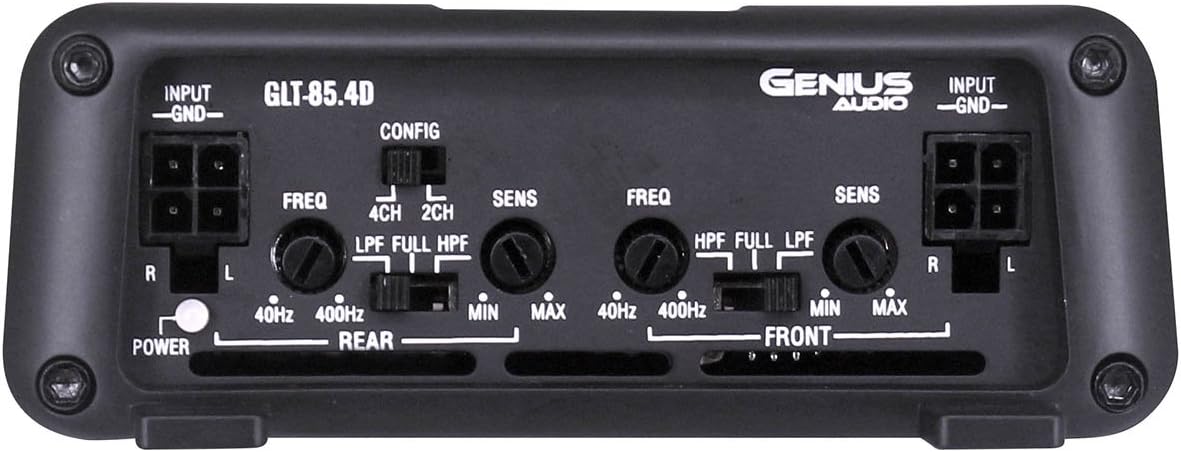
This image displays the input side of the GLT-85.4D amplifier, detailing the various controls and connections. It includes RCA input terminals (R, L) for both Rear and Front channels, gain controls (SENS MIN/MAX), frequency adjustment knobs (FREQ 40Hz-400Hz), and crossover switches (LPF, FULL, HPF) for both Rear and Front channels. A configuration switch (CONFIG 4CH, 2CH) is also visible, along with the Power indicator light.
Power and Speaker Terminal Layout (Output Side)

This image shows the output side of the GLT-85.4D amplifier, featuring the power and speaker terminals. From left to right, it includes the GROUND terminal, REMOTE turn-on terminal, +12V power terminal, and speaker output terminals for REAR BRIDGED (L+, L-, R+, R-) and FRONT BRIDGED (L+, L-, R+, R-) connections. The "4 Channel 'CLASS D' 2 ohm Stable Stereo Bridgeable MOSFET" text indicates key amp증폭기 성능.
설정 및 설치
Proper installation is crucial for optimal performance and safety. If you are unsure about any step, consult a professional installer.
장착 위치
- Choose a location that is dry, well-ventilated, and protected from direct sunlight, excessive heat, and moisture.
- 주변에 충분한 공기 흐름을 확보하세요. amp적절한 냉각을 위한 냉각기.
- 마운트하다 amplifier securely to a solid surface using the provided mounting hardware to prevent movement during vehicle operation.
배선 연결
연결 작업을 하기 전에 차량 배터리의 음극 단자를 분리하십시오.
- 전원선(+12V): Run a heavy-gauge power cable (e.g., 8 AWG or thicker, depending on total system power) directly from the positive terminal of the vehicle's battery to the +12V terminal on the amp증폭기. 배터리에서 45cm(18인치) 이내에 적절한 퓨즈(별도 구매)가 있는 인라인 퓨즈 홀더를 설치하십시오.
- 접지선(GND): Connect a heavy-gauge ground cable (same gauge as power wire) from the GND terminal on the amp차량 섀시의 깨끗하고 도색되지 않은 금속 표면에 연결하십시오. 견고하고 저항이 낮은 연결을 유지하십시오.
- Remote Turn-On Wire (REMOTE): Connect a remote turn-on wire (typically 18 AWG) from your head unit's remote output to the REMOTE terminal on the amp이 전선은 신호를 보냅니다. amp앰프를 헤드 유닛과 함께 켜고 끌 수 있습니다.
- RCA 입력 케이블: 헤드 유닛의 사전에서 RCA 케이블을 연결하세요.amp outputs (Front and Rear) to the corresponding RCA input jacks on the amp리퍼.
- 스피커 전선: 스피커를 연결하십시오 amplifier's speaker output terminals. Ensure correct polarity (+ to + and - to -). The GLT-85.4D supports 2-ohm stereo and 4-ohm bridged configurations. Refer to the "Power and Speaker Terminal Layout" image for terminal identification.
메모: For bridged operation, connect the speaker to the designated bridged terminals (e.g., L+ and R- for a single channel in bridged mode). Consult a wiring diagram for specific bridged configurations.
작동 지침
초기 파워업
- 모든 연결이 완료되고 확인되면 차량 배터리의 음극 단자를 다시 연결하십시오.
- 헤드 유닛을 켜세요. amplifier's power indicator light should illuminate.
- 로 시작하세요 amplifier's gain (SENS) controls set to minimum.
- Play a familiar piece of music at a moderate volume level on your head unit.
컨트롤 조정
- Gain (SENS): Slowly increase the gain control for each channel until you hear distortion, then back off slightly. The gain control matches the amp앰프의 입력 감도와 헤드 유닛의 출력 볼륨tage. It is not a volume control.
- Crossover (LPF/FULL/HPF):
- LPF(저역 통과 필터): Allows only frequencies below the set point to pass. Typically used for subwoofers.
- HPF(하이패스 필터): Allows only frequencies above the set point to pass. Typically used for full-range speakers to prevent low-frequency distortion.
- 가득한: 모든 주파수를 통과시킵니다.
- Configuration (CONFIG 4CH/2CH): This switch determines how the input signals are routed to the amp리파이어 채널.
- 4CH : Uses all four RCA inputs (Front L/R, Rear L/R) to drive the four output channels independently.
- 2CH : Uses only the Front L/R RCA inputs and internally routes them to all four output channels. Useful if your head unit only has two pre-amp outputs but you want to power four speakers.
추천: Fine-tune settings gradually and listen carefully to avoid speaker damage or poor sound quality.
유지
- 유지하다 amp부드럽고 마른 천으로 닦아 깨끗하게 유지하세요. 강한 화학 물질이나 연마성 세제는 사용하지 마세요.
- 다음을 확인하세요. amp증폭기의 냉각 핀은 적절한 열 방출을 유지하기 위해 먼지와 이물질이 없도록 관리됩니다.
- 모든 배선 연결부의 견고성과 부식 여부를 주기적으로 점검하세요.
문제 해결
| 문제 | 가능한 원인 | 해결책 |
|---|---|---|
| 전원 없음 / Amp리퍼가 켜지지 않습니다 |
|
|
| 소리가 나지 않습니다 |
|
|
| 왜곡된 소리 |
|
|
| Amp리파이어 과열 |
|
|
명세서
| 특징 | 세부 사항 |
|---|---|
| 모델 | GLT-85.4D |
| 채널 | 4 |
| Ampliifier 클래스 | D 급 |
| Max Power @ 12.6V | 1700와트 |
| RMS Power Output (4 Ohm Stereo @ 12.6V) | 85W x 4 |
| RMS Power Output (2 Ohm Stereo @ 12.6V) | 120W x 4 |
| RMS Power Output (4 Ohm Bridged @ 12.6V) | 240W x 2 |
| 최소 공급량tage | 8.5V |
| 최대 공급량tage | 16.8V |
| Idle Current Consumption @ 12.6VDC | 0.66A |
| Musical Max Current Consumption @ 12.6VDC | 31A |
| 치수(길이 x 너비 x 높이) | 11.02 x 7.99 x 2.76 인치 |
| 품목 무게 | 3.5파운드 |
보증 및 지원
For warranty information, technical support, or service inquiries, please refer to the official Genius Audio web사이트를 방문하거나 고객 서비스 부서에 문의하세요. 보증 청구를 위해 구매 증빙 자료로 구매 영수증을 보관하세요.
공식적인 Web대지: Genius Audio Store on Amazon


