1. 서론
This manual provides essential instructions for the safe and efficient use of your BERNSTEIN E700W Electric Heating Element with Digital Thermostat. Please read this manual thoroughly before installation and operation, and retain it for future reference. The E700W is designed to provide adjustable heating for radiators, featuring a digital thermostat for precise temperature control and programmable functions.
주요 특징은 다음과 같습니다.
- Electric heating bar with selectable power (300 Watt or 600 Watt).
- Adjustable digital thermostat for precise temperature management.
- Programmable functions for enhanced energy efficiency and comfort.
- 사용하기 쉬운 인터페이스.
- 간단한 설치 과정.
2. 안전 정보
경고: 이러한 안전 지침을 따르지 않을 경우 화재, 감전, 부상 또는 재산 피해가 발생할 수 있습니다.
- 전원 공급 장치 볼륨을 확인하십시오.tage matches the rating specified on the device (230 V AC, 50 Hz).
- This appliance is intended for indoor use only, specifically in bathrooms (IPX4 rated).
- Do not immerse the heating element or thermostat in water or other liquids.
- Do not operate the device with a damaged cord or plug. If damaged, contact qualified service personnel.
- 전원 코드를 뜨거운 표면에서 멀리 두세요.
- Do not block air vents or place objects on the heating element.
- 청소나 유지관리를 하기 전에는 반드시 장치의 플러그를 전원 콘센트에서 뽑아주세요.
- 본 기기는 신체적, 감각적 또는 정신적 능력이 저하된 사람(어린이 포함)이나 경험 및 지식이 부족한 사람이 사용하도록 의도된 것이 아니며, 안전을 책임질 사람으로부터 기기 사용에 관한 감독이나 지시를 받은 경우에만 사용할 수 있습니다.
- 어린이가 이 제품을 가지고 놀지 않도록 감독해야 합니다.
- The heating element is equipped with overheating protection and automatic temperature limitation. Do not attempt to bypass these safety features.
3. 패키지 내용
포장을 풀 때 모든 구성 요소가 들어 있고 손상되지 않았는지 확인하세요.
- Electric heating bar with connection thread (selected power: 300 Watt or 600 Watt).
- Digital thermostat with connection cable and Schuko plug.

이미지 1: 앞면 view of the E700W digital thermostat, showing the display and control buttons. The display shows time, day of the week, temperature, and various mode icons.
4. 설치
The BERNSTEIN E700W heating element is designed for simple installation into compatible radiators. It is recommended that installation be performed by a qualified professional if you are unsure about electrical connections or plumbing.
4.1 Mounting the Heating Element
- Ensure the radiator is completely drained and disconnected from the main heating system if it's a dual-fuel setup.
- Carefully screw the heating element into the designated opening of your radiator. Ensure a tight, leak-proof seal using appropriate sealing materials (e.g., PTFE tape or hemp).
- Position the digital thermostat for easy access and visibility.

Image 2: The E700W digital thermostat unit is shown attached to the bottom of a white towel radiator, with its power cable extending downwards towards a wall socket.
4.2 전기 연결
- Connect the Schuko plug of the thermostat to a properly grounded 230 V AC, 50 Hz power outlet.
- Ensure the outlet is easily accessible for disconnection if needed.
4.3 Dimensions and Power Options
The E700W is available in different power ratings, each corresponding to a specific heating bar length:
- 300와트: Heating bar length approximately 385 mm ± 8 mm.
- 600와트: Heating bar length approximately 630 mm ± 8 mm.

Image 3: Technical drawing illustrating the dimensions of the heating element. A table below shows the relationship between Voltage (V), Power (W), and Length L (mm) for the 300W and 600W variants.
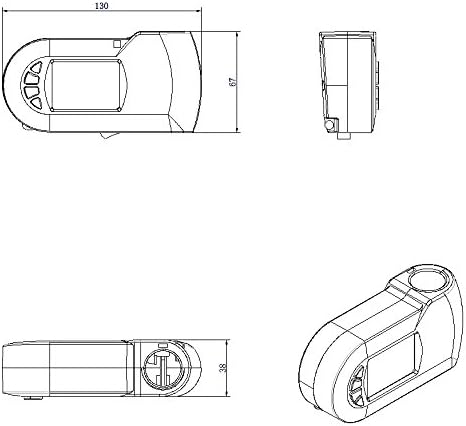
Image 4: Technical drawing showing the top, side, and isometric views of the E700W digital thermostat unit, with key dimensions indicated in millimeters (e.g., 130mm length, 67mm height, 38mm depth).
5. Operating the Digital Thermostat
The E700W digital thermostat offers various modes and settings for optimal heating control. The display provides visual feedback on the current status and settings. Control buttons are typically located on the side or front of the unit.
5.1 기본 작업
- 전원 켜기/끄기: Press and hold the power button (if available) or plug in the device to turn it on.
- 설정 온도: Use the Up/Down arrow buttons to adjust the desired temperature. The adjustable temperature range is approximately 7 °C to 30 °C.
- 표시 정보 : The display typically shows the current time, day of the week, set temperature, and active mode icons.
5.2 Advanced Functions and Programming
The thermostat includes several programmable modes to enhance comfort and energy efficiency. Accessing these modes usually involves pressing a "Mode" or "Menu" button and navigating with arrow keys.
- 주간 모드: Allows programming different temperature settings for each day of the week. Typically, you would set specific time periods and desired temperatures for weekdays and weekends.
- 24시간 모드: Enables programming temperature settings for specific time slots within a 24-hour cycle, repeating daily.
- 휴일 모드: Sets the heating to a lower, constant temperature for an extended period (e.g., during vacation) to prevent freezing and save energy. You usually set the duration and the desired holiday temperature.
- 부스트 모드: Provides a temporary increase in heating power for a short duration (e.g., 0.5 to 2 hours) to quickly warm the room. This mode is useful for rapid heating when needed.
- 창 모드: Automatically detects an open window (via a sudden temperature drop) and temporarily suspends heating to prevent energy waste. Heating resumes once the window is closed or after a set time.
- 어린이 안전 잠금 장치: Locks the control buttons to prevent accidental changes to settings, especially useful in households with children. To activate/deactivate, usually press and hold a specific combination of buttons (e.g., Up and Down arrows simultaneously for a few seconds).
Refer to the on-screen prompts and button labels for specific navigation and setting adjustments. Due to the variety of digital thermostat interfaces, precise button sequences cannot be provided without a detailed diagram of the specific model's controls. Experiment with the "Mode" or "Menu" button to cycle through options and use arrow keys to adjust values.
6. 유지관리
Regular maintenance ensures the longevity and efficient operation of your heating element.
- 청소: Disconnect the power before cleaning. Wipe the thermostat and heating element surfaces with a soft, damp cloth. Do not use abrasive cleaners, solvents, or immerse any part in water.
- 점검: Periodically check the power cord and plug for any signs of damage. Ensure the heating element is securely installed in the radiator.
- 저장: If storing the device for an extended period, ensure it is clean and dry. Store in a cool, dry place.
7. 문제 해결
If you encounter issues with your BERNSTEIN E700W heating element, refer to the following common problems and solutions:
| 문제 | 가능한 원인 | 해결책 |
|---|---|---|
| Device does not turn on / Display is blank. | No power supply; Power cord not properly connected; Power outlet faulty. | Check if the plug is fully inserted into a working outlet. Test the outlet with another appliance. Check for tripped circuit breakers. |
| Heating element not heating or insufficient heat. | Temperature setting too low; Incorrect mode selected; Overheating protection activated; Faulty element. | Increase the set temperature. Ensure the device is not in "Holiday Mode" or "Window Mode". Allow time for the element to cool down if overheating protection was triggered. If the problem persists, contact support. |
| 장치가 예기치 않게 꺼집니다. | Overheating protection activated; "Window Mode" triggered; Power interruption. | Check if a window is open. Ensure the radiator is not covered. Verify stable power supply. If overheating protection frequently activates, ensure proper installation and ventilation. |
| Cannot change settings / Buttons unresponsive. | Child Safety Lock is active. | Deactivate the Child Safety Lock (refer to section 5.2 for general instructions). |
| 디스플레이에 오류 코드가 표시됩니다. | 내부 오류입니다. | 오류 코드를 확인하고 고객 지원팀에 문의하여 도움을 받으세요. |
8. 사양
| 특징 | 세부 사항 |
|---|---|
| 상표 | 번스타인 |
| 모델 | E700W |
| 전원 옵션 | 300 Watt (heating bar length approx. 385 mm ± 8 mm) 600 Watt (heating bar length approx. 630 mm ± 8 mm) |
| 전원 공급 장치 | 230V AC, 50Hz |
| 보호 등급 | 2학년 |
| 보호 등급 | IPX4(방수) |
| 케이블 길이 | 1.50분 |
| 조정 가능한 온도 범위 | 약 7°C ~ 30°C |
| 특수 기능 | Holiday Mode, Week Mode, 24-Hour Mode, Window Mode, Child Safety, Boost Mode (0.5 to 2 hours) |
| 안전 기능 | Overheating protection, Automatic temperature limitation, Thermal fuse |
| 용도 | 화장실 |
| 색상 | 하얀색 |
| 스타일 | 디지털 디스플레이 |
9. 보증 및 지원
For warranty information, technical support, or service inquiries, please contact BERNSTEIN customer service or the retailer from whom you purchased the product. Keep your proof of purchase for warranty claims.
Contact information for Bernstein Badshop (seller on Amazon.it):
- Seller Name: Bernstein Badshop
- For support, please visit the seller's page on Amazon or contact them directly through the Amazon platform.
Note: Many user reviews indicate a lack of detailed instructions for programming the thermostat. If you require further assistance with specific programming steps, please reach out to the manufacturer or seller directly for detailed guidance.


