1. 서론
This manual provides detailed instructions for the installation, operation, and maintenance of your Hunter 54-inch Contemporary Ceiling Fan. Please read all instructions carefully before beginning installation to ensure safe and proper operation. Retain this manual for future reference.

Figure 1.1: Hunter 54-inch Contemporary Ceiling Fan with remote control.

Figure 1.2: Key features of the Hunter 54-inch Contemporary Ceiling Fan.
2. 안전 정보
감전, 화재 또는 부상의 위험을 줄이려면 항상 다음과 같은 기본 안전 수칙을 준수하십시오.
- 팬을 설치하기 전에 모든 지침을 읽으세요.
- 모든 배선은 국가 및 지역 전기 규정을 준수해야 합니다. 배선에 익숙하지 않은 경우 자격을 갖춘 전기 기술자에게 문의하십시오.
- 설치하기 전에 팬의 배전반에 있는 회로 차단기를 꺼서 전원을 차단하십시오.
- Ensure the outlet box is securely attached to the building structure and can support the fan's weight (approximately 18.1 lbs).
- 날개가 손상된 선풍기는 작동하지 마십시오. 날개 하나라도 손상된 경우 모든 날개를 교체하십시오.
- 팬 블레이드 경로에 물체를 두지 마십시오.
- 이 팬은 실내에서만 사용하도록 설계되었습니다.
3. 패키지 내용
아래 나열된 모든 구성품이 패키지에 포함되어 있는지 확인하세요.
- 1 x Fan Motor Assembly
- 3 x Fan Blades (Reversible: Light Gray Oak / Greyed Walnut)
- 1 x 조명 키트
- 3 x LED Bulbs (E26 Medium Base)
- 1 x 4인치 다운로드
- 1 x 2-inch Downrod (for standard profile 설치)
- 휴대용 리모컨 1개
- AAA 배터리 2개(리모컨용)
- 하드웨어 팩 (나사, 와셔, 전선 너트 등)
4. 설정 및 설치
전문가 설치를 권장합니다. 작업 진행 전에 회로 차단기에서 전원을 차단하십시오.
4.1 팬 장착
- Securely attach the mounting bracket to the ceiling outlet box. The outlet box must be listed for fan support.
- Select the appropriate downrod (4-inch or 2-inch) for your ceiling height. Insert the downrod through the canopy and connect it to the fan motor assembly.
- 팬 조립체를 조심스럽게 들어 올려 장착 브래킷에 걸어주세요.
4.2 배선 연결
- Connect the fan's electrical wires to the household wiring according to local electrical codes. Typically, this involves connecting the black (hot) wire from the fan to the black (hot) wire from the ceiling, the white (neutral) wire from the fan to the white (neutral) wire from the ceiling, and the green (ground) wire from the fan to the bare copper (ground) wire from the ceiling.
- Ensure all wire connections are secure using the provided wire nuts.
- 모든 전선을 콘센트 상자에 깔끔하게 집어넣으세요.
4.3 블레이드 및 조명 키트 부착
- Attach the fan blades to the motor housing using the provided screws. Ensure the desired blade finish (Light Gray Oak or Greyed Walnut) is facing downwards.
- Install the light kit to the bottom of the fan motor assembly, following the specific instructions for your model.
- Screw the three E26 Medium Base LED bulbs into the light kit sockets.
- Attach the glass shade to the light kit.

그림 4.1: 주석이 달린 그림 view of fan components and features.

그림 4.2: 예ample of the fan installed in a room.
5. 사용 설명서
Your Hunter ceiling fan is operated using the included handheld remote control.
5.1 리모콘 기능

Figure 5.1: Handheld Remote Control.
- 팬 켜짐/꺼짐 및 속도 조절: Use the fan speed buttons (up/down arrows) to cycle through the three available fan speeds (low, medium, high) or turn the fan off.
- 조명 켜기/끄기 및 밝기 조절: Press the light bulb button to turn the light on or off. To dim the light, press and hold the light bulb button. Release when the desired brightness is reached.
- 팬 방향 (회전 방향 전환 모터): The remote control includes a button to reverse the fan's blade direction. This feature allows for seasonal use:
- Downward Airflow (Summer): Creates a cooling effect.
- Upward Airflow (Winter): Circulates warm air trapped near the ceiling.
5.2개의 양면날
The fan features reversible blades with Light Gray Oak on one side and Greyed Walnut on the other. You can choose the finish that best complements your room's decor during installation.
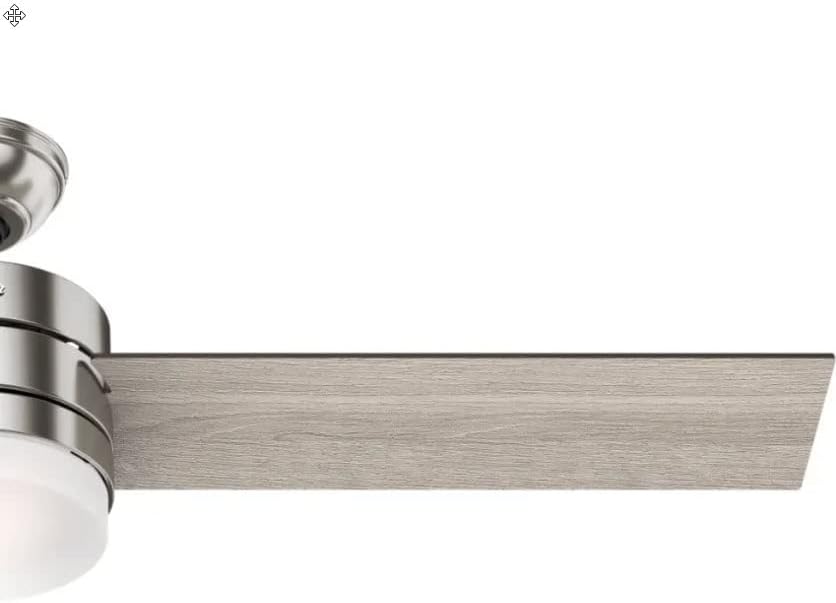
그림 5.2: 예ample of the Light Gray Oak blade finish.
6. 유지관리
정기적인 유지관리를 통해 천장선풍기의 최적의 성능과 수명을 보장할 수 있습니다.
6.1 청소
- 청소하기 전에는 항상 선풍기 전원을 끄세요.
- 부드러운 d를 사용하세요amp cloth to clean the fan blades and motor housing. Avoid abrasive cleaners that may scratch the finish.
- Clean the glass shade with a mild glass cleaner.
6.2 전구 교체
The fan uses E26 Medium Base LED bulbs. When replacing, ensure the power is off and allow bulbs to cool before handling.
- Unscrew the glass shade.
- Carefully unscrew the old LED bulb(s) and screw in new ones.
- 유리 갓을 다시 부착하세요.
6.3 Blade Balancing
If the fan wobbles during operation, ensure all blade screws are tight. A balancing kit (often included with fans, though not explicitly listed here) can be used to correct persistent wobbling.
7. 문제 해결
일반적인 문제와 해결 방법은 다음 표를 참조하세요.
| 문제 | 가능한 원인 | 해결책 |
|---|---|---|
| 팬이 시작되지 않음 | 팬에 전원이 들어오지 않습니다. 전선 연결이 느슨합니다. 리모컨 배터리가 부족합니다. | 회로 차단기를 점검하십시오. 모든 전선 연결이 단단히 고정되어 있는지 확인하십시오. 리모컨 배터리를 교체하십시오. |
| 빛이 작동하지 않습니다 | Loose wire connections; Faulty bulb(s); Light switch off. | Check wiring to light kit; Replace bulb(s); Ensure light is turned on via remote. |
| 팬이 흔들린다 | 느슨한 날 나사; 불균형한 날; 느슨한 장착 브래킷. | 모든 날 나사를 조이십시오. 날 균형 조절 키트를 사용하십시오. 장착 브래킷이 단단히 고정되었는지 확인하십시오. |
| 리모콘이 응답하지 않음 | 배터리가 부족하거나 방전되었습니다. 리모컨이 팬과 페어링되지 않았습니다. | Replace AAA batteries; Refer to remote pairing instructions (usually involves cycling power and pressing a button on the remote). |
8. 사양
| 특징 | 세부 사항 |
|---|---|
| 상표 | 사냥꾼 |
| 모델 번호 | CC5C91C61 |
| 크기 | 54인치 |
| 마치다 | 브러시드 니켈 |
| 블레이드 소재 | Wood (Reversible: Light Gray Oak / Greyed Walnut) |
| 모터 유형 | AC Motor, Whisperwind |
| 광원 | Integrated Dimmable LED (3 bulbs) |
| 전구베이스 | E26 미디엄 |
| 색온도 | 3000 켈빈 |
| 광 출력 | 800루멘 |
| 제어 방법 | 원격 제어 |
| 권tage | 120 볼트 |
| 왓tage | 44 watts (fan only) |
| 품목 무게 | 18.1 파운드 |
| 제품 치수 | 54인치 길이 x 54인치 너비 x 14.5인치 높이 |
| 실내/실외 사용 | 실내 |
| 연간 예상 에너지 비용 | $12 (based on 6.4 hours/day, 12 cents/kWh, excluding lights) |
| 공기 흐름 | 분당 3,590입방 피트 |
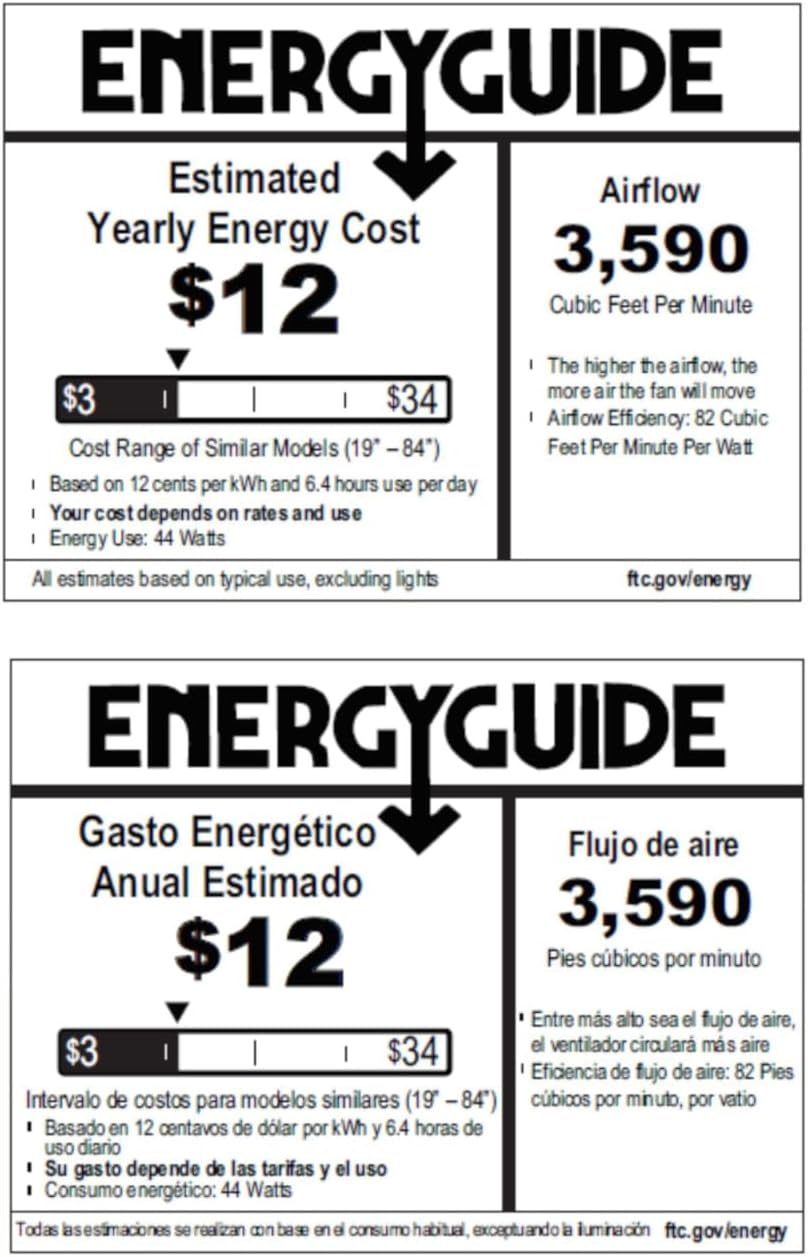
Figure 8.1: Energy Guide for the Hunter 54-inch Ceiling Fan.
9. 보증 및 지원
For warranty information or technical support, please refer to the official Hunter web사이트를 방문하거나 고객 서비스에 문의하세요. 보증 청구에 대비해 구매 증빙 자료로 구매 영수증을 보관하세요.


