1. 서론
The Ewent EW7014 USB 3.1 Gen-1 Dual Docking Station provides a convenient solution for connecting and accessing 2.5-inch and 3.5-inch SATA hard drives or Solid State Drives (SSDs). This device supports high-speed data transfer via USB 3.1 Gen-1 and features a standalone cloning function, allowing you to duplicate drives without a computer connection.
1.1. 제품 오버view

Image 1.1: Ewent EW7014 Dual Docking Station with two hard drives.
1.2. 패키지 내용
- Ewent EW7014 Dual Docking Station
- USB 3.1 Gen-1 Cable
- 전원 어댑터

Image 1.2: Contents of the Ewent EW7014 package.
2. 주요 특징
- 듀얼 베이 디자인: Supports two 2.5-inch or 3.5-inch SATA I/II/III HDDs/SSDs simultaneously, up to 12.5 mm thickness.
- USB 3.1 Gen-1 Connectivity: Offers Super Speed data transfer rates up to 5 Gbps (backward compatible with USB 2.0).
- Standalone Cloning Function: Duplicate hard drives without requiring a computer connection.
- LED 표시등: Provides status LEDs for power, data activity, and cloning progress.
- 플러그 앤 플레이: 대부분의 운영체제에서는 드라이버 설치가 필요하지 않습니다.

Image 2.1: Visual representation of the docking station's backup and cloning capabilities.
3. 설정 지침
3.1. 도킹 스테이션 연결
- Connect the provided power adapter to the 'Power' input port on the rear of the docking station. Plug the other end into a power outlet.
- Connect one end of the supplied USB 3.1 Gen-1 cable to the 'USB 3.1' port on the rear of the docking station.
- USB 케이블의 다른 쪽 끝을 컴퓨터의 사용 가능한 USB 포트에 연결합니다.
- Ensure the 'ON/OFF' switch on the rear of the docking station is in the 'OFF' position before inserting drives.
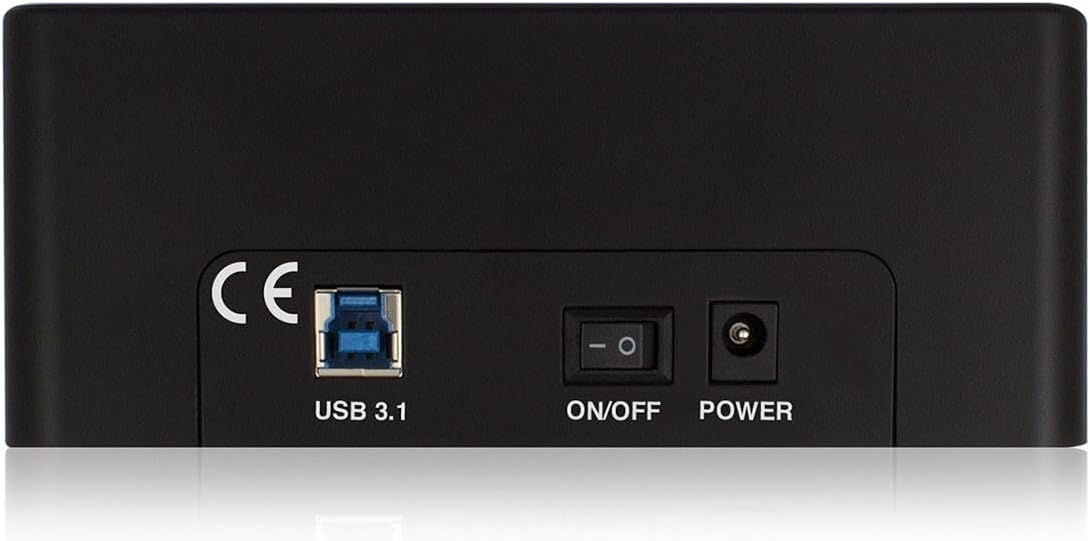
Image 3.1: Rear panel connections of the docking station.
3.2. Inserting Hard Drives / SSDs
- Gently slide your 2.5-inch or 3.5-inch SATA HDD/SSD into an available drive bay (HDD1 or HDD2) until it is firmly seated. Ensure the SATA connector on the drive aligns with the connector in the bay.
- If using 2.5-inch drives, ensure they are securely placed within the bay.
- Once drives are inserted, switch the 'ON/OFF' button to the 'ON' position. The power LED will illuminate.
4. 사용 설명서
4.1. Data Transfer Mode (PC Connection)
When connected to a computer via USB, the docking station functions as an external drive enclosure. Inserted drives will appear as removable storage devices in your operating system.
- Ensure the docking station is powered on and connected to your computer.
- Insert your SATA HDD/SSD into either drive bay.
- Your operating system should automatically detect the drive(s). You can then access, copy, or move file다른 외장 저장 장치와 마찬가지로 사용하시면 됩니다.
- The data activity LEDs (HDD1, HDD2) will flash during read/write operations.
- 도킹 스테이션의 전원을 끄거나 드라이브를 제거하기 전에 항상 운영 체제에서 드라이브를 안전하게 꺼내십시오.
4.2. Standalone Cloning Function
The cloning function allows you to duplicate the contents of a source drive to a target drive without a computer connection. The target drive must be equal to or larger in capacity than the source drive.

Image 4.1: Top panel with drive bays and LED indicators for cloning progress.
Warning: All data on the target drive will be erased during the cloning process. Ensure you have backed up any important data from the target drive before proceeding.
- 도킹 스테이션의 전원이 꺼져 있고 컴퓨터에서 분리되어 있는지 확인하십시오.
- 삽입하다 소스 드라이브 (복사할 원본 드라이브)에서 다음 드라이브로 하드디스크1 만.
- 삽입하다 대상 드라이브 (복사할 드라이브)에 하드디스크2 만.
- Power on the docking station using the 'ON/OFF' switch.
- Press and hold the 'Clone' button (usually located near the drive bays) for approximately 3-5 seconds until the cloning progress LEDs (25%, 50%, 75%, 100%) begin to flash.
- Release the 'Clone' button. The cloning process will begin. The progress LEDs will illuminate sequentially to indicate the completion percentage.
- 진행 LED가 모두 켜지면 복제 과정이 완료된 것입니다.
- Power off the docking station and safely remove both drives.
5. 기술 사양
| 모델 번호 | EW7014 |
| 지원되는 드라이브 | 2.5인치/3.5인치 SATA I/II/III HDD/SSD |
| Maximum Drive Thickness | 12.5mm (XNUMXmm) |
| 인터페이스 | USB 3.1 Gen-1 (USB 3.0) |
| 데이터 전송 속도 | Up to 5 Gbps (USB 3.1 Gen-1) |
| 베이 수 | 2 |
| 복제 기능 | Standalone (PC-less) |
| 치수(길이 x 너비 x 높이) | 5.87 x 2.4 x 4.61인치(14.9 x 6.1 x 11.7cm) |
| 무게 | 1.41파운드(0.64kg) |
| 전원 공급 장치 | 외부 AC 어댑터 |
| 호환되는 운영 체제 | Windows, macOS, Linux (driver-free) |
6. 문제 해결
6.1. Drive Not Detected by Computer
- 도킹 스테이션의 전원이 켜져 있고 전원 어댑터가 제대로 연결되어 있는지 확인하십시오.
- Verify the USB cable is firmly connected to both the docking station and your computer. Try a different USB port on your computer.
- Check if the hard drive/SSD is properly seated in the bay. Remove and re-insert it.
- If it's a new drive, it might need to be initialized, partitioned, and formatted in your operating system's Disk Management (Windows) or Disk Utility (macOS).
- Test with a different known-good hard drive/SSD to rule out a drive issue.
6.2. Cloning Process Does Not Start
- Ensure the docking station is disconnected from the computer before initiating cloning.
- Verify that the source drive is in HDD1 and the target drive is in HDD2.
- 대상 드라이브의 용량이 소스 드라이브의 용량과 같거나 그 이상인지 확인하십시오.
- Press and hold the 'Clone' button for the required duration (3-5 seconds) until the progress LEDs start flashing.
- Ensure both drives are properly inserted and detected by the docking station (power on, then check if drive LEDs briefly illuminate).
6.3. 느린 데이터 전송 속도
- Ensure you are connected to a USB 3.1 Gen-1 (USB 3.0) port on your computer. Connecting to a USB 2.0 port will result in slower speeds.
- Verify that your computer's USB 3.1 Gen-1 drivers are up to date.
- The actual transfer speed can be limited by the speed of the hard drive/SSD itself.
- 작은 것을 많이 옮기지 마세요 file동시에 여러 번 시도해야 합니다. 그렇지 않으면 전체 전송 속도가 저하될 수 있습니다.
7. 유지관리
- Keep the docking station clean by wiping it with a soft, dry cloth. Avoid using liquid cleaners or solvents.
- Ensure the device is kept in a dry environment, away from direct sunlight and extreme temperatures.
- Do not block the ventilation openings (if any) to prevent overheating.
- Handle hard drives and SSDs with care when inserting or removing them to prevent damage to the connectors.
8. 보증 및 지원 정보
For warranty information and technical support, please refer to the documentation provided with your purchase or visit the official Ewent web사이트. 보증 청구를 위해 구매 증빙 자료를 보관하세요.
Ewent is committed to providing reliable products and customer assistance. If you encounter issues not covered in this manual, please contact Ewent customer support for further assistance.


