1. 서론
Thank you for choosing the Lenco PDR-030 DAB+/FM Portable Digital Radio. This manual provides essential information for setting up, operating, and maintaining your device. The PDR-030 offers high-quality digital radio reception (DAB+) and traditional FM radio, along with features such as an integrated rechargeable battery for portability, an RDS display, station memory, and an alarm clock function.
포함된 구성 요소:
- Lenco PDR-030 Digital Radio
- AC Power Adapter (220 Volt)
- 사용자 설명서
2. 중요한 안전 정보
- 화재나 감전을 예방하려면 기기를 비나 습기에 노출시키지 마십시오.
- 전원 어댑터의 볼륨을 확인하세요tage는 귀하의 지역 전원 공급 장치와 일치합니다.
- c를 열지 마세요asing. 모든 서비스는 자격을 갖춘 담당자에게 의뢰하세요.
- 장치를 열원 근처나 직사광선에 노출시키지 마십시오.
- Handle the integrated battery with care. Do not attempt to replace it yourself.
- 장치를 강한 자기장에서 멀리 두십시오.
3. 제품 오버view
Familiarize yourself with the main components and controls of your Lenco PDR-030 radio.
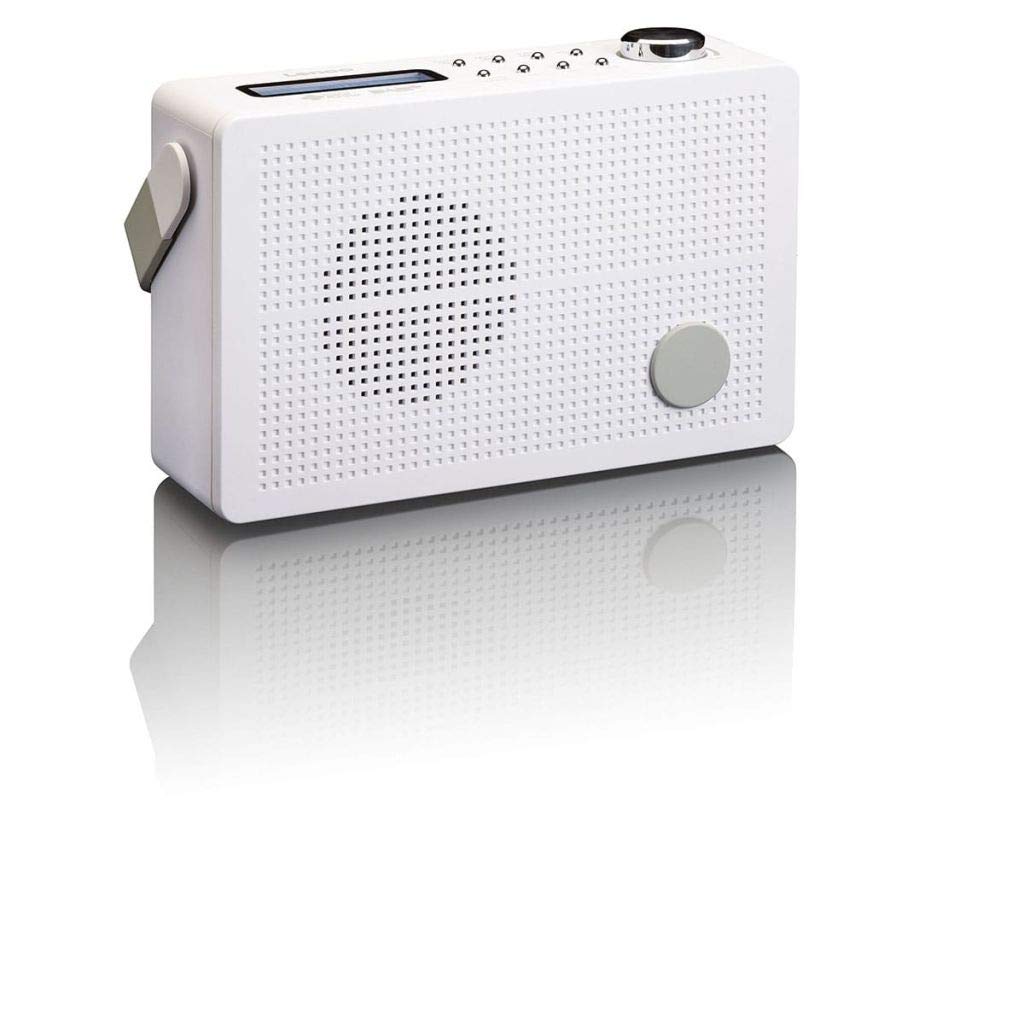
그림 3.1: Front Panel of Lenco PDR-030 Radio. Features include a blue backlit LCD display, power/source button, alarm, sleep, info/menu, preset buttons, select/snooze, scan, previous, next buttons, and a rotary volume knob.
주요 제어 및 기능:
- 표시하다: Two-line illuminated LCD for time, date, station name, and information.
- 전원/소스 버튼: Turns the radio on/off and switches between DAB+ and FM modes.
- 볼륨 노브: 오디오 출력 레벨을 조정합니다.
- 텔레스코픽 안테나: 최적의 라디오 신호 수신을 위해.
- 헤드폰 잭(3.5mm): 개인적으로 듣기 위한 것입니다.
- Alarm/Sleep/Info/Menu/Preset Buttons: For various functions including setting alarms, sleep timer, accessing information, menu navigation, and managing station presets.
- Select/Snooze/Scan/Prev/Next Buttons: For station tuning, menu selection, and snooze function.
4. 설정
4.1 라디오 전원 공급
The PDR-030 can be powered by the included AC adapter or its integrated rechargeable battery.
- AC 전원: Connect the supplied 220V AC power adapter to the DC input jack on the radio and then to a wall outlet. The radio will automatically begin charging the internal battery.
- 배터리 전원: The integrated Lithium-ion battery allows for portable use. Ensure the battery is sufficiently charged before use without the AC adapter.
4.2 안테나 설정
Extend the telescopic antenna fully for optimal reception of both DAB+ and FM signals. Adjust its position for the best signal quality.
4.3 초기 전원 켜기 및 스테이션 스캔
- 를 누르세요 전원 버튼을 눌러 라디오를 켭니다.
- Upon first use, the radio will automatically enter DAB+ mode and perform a full scan for available digital radio stations. This may take a few minutes.
- 스캔이 완료되면 라디오는 사용 가능한 첫 번째 방송국으로 주파수를 맞춥니다.
5. 사용 설명서
5.1 전원 켜기/끄기
를 누르세요 전원 라디오를 켜거나 끄는 버튼입니다.
5.2 모드 선택 (DAB+/FM)
를 누르세요 원천 button repeatedly to switch between DAB+ and FM radio modes.
5.3 튜닝 스테이션
- DAB+ 모드:
- 초기 스캔 후에는 다음을 사용하십시오. 이전 그리고 다음 사용 가능한 DAB+ 방송국 목록을 탐색하는 버튼입니다.
- To perform a new full scan, press the 메뉴 button, navigate to "Full Scan" using 이전 / 다음, 그리고 누르세요 선택하다.
- FM 모드 :
- 를 누르세요 주사 버튼을 누르면 다음으로 이용 가능한 FM 방송국을 자동으로 검색합니다.
- 수동 튜닝을 하려면 버튼을 길게 누르세요. 이전 or 다음 주파수를 미세하게 조정하는 버튼입니다.
5.4 Saving and Recalling Preset Stations
이 라디오는 DAB+ 방송국을 최대 10개, FM 방송국을 최대 10개까지 저장할 수 있습니다.
- 사전 설정을 저장하려면:
- 원하는 방송국을 선택하세요.
- 를 누르고 계세요 사전 설정 "사전 설정 저장"이 디스플레이에 나타날 때까지 버튼을 누릅니다.
- 사용하세요 이전 / 다음 사전 설정 번호(1~10)를 선택하려면 버튼을 누르세요.
- 누르다 선택하다 스테이션을 확인하고 저장하려면.
- 프리셋 불러오기:
- 를 누르세요 사전 설정 버튼을 짧게 누르세요.
- 사용하세요 이전 / 다음 원하는 사전 설정 번호를 선택하려면 버튼을 누르세요.
- 누르다 선택하다 미리 설정된 방송국에 맞추세요.
5.5 볼륨 조절
회전하다 볼륨 노브 시계 방향으로 돌리면 소리가 커지고, 시계 반대 방향으로 돌리면 소리가 작아집니다.
5.6 RDS Functionality (FM Mode)
In FM mode, the RDS (Radio Data System) function displays information such as station name, program type, and other broadcast data on the two-line LCD display.
5.7 알람 시계 기능
The PDR-030 can be used as an alarm clock with two separate alarm times.
- 알람 설정:
- 를 누르세요 경보 단추.
- 사용 이전 / 다음 알람 1 또는 알람 2를 선택하려면 누르세요. 선택하다.
- Follow the on-screen prompts to set the alarm time, duration, source (Buzzer or Radio), frequency (Daily, Once, Weekdays, Weekends), and volume.
- 알람이 "켜짐"으로 설정되어 있는지 확인하고 누르십시오. 선택하다 저장하다.
- 스누즈 기능 : 알람이 울리면 버튼을 누르세요. 선잠 button to temporarily silence it for a set period.
- 수면 타이머 : 를 누르세요 잠 button repeatedly to set a sleep timer (e.g., 15, 30, 45, 60 minutes) after which the radio will automatically turn off.
5.8 헤드폰 연결
Connect 3.5mm stereo headphones to the headphone jack for private listening. The internal speaker will be muted automatically.
6. 유지관리
6.1 청소
Wipe the radio's exterior with a soft, dry cloth. Do not use abrasive cleaners, waxes, or solvents as they may damage the finish. Ensure no liquids enter the device.
6.2 배터리 관리
The integrated Lithium-ion battery is designed for long life. To maximize battery lifespan:
- 배터리를 자주 완전히 방전시키지 마세요.
- If storing the radio for an extended period, charge the battery to approximately 50% and store in a cool, dry place.
- Do not attempt to replace the battery yourself. Contact qualified service personnel if battery issues arise.
7. 문제 해결
| 문제 | 가능한 원인 | 해결책 |
|---|---|---|
| 전원이 없습니다 | AC adapter not connected or faulty; battery discharged. | Check AC adapter connection. Charge the battery. |
| DAB+/FM 수신 불량 | 안테나가 확장되지 않음; 신호가 약한 영역; 간섭. | Fully extend and adjust the telescopic antenna. Move the radio to a location with better signal. Avoid placing near other electronic devices. |
| 소리가 나지 않습니다 | 볼륨이 너무 낮음; 헤드폰이 연결됨; 음소거가 활성화됨. | Increase volume. Disconnect headphones. Check if mute is active (if applicable). |
| 알람이 울리지 않음 | Alarm not activated; alarm volume too low; incorrect time setting. | Ensure alarm is set to "On". Check alarm volume. Verify current time and alarm time settings. |
8. 사양
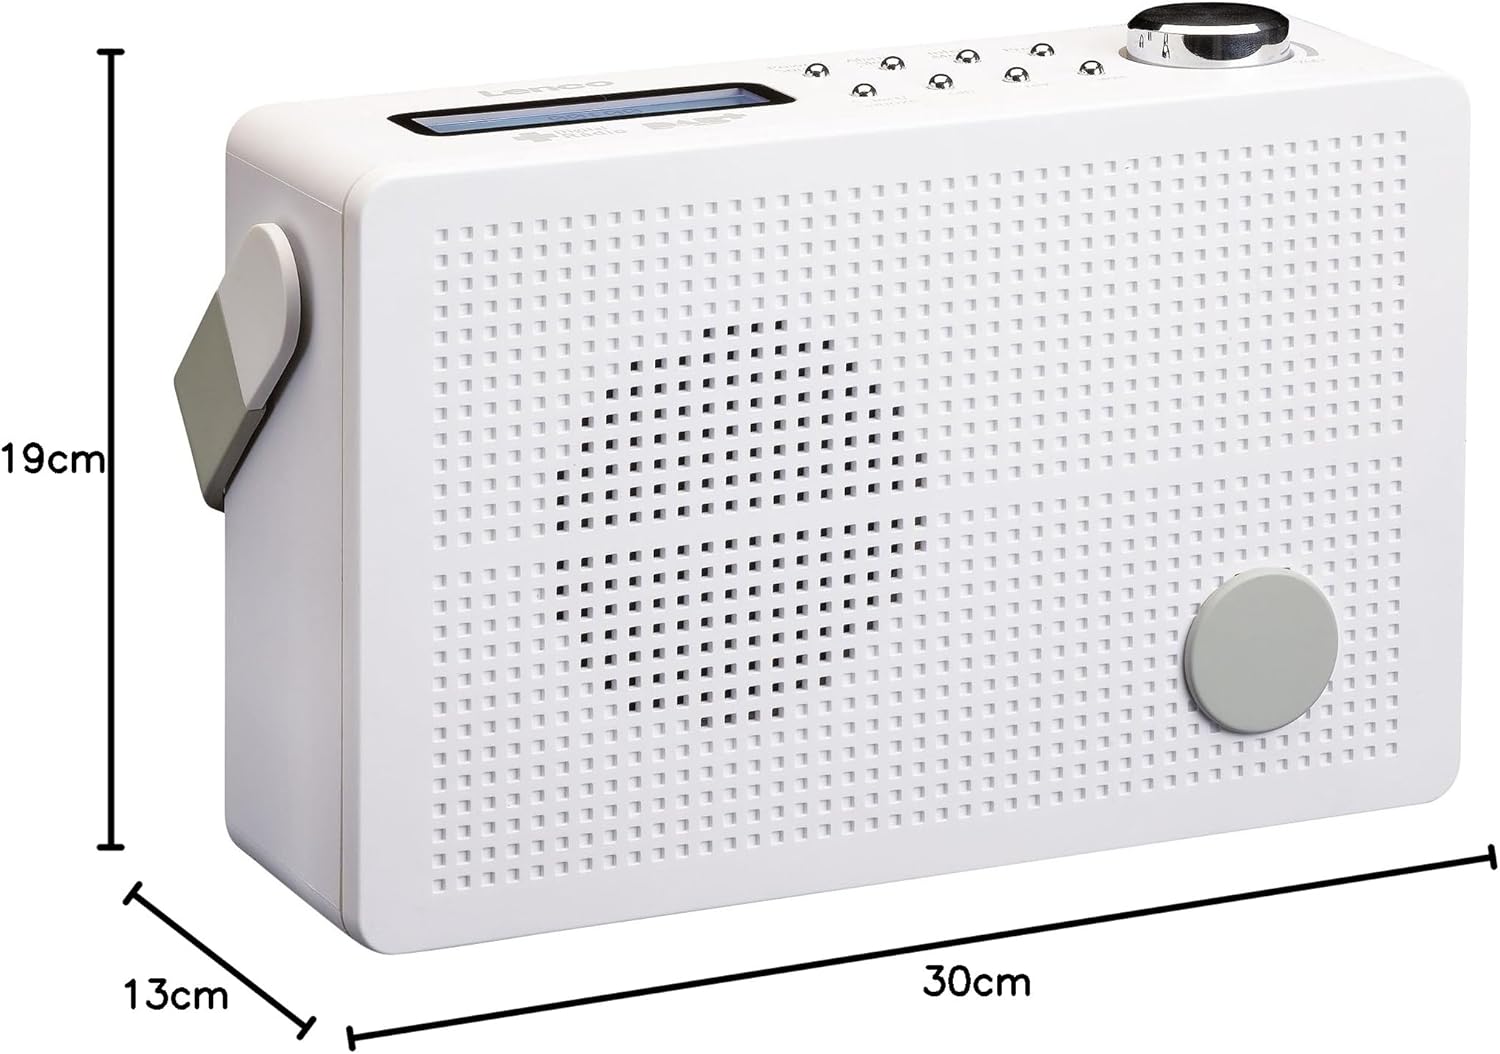
그림 8.1: Lenco PDR-030 Dimensions.
| 특징 | 세부 사항 |
|---|---|
| 모델 번호 | PDR-030 |
| 튜너 기술 | DAB+, FM (Ukw) |
| 전원 | Battery-Powered (Integrated Lithium-ion), AC Adapter |
| AC 볼륨tage | 220볼트 |
| 제품 치수(W x D x H) | 21.4 x 6.5 x 13.8 cm (approx. 22.5 x 8.5 x 15 cm as per another spec) |
| 품목 무게 | 9 g (Note: This seems incorrect, likely 670g from description) |
| 재료 유형 | 플라스틱 |
| 하드웨어 인터페이스 | 3.5mm 오디오(헤드폰 잭) |
| 특별 기능 | Portable, RDS Display, Alarm Clock, Station Memory (10 DAB+, 10 FM) |
Note: Some dimensions and weight specifications provided by the manufacturer may vary slightly. The description states 670 grams for weight, while specifications list 9g. Please refer to the product packaging for the most accurate information.
9. 보증 및 지원
Lenco products are designed for reliability and performance. This product typically comes with a 24-month manufacturer's warranty from the date of purchase, covering defects in materials and workmanship. Please retain your proof of purchase for warranty claims.
For technical support, service, or warranty inquiries, please refer to the contact information provided on the Lenco official website or your local retailer. Do not attempt to repair the device yourself.
자세한 내용은 다음을 방문하세요. Lenco Store on Amazon.