1. 서론
This manual provides essential information for the setup, operation, and maintenance of your SMART Board Interactive Whiteboard System SBM685IX3. Please read this manual thoroughly before using the product to ensure proper functionality and to maximize your experience.
2. 제품 오버view
The SMART Board Interactive Whiteboard System SBM685IX3 is an advanced interactive display solution designed for collaborative environments such as classrooms and meeting rooms. It combines an 87-inch interactive whiteboard with an ultra-short-throw projector to deliver a large, dynamic display surface.
주요 구성 요소는 다음과 같습니다.
- 대화식 화이트 보드: An 87-inch (7.25 feet diagonal viewing angle) touch-sensitive surface for direct interaction.
- Ultra-Short-Throw Projector: Projects large images from a very short distance, minimizing shadows and glare. Features a 16:10 widescreen (WXGA) aspect ratio and a built-in 16W speaker.
- Pen Tray: For storing interactive pens.

Figure 2.1: The SMART Board Interactive Whiteboard System with an ultra-short-throw projector mounted above, displaying a presentation slide.
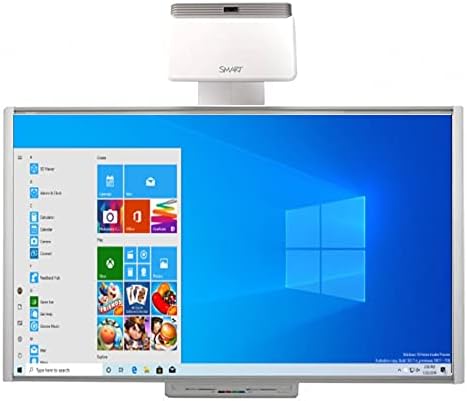
Figure 2.2: The SMART Board interactive whiteboard displaying a Windows 10 desktop interface, highlighting its functionality as a large interactive display.
3. 상자 안에 무엇이 들어있나요?
포장을 풀 때 다음 구성 요소가 모두 있는지 확인하세요.
- SMART Board M685 (87’’)
- Wall mount for SMART Board
- 펜 트레이
- 펜 2개
- 지우개
- Ultra-Short-Throw Projector
- 프로젝터 마운트
- USB cable (for SMART Board connectivity)
- HDMI cable (for projector video input)
- Power cables (for projector and SMART Board)
- 빠른 시작 가이드
4. 설정 지침
SMART Board 인터랙티브 화이트보드 시스템을 설정하려면 다음 단계를 따르십시오.
4.1 Mounting the Whiteboard and Projector
- Install Whiteboard Wall Mount: Securely attach the provided wall mount hardware for the SMART Board to a sturdy wall surface according to the quick start guide.
- 화이트보드 장착: Carefully lift and attach the SMART Board M685 to the installed wall mount.
- Install Projector Mount: Attach the projector mount to the wall or ceiling, ensuring it is positioned correctly above the whiteboard. The ultra-short-throw projector is designed to project a 100-inch image from approximately 12 inches away from the edge of the projector to the screen.
- Mount Projector: Secure the ultra-short-throw projector onto its mount.

Figure 4.1: An installed SMART Board interactive whiteboard system in a room, showing the projector mounted on the wall above the board, displaying a blue Windows background.
4.2 시스템 연결
- Connect SMART Board to Computer: Use the provided USB cable to connect the SMART Board to your computer. This enables touch and pen interaction.
- Connect Projector to Computer: Use the provided HDMI cable to connect the projector to your computer's video output.
- 전원 연결 : Connect the power cables to the SMART Board and the projector, then plug them into appropriate power outlets.
- 전원 켜기: Turn on the projector and the SMART Board. Your computer's display should now be projected onto the whiteboard.
5. 사용 설명서
The SMART Board SBM685IX3 offers intuitive interaction for various applications.
5.1 기본 상호작용
- Touch and Pen: Use your finger or the provided pens to interact with the projected content. The system supports dual-touch controls, allowing multiple users to interact simultaneously.
- 마우스 기능: Perform standard mouse functions (click, right-click, drag) directly on the board.
- 터치 제스처: Utilize natural touch gestures such as flicking, rotating, and zooming to manipulate content.
5.2 SMART Ink Functionality
SMART Ink allows you to write and draw directly over various applications and content:
- 주석: Write over websites, videos, PDF documents, and Microsoft Office files.
- Save Notes: Save your annotations and notes in almost any file type for later reference or sharing.

Figure 5.1: The SMART Board interactive whiteboard displaying a world map with annotations, illustrating interactive teaching or presentation capabilities.

Figure 5.2: Two children interacting with the SMART Board interactive whiteboard, which displays a dinosaur skeleton image, demonstrating its use in educational settings.
5.3 시스템 호환성
The SMART Board SBM685IX3 is compatible with both Windows and Mac OS operating systems, allowing for flexible integration into existing IT infrastructures.

Figure 5.3: The SMART Board interactive whiteboard displaying the Windows Start menu with various applications, emphasizing its computer-like functionality.
6. 특징
The SMART Board Interactive Whiteboard System SBM685IX3 offers several features to enhance collaboration and presentation:
- Natural Touch Experience: Write, erase, and perform mouse functions using a finger or pen with intuitive touch gestures like flick, rotate, and zoom.
- Simultaneous Touch: Supports multiple simultaneous touches, facilitating collaborative work among students or team members.
- SMART Ink Integration: Allows users to write directly over various digital content, including websites, videos, PDFs, and Microsoft Office files, and save notes in multiple file 형식.
- Enhanced Presentations: Provides a large, dynamic surface for delivering engaging content, enabling audience interaction with on-screen elements.
- 다양한 응용 분야: Suitable for diverse uses such as capturing project notes, incorporating client feedback in design processes, and creating training simulators.
7. 유지관리
SMART Board 시스템의 수명 연장 및 최적 성능을 보장하려면 다음 유지 관리 지침을 따르십시오.
- 화이트보드 청소하기: 부드럽고 보풀이 없는 천을 살짝 사용하십시오. dampened with water or a mild, non-abrasive cleaner specifically designed for interactive whiteboards. Avoid harsh chemicals or abrasive materials.
- Projector Lens Care: 프로젝터 렌즈의 먼지를 제거하려면 렌즈 청소용 천이나 에어 블로어를 사용하여 부드럽게 닦아주세요. 렌즈를 손가락으로 직접 만지지 마세요.
- 일반 청소: Keep the surrounding area clean and free of dust. Regularly wipe down the projector casing and pen tray.
- 케이블 관리 : Ensure all cables are securely connected and not under strain. Avoid bending or kinking cables sharply.
8. 문제 해결
If you encounter issues with your SMART Board system, refer to the following common troubleshooting steps:
8.1 No Display on Whiteboard
- 전원 확인: Ensure both the projector and the SMART Board are powered on and their power cables are securely connected.
- Verify HDMI Connection: Confirm the HDMI cable is firmly connected between the computer and the projector.
- 컴퓨터 디스플레이 설정: Check your computer's display settings to ensure it is configured to extend or duplicate the display to the projector.
- Projector Input: Ensure the projector's input source is set to the correct HDMI port.
8.2 No Touch or Pen Interaction
- USB 연결 확인: Ensure the USB cable connecting the SMART Board to your computer is securely plugged in.
- 드라이버 설치: Verify that the necessary SMART Board drivers are installed on your computer. Refer to the SMART Technologies web최신 드라이버 사이트.
- 구경 측정: If interaction is inaccurate, perform a calibration of the SMART Board. Instructions for calibration are typically found in the SMART software settings.
8.3 오디오 문제
- 볼륨 레벨: Check the volume settings on your computer and the projector.
- 오디오 출력: Ensure your computer's audio output is directed to the HDMI port connected to the projector.
For further assistance, consult the detailed troubleshooting guides available on the SMART Technologies support web대지.
9. 사양
The following are the technical specifications for the SMART Board Interactive Whiteboard System SBM685IX3:
| 특징 | 사양 |
|---|---|
| 상표 | 똑똑한 |
| 모델 | SBM685IX3 |
| 제조업체 | NETCNA |
| 품목 무게 | 63파운드 |
| 제품 치수 | 77.5 x 49.5 x 2 인치 |
| Whiteboard Size | 87 inches (7.25 feet diagonal view각도) |
| 프로젝터 유형 | Ultra-Short-Throw |
| 프로젝터 화면비 | 16:10 Widescreen (WXGA) |
| 프로젝터 오디오 | 16W 스피커 내장 |
| 연결성 | USB (for board), HDMI (for projector) |
| 색상 | 하얀색 |
| 재료 유형 | Low friction aluminum |
| 장착 유형 | 벽걸이형 |
| 추천 용도 | School, office, presentation, education, training, classroom, remote learning, workshops, meetings, project management, business presentations |
| ASIN | B01LB9GFKM |
| 첫 번째 이용 가능 날짜 | 31년 2016월 XNUMX일 |
10. 보증 및 지원
For information regarding warranty coverage, technical support, and service, please refer to the documentation included with your product or visit the official SMART Technologies website. Specific warranty terms may vary based on region and purchase date.
For driver downloads, software updates, and additional support resources, please visit the manufacturer's support portal.


