1. 제품 오버view
The LUX Pro P711V-010 is a versatile thermostat designed for controlling heating and cooling systems. It offers both programmable (7-day, 5/2-day) and non-programmable settings, an easy-view backlight, and a keypad lock feature. This manual provides detailed instructions for installation, operation, and programming to ensure optimal performance and energy efficiency.

이미지 1.1: 앞면 view of the LUX Pro P711V-010 Thermostat, showing the digital display and control buttons.

Image 1.2: Key features of the P711V-010, highlighting vertical installation compatibility, dual power options (battery or 24VAC), and keyboard lockout functionality.
2. 특징
- 프로그래밍 가능한 설정: Offers 7-day, 5/2-day, or non-programmable options for flexible temperature control.
- 쉬운-View 백라이트: Provides a clear display for easy reading in various lighting conditions.
- User-Selectable Periods: Customize your heating and cooling schedule with 2 or 4 periods per day.
- 키패드 잠금: Prevents unauthorized adjustments to settings.
- 이중 전원 옵션: Can be powered by 2 AA batteries (included) or a 24-volt system.
- 온도 표시 : Switch between Fahrenheit (F) and Celsius (C) display.
- Adjustable Temperature Differential: Allows customization of the temperature swing before the system activates.
- User Temperature Calibration: 온도 측정값의 정확도를 높이기 위해 미세 조정하십시오.
- Adjustable Heat/Cool Set Temperature Limit Stops: Set minimum and maximum temperature limits.
- 5/2-Minute Time Delay: Protects HVAC equipment by preventing short cycling.
3. 패키지 내용
패키지를 열었을 때 다음 품목이 모두 포함되어 있는지 확인하세요.
- LUX Pro P711V-010 Thermostat Unit
- AA LR6 배터리 2개
- 2 ST Screws
- 2 벽 앵커
- 와이어 라벨
- 사용 설명서(본 문서)

Image 3.1: Illustration of the contents included in the thermostat package.
4. 사양
| 사양 | 세부 사항 |
|---|---|
| 모델명 | P711V-010 |
| 치수 | 1.25 x 3.38 x 5.38 인치 |
| 품목 무게 | 0.01 온스 |
| 전원 | Battery Powered (2 AA included) or 24 Volts (system) |
| 디스플레이 유형 | 백라이트가있는 LCD |
| 제어 유형 | 푸시 버튼 |
| 장착 유형 | 수직 마운트 |
| 권tage | 24 볼트 |
| 색상 | 하얀색 |
| 인증 | UL 인증 |
5. 시스템 호환성
The P711V-010 thermostat is compatible with a variety of HVAC systems. Please review the compatibility information below to ensure it is suitable for your system.
호환 시스템 (24V)
- ✔ Gas/Oil/Electric Furnace (Heating only)
- ✔ Gas/Oil/Electric Furnace (Single Stage)
- ✔ Heat Pump without Auxiliary Heat
- ✔ 2-wire Hydronic (Hot Water)
- ✔ 750 Millivolt Systems
- ✔ Gas Fireplaces (24V)
- ✔ Cooling only systems
- ✔ Single stage 냉각 시스템
호환되지 않음:
- ✘ Heat Pump Multistage
- ✘ Radiant Ceiling Heat
- ✘ Electric Baseboards
- ✘ Heat Pump with Auxiliary Heat
- ✘ Portable Space Heaters
- ✘ 3-wire Hydronic (Hot Water)
- ✘ Gas/Oil/Electric Furnace - Multistage
- ✘ Cool Multistage
- ✘ Plug-in Air Conditioners

Image 5.1: Visual chart detailing compatible and incompatible HVAC system types.
6. 설치
중요한: Before beginning installation, turn off power to your heating and cooling system at the main circuit breaker or fuse box. Improper wiring can damage the thermostat and/or your HVAC system.
6.1 배선도
Refer to the following diagrams to correctly wire your thermostat based on your existing system configuration. Use the provided wire labels to mark your existing wires before disconnecting your old thermostat.
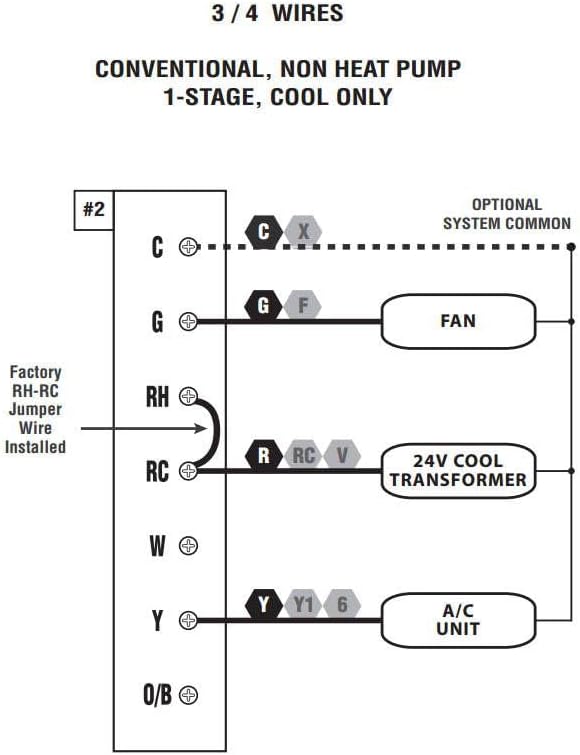
Image 6.1: Wiring diagram for 3 or 4 wire conventional systems with 1-stag전자 냉각 전용.

Image 6.2: Wiring diagram for 4 or 5 wire conventional systems with 1-stage 가열 및 1-stag냉각.

Image 6.3: Wiring diagram for 5 or 6 wire conventional systems with 1-heat and 1-cool, utilizing two transformers. Note: Remove the factory RH-RC jumper wire for this configuration.
7. 운영
This section details the basic controls and functions of your P711V-010 thermostat.

Image 7.1: Labeled diagram of the P711V-010 control panel, indicating the LCD display, programming buttons (Set, Next, Hold), temperature adjustment buttons (Up, Down), Fan Mode switch, and System Mode switch.
7.1 기본 컨트롤
- Fan Switch (Auto/On):
- 자동: 팬은 난방 또는 냉방 시스템이 작동 중일 때만 작동합니다.
- 에: 팬이 계속 작동합니다.
- Mode Switch (Heat/Off/Cool):
- 열: Thermostat controls the heating system.
- 끄다: 난방 및 냉방 시스템이 모두 꺼져 있습니다.
- 시원한: Thermostat controls the cooling system.
- 위쪽(▲) / 아래쪽(▼) 버튼: Adjust the set temperature or navigate programming menus.
- 설정 버튼: 프로그래밍 설정을 입력하고 확인하는 데 사용됩니다.
- 다음 버튼: Advances through programming steps.
- 홀드 버튼: Maintains the current temperature indefinitely, overriding any programmed schedule. Press again to cancel HOLD and resume program.
7.2 프로그래밍
The P711V-010 offers 7-day, 5/2-day, or non-programmable modes. Refer to the full instruction manual for detailed programming steps for each mode. Generally, programming involves setting the time, day, and desired temperatures for specific periods (e.g., Wake, Leave, Return, Sleep).
7.3 키패드 잠금
To prevent unauthorized changes, the thermostat features a keypad lock. Consult the detailed manual for instructions on how to activate and deactivate this feature.
8. 문제 해결
온도 조절기에 문제가 발생하면 다음과 같은 일반적인 문제 해결 단계를 고려해 보세요.
- 디스플레이 없음/빈 화면: Check batteries and replace if necessary. Ensure power to the HVAC system is on.
- 시스템이 응답하지 않음: Verify the thermostat is set to the correct mode (Heat/Cool). Check wiring connections. Ensure the system's circuit breaker is not tripped.
- 잘못된 온도 측정: The thermostat may require calibration. Refer to the full manual for calibration instructions.
- 프로그램이 실행되지 않습니다: Ensure the thermostat is not in 'HOLD' mode. Verify programming settings are correctly entered.
- Short Cycling: The 5/2-minute time delay is designed to prevent this. If short cycling persists, consult an HVAC professional.
For more detailed troubleshooting, refer to the comprehensive instruction manual included with your product or visit the LUX support web대지.
9. 보증 및 지원
The LUX Pro P711V-010 Thermostat comes with a 5년 한정 보증. 본 보증은 정상적인 사용 환경에서 발생하는 재료 및 제조상의 결함에 적용됩니다. 보증 청구를 위해 구매 증빙 서류를 보관해 주십시오.
For technical support, warranty service, or additional information, please refer to the contact details provided in the full product manual or visit the official LUX web대지.


