1. 서론
This manual provides detailed instructions for the installation, operation, and maintenance of your Focal FPX1.1000 Class D Mono Amp앰프입니다. 설치 또는 작동 전에 본 설명서를 꼼꼼히 읽어 올바른 기능과 안전을 확보하십시오. 나중에 참조할 수 있도록 본 설명서를 보관하십시오.
2. 안전 지침
부상이나 장비 손상을 방지하기 위해 다음 안전 수칙을 준수하십시오. amp증폭기 및 차량:
- 전문 설치 권장: Installation of car audio equipment can be complex. It is highly recommended that a qualified professional install this amp리퍼.
- 배터리 분리: 단락을 방지하기 위해 전기 작업을 시작하기 전에 항상 차량의 배터리 음극 단자를 분리하세요.
- 적절한 배선: Use appropriate gauge wiring for power, ground, and speaker connections as specified in the installation section. Incorrect wiring can cause overheating, fire, or damage to components.
- 통풍: 확인하십시오 amp증폭기는 과열을 방지하기 위해 통풍이 잘 되는 곳에 설치해야 합니다. 냉각 핀을 막지 마십시오.
- 습기를 피하세요: 노출시키지 마십시오 amp습기나 물에 대한 증폭기.
- 안전한 장착: 마운트하다 amp차량 운행 중 풀리지 않도록 증폭기를 단단히 고정하십시오. 풀리면 부상이나 손상이 발생할 수 있습니다.
- 퓨즈 보호: Always use an external fuse on the main power wire, close to the battery, with the recommended amp분노.
3. 제품 오버view
3.1 주요 특징
- CEA Power (4 Ohms): 1×420 Wrms
- Maximum Power (2 Ohms): 1×700 Wrms
- Maximum Power (1 Ohm): 1×1000 Wrms
- Bandwidth: 15Hz–250Hz
- Integrated Protections: Short Circuit, low impedance, reversal of polarity, DC, power drop, heat protection.
- 클래스 D 모노 Amplifier design for high power and efficiency.
3.2 상자 내용물
- Focal FPX1.1000 Mono Amp리퍼
- 사용 설명서 (본 문서)
- 장착 하드웨어(나사 등)
4. 설치 및 설정
Proper installation is crucial for optimal performance and safety. Consult a professional installer if you are unsure about any steps.
4.1 설치 위치
다음 조건을 충족하는 설치 위치를 선택하십시오.
- 건조하고 습기가 없어야 합니다.
- 열을 잘 발산할 수 있도록 통풍이 잘 되어야 합니다.
- Secure and protected from physical damage.
- Away from fuel lines, brake lines, and electrical wiring harnesses.
Common locations include under a seat, in the trunk, or behind a panel.
4.2 배선 연결
연결 작업을 하기 전에 차량 배터리의 음극 단자를 분리하십시오.
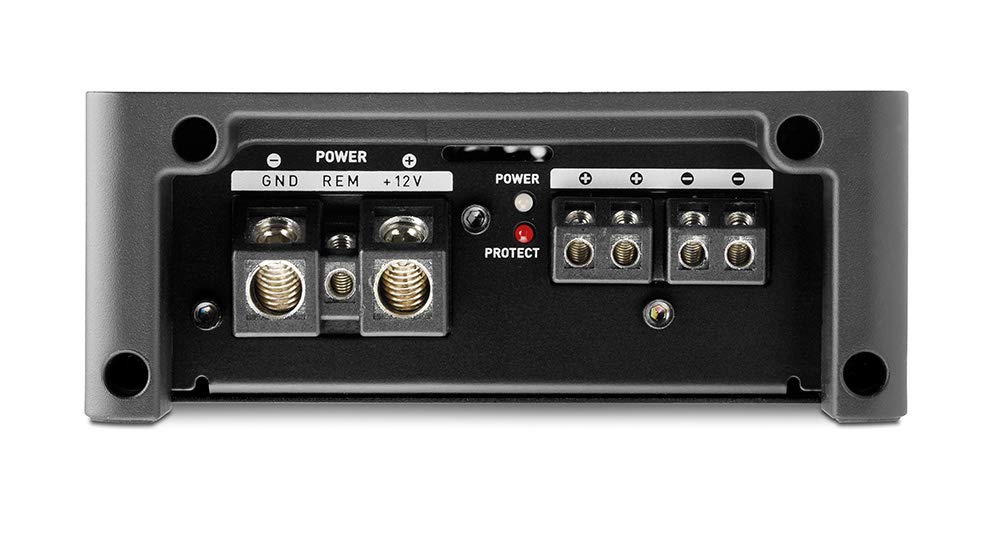
Image 1: Power and Speaker Terminal Connections. This image displays the rear panel of the amplifier, highlighting the power input terminals (GND, REM, +12V) and the speaker output terminals. A red 'PROTECT' indicator light is also visible.
- 전원선(+12V): Run a heavy-gauge power wire (e.g., 4 AWG or larger, depending on total system power) directly from the positive terminal of the vehicle's battery to the +12V terminal on the amplifier. Install an inline fuse holder with the appropriate fuse (refer to specifications for recommended fuse size) within 18 inches (45 cm) of the battery.
- 접지선(GND): Connect a heavy-gauge ground wire (same gauge as power wire) from the GND terminal on the amplifier to a clean, unpainted metal surface on the vehicle's chassis. Ensure a good electrical connection by scraping away any paint or rust. The ground wire should be as short as possible, ideally less than 3 feet (1 meter).
- 원격 턴온 와이어(REM): Connect a smaller gauge wire (e.g., 18 AWG) from the REM terminal on the amplifier to the remote turn-on output of your head unit or other switched 12V source. This wire turns the amp앰프를 오디오 시스템과 함께 켜고 끌 수 있습니다.
- 스피커 출력: 서브우퍼를 스피커 출력 단자에 연결하십시오. 극성이 올바른지 확인하십시오(+는 +에, -는 -에 연결). 본 제품은 모노입니다. amplifier, designed for a single subwoofer or multiple subwoofers wired to present a 1-ohm or 2-ohm load. Refer to your subwoofer's specifications for impedance matching.
- RCA 입력: Connect RCA cables from the subwoofer output of your head unit to the INPUT CH1/CH2 RCA jacks on the amp리퍼.

Image 2: Input and Control Panel. This image shows the front panel of the amplifier, featuring RCA input and output jacks, a remote port, and various control knobs for Gain, Subsonic filter, Bass Boost, Phase, and Low Pass Filter (LPF).
5. 사용 설명서
설치 후 조정하세요 amp최적의 사운드 성능을 위한 리파이어 설정.
5.1 제어판 조정
- 게인(입력 감도): 이 컨트롤은 다음과 일치합니다. amplifier's input sensitivity to the output level of your head unit. Start with the gain at minimum (Min) and slowly increase it until you hear distortion, then back off slightly. Do not use the gain control as a volume knob.
- 아음속: 이 필터는 사람이 들을 수 없는 극저주파를 제거하여 불필요한 에너지를 낭비하지 않도록 합니다. amplifier power or damage subwoofers. Adjust it to a frequency below your subwoofer's resonant frequency or port tuning frequency (typically 15-30Hz).
- 베이스 부스트: This control provides an increase in bass output at a specific frequency. Use sparingly to avoid distortion and potential damage to subwoofers.
- 단계: This control adjusts the phase of the subwoofer output relative to the main speakers (0° to 180°). Adjust for the best blend and impact with your front speakers.
- LPF(저역 통과 필터): This filter allows only frequencies below the set point to pass through to the subwoofer. Adjust it to blend smoothly with your main speakers, typically between 50Hz and 80Hz.
5.2 전원 및 보호 표시등
- 전원 표시기: 다음과 같은 경우에 켜집니다. amp앰프는 전원을 공급받고 정상적으로 작동하고 있습니다.
- 보호 표시기: 다음과 같은 경우에 켜집니다. amplifier detects a fault (e.g., short circuit, overheating, low impedance). If this light comes on, turn off your audio system immediately and troubleshoot the issue.
6. 유지관리
The Focal FPX1.1000 amp이 앰프는 최소한의 유지보수만 필요합니다. 수명을 연장하려면 다음 지침을 따르십시오.
- 청소: 주기적으로 닦아주세요 amp부드럽고 마른 천으로 기기 외부를 닦으세요. 강한 화학 물질이나 연마성 세척제는 사용하지 마세요.
- 통풍: Ensure that the cooling fins remain free of dust and debris. Use compressed air to gently clear any blockages if necessary.
- 사이: 가끔 모든 배선 연결을 점검하여 안전하고 부식되지 않았는지 확인하세요.
7. 문제 해결
문제가 발생하는 경우 amp증폭기 관련 문의는 전문가의 도움을 받기 전에 다음 표를 참조하십시오.
| 문제 | 가능한 원인 | 해결책 |
|---|---|---|
| 전원 없음 / Amp리퍼가 켜지지 않습니다 |
|
|
| Protect light is on |
|
|
| 소리가 나지 않습니다 |
|
|
| 왜곡된 소리 |
|
|
8. 사양
| 특징 | 세부 사항 |
|---|---|
| 모델 번호 | FPX1.1000 |
| 상표 | 초점 |
| CEA 전원(4옴) | 1×420 Wrms |
| Maximum Power (2 Ohms) | 1×700 Wrms |
| Maximum Power (1 Ohm) | 1×1000 Wrms |
| 대역폭 | 15Hz ~ 250Hz |
| 보호 | Short Circuit, low impedance, reversal of polarity, DC, power drop, heat protection |
| 제품 치수 | 11.81 x 11.81 x 11.81인치; 6파운드 |
| 장착 유형 | 표면 실장 |
| 권tage | 10 Volts, 14.4 Volts, 5 Volts (Operating Voltag전자 범위) |
9. 보증 및 지원
Focal products are designed and manufactured to high quality standards. This product is covered by a limited warranty against defects in materials and workmanship. The specific terms and duration of the warranty may vary by region and retailer. Please retain your proof of purchase for warranty claims.
For technical support, warranty service, or further assistance, please contact your authorized Focal dealer or visit the official Focal web연락처 정보 사이트.


