소개
This manual provides comprehensive instructions for the installation, operation, and maintenance of your PROJECT X Ghost Box Wireless Accessory Control Ecosystem Kit. This system is designed to offer a customizable and wirelessly controlled experience for managing vehicle accessories. Please read this manual thoroughly before installation and operation to ensure proper function and safety.
The Ghost Box kit includes one keypad and four control modules, enabling smart control of multiple accessories.
제품 끝view
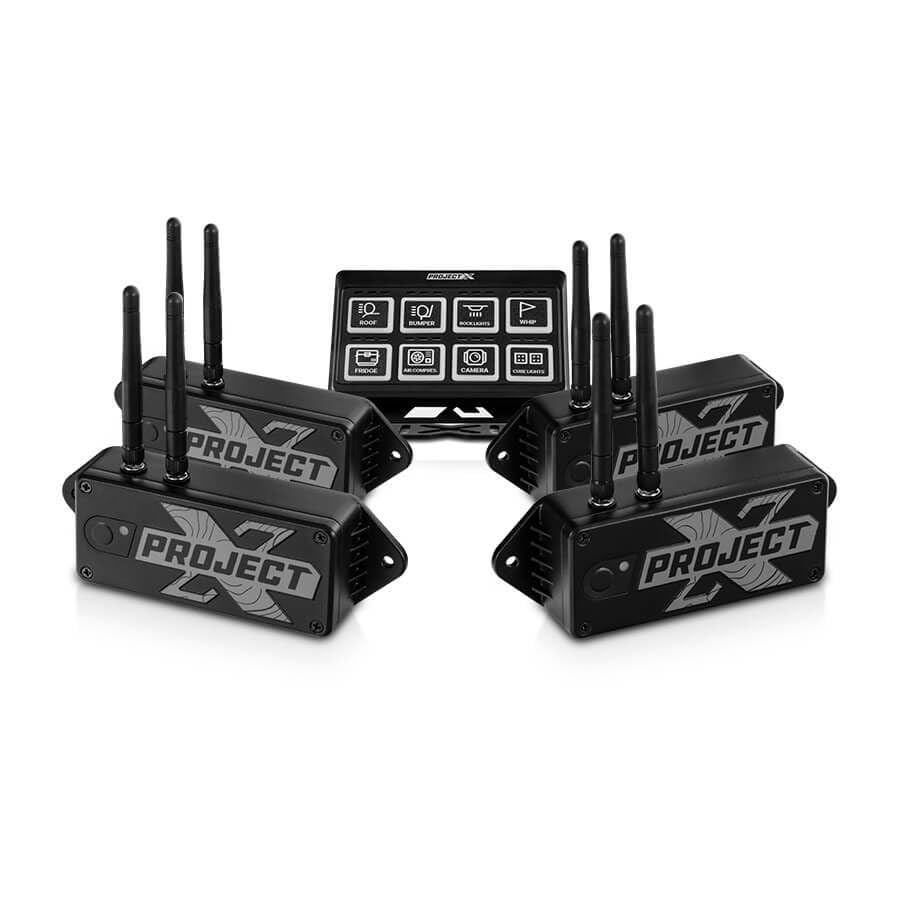
이미지 1: The PROJECT X Ghost Box Kit, featuring a central control keypad and four individual wireless control modules. Each module is black with "PROJECT X" branding and multiple antennas for wireless communication. The keypad displays various accessory icons such as roof, bumper, spotlights, whip, fridge, air compressor, camera, and rock lights.
The PROJECT X Ghost Box system consists of a central keypad and multiple wireless control modules. These modules connect to your vehicle's accessory power harness, converting traditional accessories into "smart" devices controllable via the keypad or the PROJECT X mobile application.
주요 특징:
- 무선 연결 : Utilizes Bluetooth for initial pairing and 2.4GHz RF Wireless for reliable, low-latency communication with accessories.
- 저용량tage 보호: Each control module features adjustable low-voltage protection (10.0V to 14.9V) to prevent battery drain.
- 앱 제어: Remote control functionality via the PROJECT X mobile application.
- 확장 가능한 시스템: Designed for easy integration and expansion with additional accessories.
상자 안에 무엇이 들어있나요?
Upon opening your PROJECT X Ghost Box kit, please verify that all components are present:
- 1 x Ghost Box Keypad
- 4 x Ghost Box Control Modules
설정 및 설치
1. 설치 계획
Before beginning installation, plan the placement of your Ghost Box Keypad and Control Modules. Consider accessibility, cable routing, and proximity to the accessories they will control. Ensure the chosen locations are protected from extreme elements and potential damage.
2. Installing Control Modules
- Mount each control module securely in a dry, protected location near the accessory it will power.
- Connect the accessory's power harness to the designated output on the control module. Refer to the wiring diagram (if provided separately) for specific connections.
- Connect the control module's power input to a fused 12V power source in your vehicle. Ensure proper grounding.
- Repeat for all four control modules and their respective accessories.
3. Installing the Keypad
- Choose a convenient and accessible location for the keypad within the vehicle's cabin.
- Securely mount the keypad using the provided hardware or adhesive.
- Connect the keypad to a suitable 12V power source, ensuring it is fused.
4. 초기 페어링 (블루투스)
- Power on your vehicle and the Ghost Box system.
- Download the PROJECT X app from your device's app store.
- Open the app and follow the on-screen instructions to pair your Ghost Box Keypad and Control Modules via Bluetooth. This initial pairing establishes the connection for 2.4GHz RF Wireless communication.
작동 지침
키패드 사용
The Ghost Box Keypad provides direct control over your connected accessories. Each button on the keypad corresponds to a specific accessory or function.
- Press a button once to activate the corresponding accessory.
- Press the button again to deactivate the accessory.
- Some buttons may have additional functions (e.g., momentary, dimming) configurable via the PROJECT X app.
Using the PROJECT X App
The PROJECT X app offers advanced control and customization options for your Ghost Box system.
- 원격 제어: Activate and deactivate accessories directly from your smartphone.
- 사용자 정의: Assign specific accessories to keypad buttons, configure button behavior (e.g., ON-OFF-ON, momentary), and adjust low-voltage protection settings for each module.
- 모니터링: View the status of connected accessories and system diagnostics.
Adjusting Low-Voltage 보호
Each control module's low-voltage protection can be adjusted from 10.0V to 14.9V in 0.1V increments. This feature prevents excessive battery drain by automatically shutting off accessories if the vehicle's battery voltage 값이 설정된 임계값 아래로 떨어집니다.
- Open the PROJECT X app on your smartphone.
- Navigate to the settings for the specific control module you wish to adjust.
- Select the desired low-voltage cutoff point.
- 변경 사항을 저장합니다.
유지
The PROJECT X Ghost Box system is designed for durability and minimal maintenance. However, regular checks can ensure optimal performance.
- 배선 검사: Periodically inspect all wiring connections for corrosion, fraying, or loose terminals. Ensure all connections are secure.
- Module and Keypad Cleaning: Keep the control modules and keypad clean and free of dirt, dust, and moisture. Use a soft, dry cloth for cleaning. Avoid harsh chemicals.
- 펌웨어 업데이트: Check the PROJECT X app regularly for any available firmware updates for your Ghost Box system. Updates can improve performance and add new features.
문제 해결
| 문제 | 가능한 원인 | 해결책 |
|---|---|---|
| 액세서리가 켜지지 않습니다. |
|
|
| 키패드가 응답하지 않습니다. |
|
|
| App cannot connect to Ghost Box. |
|
|
명세서
| 특징 | 세부 사항 |
|---|---|
| 상표 | 프로젝트 X |
| 모델 | Ghost Box (1 Keypad + 4 Modules) |
| 작동 모드 | 켜짐-꺼짐-켜짐 |
| Current Rating (per module) | 40 Amps |
| 운영 볼륨tage | 16볼트(최대) |
| 저용량tage 보호 | Adjustable 10.0V to 14.9V |
| 연락처 유형 | 일반적으로 오픈 |
| 커넥터 유형 | 플러그인 |
| 무선 기술 | Bluetooth (pairing), 2.4GHz RF Wireless (operation) |
| 제품 크기(L x W x H) | 6.7 x 3.4 x 4.5 inches (overall package/keypad, modules are smaller) |
| 무게 | 7.3 Pounds (overall package) |
보증 정보
PROJECT X products are manufactured to high-quality standards. For specific warranty terms and conditions, please refer to the warranty card included with your product or visit the official PROJECT X web사이트. 보증 청구를 위해 구매 증빙 자료를 보관하세요.
보호 계획은 별도로 구매 가능합니다.
- 4년 보호 계획
- Complete Protect: Covers eligible past and future purchases (monthly subscription)
고객 지원
If you encounter any issues or have questions not covered in this manual, please contact PROJECT X customer support. Contact information can typically be found on the product packaging or the official PROJECT X web대지.
For the latest information, FAQs, and additional resources, please visit the Project X Brand Page.


