1. 이상view
The GIGABYTE GA-X99-Phoenix SLI is an ATX motherboard designed for high-performance computing. It supports Intel Core i7 Broadwell-E processors on the LGA2011-3 socket and features the Intel X99 chipset. This motherboard is equipped with Quad Channel DDR4 memory support, multiple PCIe slots for 3-Way/2-Way SLI and CrossFire configurations, and advanced storage options including NVMe PCIe Gen3 x4 M.2 and U.2 interfaces. It also integrates Intel USB 3.1 with Type-C, dual Intel Gigabit Ethernet, and Intel 802.11ac wireless connectivity.
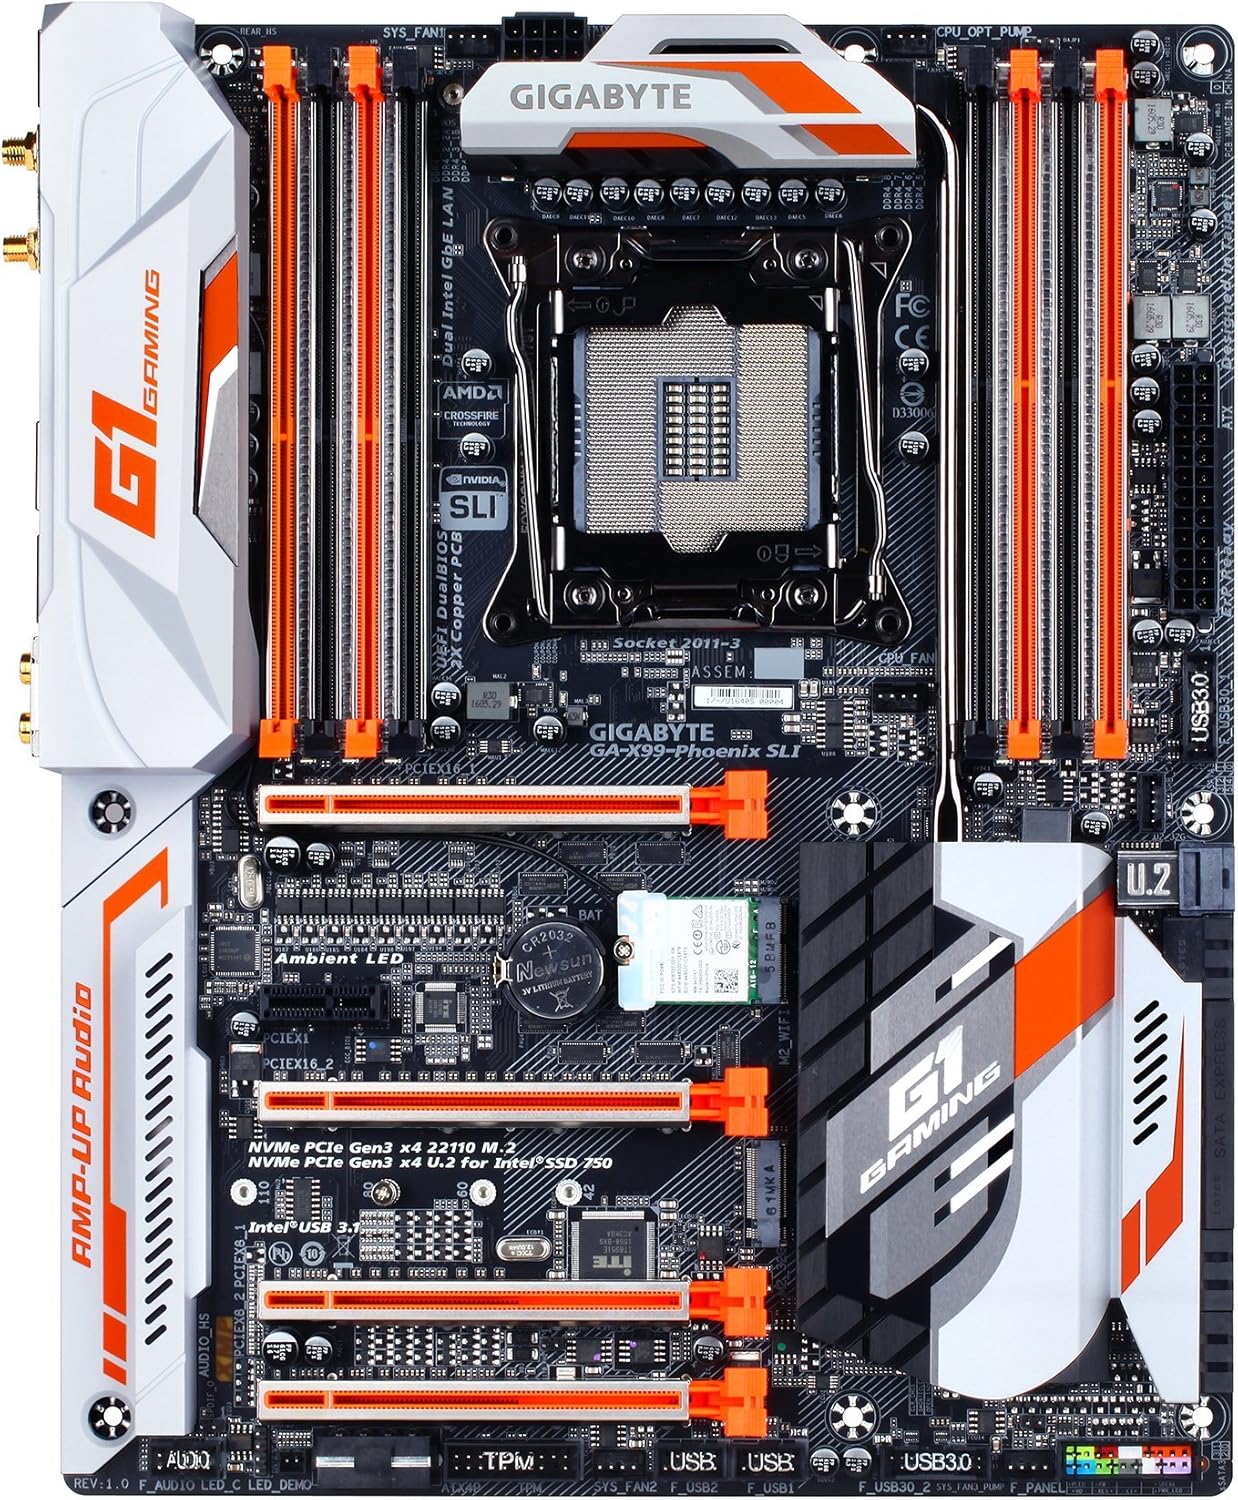
그림 1: 상향식 view of the GIGABYTE GA-X99-Phoenix SLI motherboard, showcasing its layout including the CPU socket, RAM slots, PCIe slots, and various connectors.
2. 설정 및 설치
2.1 설치 전 체크리스트
- 케이스 호환성: Ensure your PC case supports the E-ATX form factor. Standard ATX cases may not accommodate this motherboard.
- 프로세서: Verify you have an Intel Core i7 processor compatible with the LGA 2011-3 socket.
- 메모리: Use DDR4 DIMMs. The motherboard supports Quad Channel, Registered / Non-ECC Unbuffered DDR4.
- 전원 공급 장치: A stable power supply unit (PSU) with sufficient wattage is crucial for system stability.
2.2 마더 보드 설치
- 사례 준비: PC 케이스의 뒤쪽 개구부에 I/O 실드를 설치합니다.
- 마더보드 장착: 케이스의 스탠드오프에 마더보드를 조심스럽게 맞춰 정렬한 후 나사로 고정하십시오.
- CPU 설치: Open the CPU socket lever, align the CPU with the socket (matching the golden triangle on the CPU to the mark on the socket), gently place the CPU, and close the lever.
- CPU 쿨러 설치: 선택한 CPU 쿨러를 제조사의 지침에 따라 장착하십시오.
- 메모리(RAM) 설치: Open the clips on the DDR4 DIMM slots. Align the memory modules with the slots, ensuring the notch on the module matches the key in the slot. Press down firmly until the clips snap into place. For optimal performance, populate memory in a quad-channel configuration as recommended by the motherboard manual.
- 전원 연결: Connect the 24-pin ATX main power connector and the 8-pin CPU power connector from your PSU to the motherboard.
- 저장 장치 연결: Connect SATA, M.2, or U.2 drives to the appropriate ports.
- 주변기기 연결: Connect front panel headers (power, reset, USB, audio), USB devices, and other peripherals.

그림 2: 각도 view of the motherboard, highlighting the rear I/O panel and the layout of the PCIe and RAM slots.
2.3 초기 부팅 및 BIOS 접근
After connecting all necessary components, power on your system. During the Power-On Self-Test (POST), press the 델 key repeatedly to enter the UEFI BIOS setup. You may also press the 끝 key during POST to access Q-Flash for BIOS updates.
3. 마더보드 작동
3.1 UEFI BIOS 탐색
The GIGABYTE UEFI BIOS provides a graphical interface for system configuration. While mouse navigation is available, some users may find the keyboard more responsive for precise control due to potential mouse lag within the BIOS environment.
3.2 오버클럭 기능
This motherboard offers robust overclocking capabilities. For users new to overclocking, GIGABYTE's 이지튠 utility (part of the APP Center) provides one-click overclocking options (e.g., 3.8GHz, 4.0GHz, 4.2GHz) for compatible CPUs. Memory overclocking can be adjusted directly in the BIOS by selecting desired speeds from a dropdown menu, allowing the motherboard to manage voltage settings automatically.
3.3 소프트웨어 유틸리티
그만큼 GIGABYTE APP Center provides access to various utilities, including:
- 이지튠: For system tuning, monitoring, and overclocking.
- Cloud Station: For cloud-based data management and sharing.
- Other utilities for fan control, system information, and more.
3.4 오디오 및 네트워크
The motherboard features 115dB SNR HD Audio with a built-in rear audio amplifier for enhanced sound quality. Network connectivity is provided by Dual Intel Gigabit Ethernet LAN ports, which can be optimized with cFosSpeed Internet Accelerator Software, and integrated Intel 802.11ac Dual Band Wireless with Bluetooth 4.2.

Figure 3: Close-up of the rear I/O panel, showing various ports including USB, Ethernet, audio jacks, and wireless antenna connectors.
4. 유지관리
4.1 CMOS 배터리
The motherboard uses a Lithium Metal battery (CR2032) to retain BIOS settings and the system clock when the computer is powered off. If you experience issues with incorrect time/date or lost BIOS settings, the CMOS battery may need replacement. Refer to the motherboard diagram for its location.
4.2 BIOS 업데이트
GIGABYTE's Q-플래시 플러스 utility allows you to update the BIOS without installing a CPU, memory, or graphics card. Simply download the latest BIOS version from the GIGABYTE website, place it on a USB flash drive, and follow the instructions for Q-Flash Plus. Regular BIOS updates can improve system stability, compatibility, and performance.
5. 문제 해결
5.1 일반적인 문제
- System Fails to POST (Power-On Self-Test):
- 모든 전원 연결(24핀 ATX, 8핀 CPU)을 확인하세요.
- CPU와 RAM이 올바르게 장착되었는지 확인하십시오.
- Verify the CPU cooler is properly installed.
- CPU, RAM 1개, 내장 그래픽이 없는 경우 GPU 등 필수 구성 요소만 사용하여 부팅해 보세요.
- System Freezes or is Unstable:
- Ensure the BIOS is updated to the latest stable version. Early BIOS versions may have compatibility issues.
- 과열을 배제하기 위해 CPU와 GPU 온도를 확인하세요.
- 오버클럭을 한 경우, 안정성을 확인하기 위해 기본 설정으로 되돌리십시오.
- 메모리 진단 도구를 실행하여 RAM 무결성을 확인하세요.
- No Debug Code LED: This motherboard does not feature a debug code LED. Troubleshooting will rely on beep codes (if enabled) or visual inspection of components.
- Mouse Lag in BIOS: This is a known characteristic for some users. Use keyboard navigation for a more responsive experience.
6. 사양
| 특징 | 사양 |
|---|---|
| 상표 | 기가바이트 |
| 모델명 | GA-X99-Phoenix SLI |
| CPU 소켓 | LGA 2011-3 |
| 호환 프로세서 | Intel Core i7 (Broadwell-E) |
| 칩셋 유형 | 인텔 X99 |
| RAM 메모리 기술 | DDR4 SD램 |
| 메모리 채널 | 쿼드 채널 |
| 최대 메모리 용량 | Up to 256 GB (8 DIMMs) |
| 그래픽 인터페이스 | PCIe Gen3 x16 slots (Supports 3-Way/2-Way SLI & CrossFire) |
| 스토리지 인터페이스 | NVMe PCIe Gen3 x4 22110 M.2, U.2, SATA Express, SATA 6Gb/s |
| USB 포트 | Intel USB 3.1 (Type-A & Type-C), USB 3.0, USB 2.0 |
| 랜 | Dual Intel Gigabit Ethernet |
| 무선 연결 | Intel 802.11ac Dual Band Wireless, Bluetooth 4.2 |
| 오디오 | 115dB SNR HD Audio with Built-in Rear Audio Amp리퍼 |
| 폼 팩터 | E-ATX (14.48 x 12.2 x 3.85 inches) |
| 특별 기능 | Ambient Surround LED, Ultra Durable Metal Shielding, Anti-Sulfur Resistors, Anti-Rust Rear I/O, Dual Hybrid Fan Headers, GIGABYTE UEFI Dual BIOS with Q-Flash Plus |
| CMOS 배터리 | 1개의 리튬 금속 배터리 필요 |