소개
This user manual provides detailed instructions for the MICTUNING Blue ROCK LIGHTS Rocker Switch Kit, model LS083501JL. This 5-pin ON/OFF rocker switch is designed for automotive applications, featuring a blue LED light for clear visibility and a durable construction.
The switch is a Single Pole Single Throw (SPST) design, making it straightforward to integrate into various wiring harnesses. It includes pre-attached jumper wires for simplified installation.
Equipped with two premium LEDs, the switch emits a cozy blue beam that illuminates the etched patterns, ensuring easy identification and operation even in low-light conditions. Its robust construction, made from strengthened plastic and well-conductive pins, guarantees long-lasting durability. The patterns are laser-etched directly onto the switch surface to prevent fading.
This versatile switch is rated for 20A at 12V and 10A at 24V, making it suitable for controlling a wide range of automotive lighting, including LED light bars, work lights, fog lamps, headlights, taillights, and auxiliary lamps.

Figure 1: MICTUNING Blue ROCK LIGHTS Rocker Switch Kit with included jumper wires.
제품 사양
| 특징 | 세부 사항 |
|---|---|
| 작동 모드 | 온-오프 |
| 현재 평가 | 20 Amp초(12V), 10 Amp초 (24V) |
| 운영 볼륨tage | 12볼트(직류), 24볼트(직류) |
| 연락처 유형 | 일반적으로 오픈 |
| 커넥터 유형 | 플러그인 |
| 상표 | 마이튜닝 |
| 단말기 | 핀 |
| 품목 치수(L x W x H) | 168 x 24 x 24 인치 (Note: This dimension appears to be for packaging or a different product aspect. Refer to Figure 2 for actual switch dimensions.) |
| 회로 유형 | 1방향 |
| 액추에이터 유형 | 흔들리는 것 |
| 접촉 재료 | 플라스틱 |
| 국제 보호 등급 | IP66 |
| 위치 수 | 2 |
| 상한 온도 등급 | 섭씨 80도 |
| 제어 방법 | 만지다 |
| 색상 | 파란색 |
| 품목 무게 | 1 온스 |
| 모델 번호 | LS083501JL |
| 안전 등급 | DOT Certified, 3C, ROHS, CE |
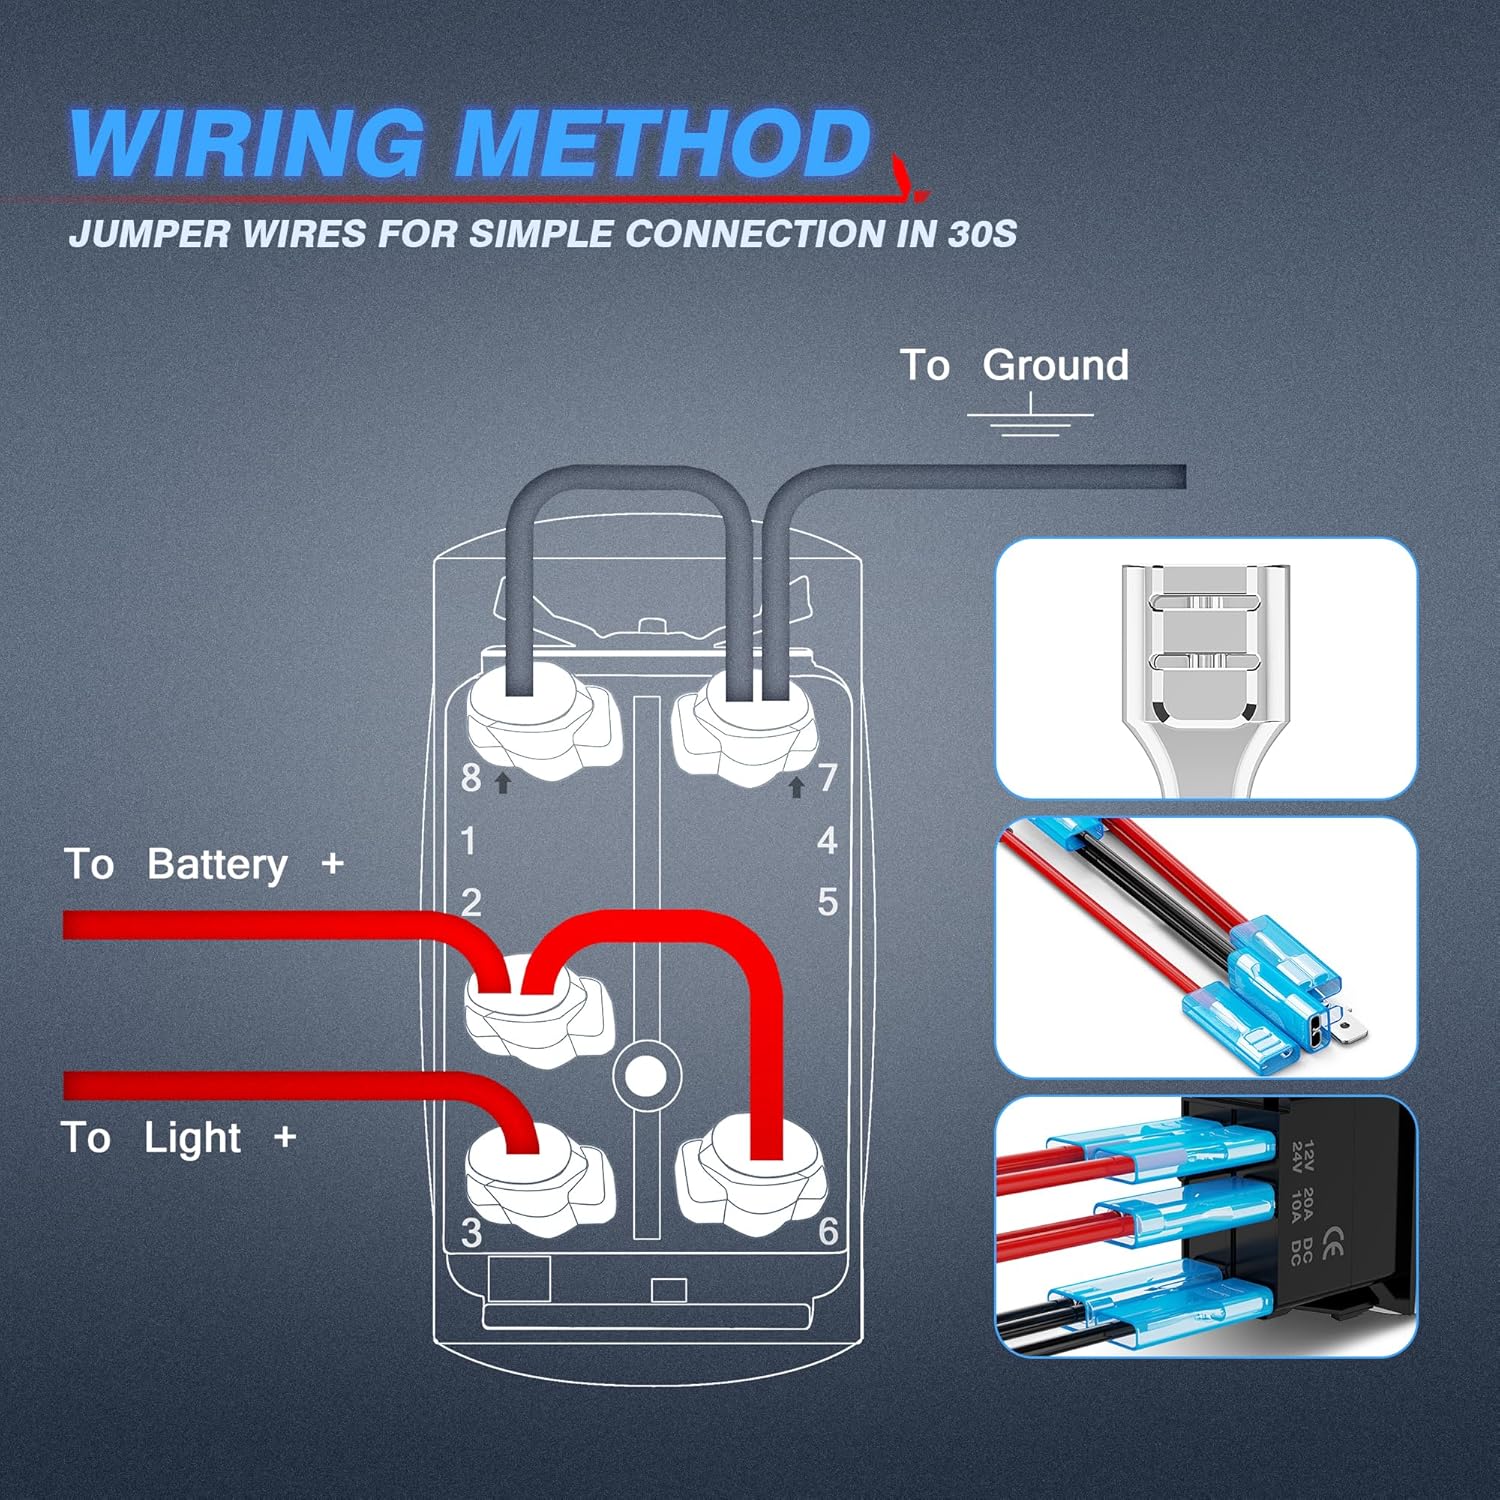
Figure 2: Detailed product dimensions for installation planning (approx. 0.83in width, 1.7in height, 1.5in depth).
상자 안에 무엇이 들어있나요?
The MICTUNING Blue ROCK LIGHTS Rocker Switch Kit includes the following components:
- 1x 5 Pin Rocker Switch
- 1x Jumper wire set
설정 및 설치
Before beginning installation, ensure the vehicle's power is disconnected to prevent electrical hazards. This switch is designed for easy installation with the included jumper wires.
배선도
The switch features a standard 5-pin configuration. Refer to the diagram below for proper wiring connections. The included jumper wires simplify the connection process, typically completed within 30 seconds per connection.

Figure 3: Detailed wiring diagram showing connections for battery, light, and ground. The jumper wires are designed for quick and secure connections.
- Pin 2 (or 1): Connect to Battery Positive (+)
- 핀 3 : Connect to Light Positive (+)
- Pin 8 (or 7): Connect to Ground (-)
- The remaining pins are for internal switch illumination and can be connected as per the diagram for full functionality.
For applications with significant current draw, it is highly recommended to use a relay in conjunction with this switch to protect your vehicle's electrical system and ensure optimal performance.
스위치 장착
The rocker switch is designed for flush mounting into a compatible panel opening. Ensure the opening dimensions match the switch's specifications (approximately 0.83in x 1.5in) for a secure fit. The tin-plated copper terminals provide superior wear and corrosion resistance.

Figure 4: The switch features both pattern and words that illuminate when activated, and the words light up continuously for easy location in the dark.

Figure 5: Two premium LEDs provide bright, clear illumination for the laser-etched pattern, which resists fading.

Figure 6: Comparison highlighting the superior features of the MICTUNING switch, including laser-etched patterns, well-conductive pins, and rubber protectors.
작동 지침
The MICTUNING Rocker Switch operates as a simple ON/OFF control for your connected accessories.
- 켜려면: Press the upper part of the rocker switch. The blue LED pattern and words will illuminate, indicating that the connected device (e.g., rock lights) is active.
- 끄기: Press the lower part of the rocker switch. The LED pattern will turn off, indicating the connected device is no longer active. The "ROCK LIGHTS" text may remain dimly lit for easy location in the dark, depending on wiring configuration.
The switch is designed for wide application across various vehicles and marine vessels, including RVs, SUVs, ATVs, motorcycles, yachts, marine boats, trailers, buses, and trucks.

그림 7: 예amples of vehicles and applications where the MICTUNING Rocker Switch can be used.
유지
The MICTUNING Rocker Switch is designed for durability and requires minimal maintenance. Follow these guidelines to ensure its longevity:
- 청소: Use a soft, dry cloth to wipe the surface of the switch. Avoid using abrasive cleaners or solvents, as they may damage the plastic or etched patterns.
- 점검: Periodically check the wiring connections to ensure they are secure and free from corrosion. If any wires appear loose or damaged, disconnect power and re-secure or replace them as necessary.
- 환경 보호: While the switch has an IP66 rating for protection against dust and strong jets of water, avoid prolonged submersion or exposure to extreme conditions beyond its specified operating temperature range (up to 80°C).
문제 해결
If you encounter issues with your MICTUNING Rocker Switch, refer to the following common problems and solutions:
- Problem: The switch does not turn on the connected device.
- 전원 확인: Ensure there is power supplied to the switch's battery input pin (Pin 2 or 1). Use a multimeter to verify voltage.
- 지상 점검: Confirm that the ground connection (Pin 8 or 7) is secure and properly grounded to the vehicle chassis.
- 부하 연결 상태를 확인하세요: Verify that the wire to the connected device (Pin 3) is properly attached and that the device itself is functioning.
- 배선 검사: Double-check all wiring against the provided diagram (Figure 3) for correct connections. Loose or incorrect wiring is a common cause of non-functionality.
- Fuse/Circuit Breaker: Ensure any inline fuses or circuit breakers in the power line are intact and not tripped.
- Problem: The LED light on the switch does not illuminate, or illuminates incorrectly.
- 조명 배선: Ensure all 5 pins are correctly wired according to the diagram. The illumination functionality relies on specific pin connections.
- 지속 조명: If the "ROCK LIGHTS" text remains lit even when the switch is off, this is often by design for easy location. If you prefer it to turn off completely, review your wiring to ensure it's not directly connected to a constant power source without a trigger from the ignition or another switched source.
- 조명 없음: If no LEDs light up at all, re-check all power and ground connections to the switch. A faulty switch is rare but possible; if all wiring is confirmed correct, consider replacing the switch.
- Problem: Switch feels loose or pops out of the panel.
- Panel Opening Size: Ensure the panel cutout dimensions precisely match the switch's dimensions (approx. 0.83in x 1.5in). An oversized opening will prevent a secure fit.
- 설치: Ensure the switch is fully pushed into the panel until it clicks securely into place.
보증 및 지원
MICTUNING products are designed for quality and reliability. For specific warranty details regarding your MICTUNING Blue ROCK LIGHTS Rocker Switch Kit, please refer to the product packaging or the official MICTUNING web대지.
For technical support, troubleshooting assistance, or to inquire about replacement parts, please contact MICTUNING customer service through their official channels. You can also visit the official MICTUNING Brand Store on Amazon for more information and product offerings:
Visit the MICTUNING Brand Store
Additionally, a user manual in PDF format may be available for download:


