1. 서론
This manual provides detailed instructions for the installation, operation, and maintenance of your Advance Darkside 8303B30 Micro ATX PC Case. Please read this manual thoroughly before beginning installation to ensure proper setup and to maximize the performance and longevity of your system components.
The Advance Darkside ATX Mid-Tower PC case features a top panel with a 2.5/3.5 inch SATA HDD docking station, 2 USB 3.0 ports, and 1 USB 2.0 port. It is designed to accommodate Micro ATX motherboards and offers efficient cooling solutions.
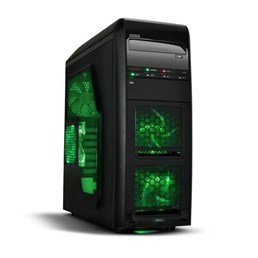
그림 1: 전면 view of the Advance Darkside 8303B30 PC Case, showcasing its design and front panel features.
2. 제품 특징
- 모델: Advance Darkside 8303B30
- 섀시 소재: SGCC Steel
- 색상: Black (interior and exterior)
- 마더보드 호환성: 마이크로 ATX
- 전면 패널 연결: USB 3.0 포트 2개, USB 2.0 포트 1개, 오디오 잭
- 저장 기능: Top panel 2.5/3.5 inch SATA HDD docking station
- 냉각 시스템: Five 120mm fans included (two LED fans at the front, one LED fan on the side, one fan at the rear, and one fan at the top). Water cooling ready.
- 그래픽 카드 지원: Designed for King Size graphics cards
- 사이드 패널 : Plexiglass window
3. 설정 지침
3.1. 사건 준비
- Unpack the PC case carefully and remove all packaging materials.
- 케이스를 안정적이고 평평한 표면에 놓으세요.
- 케이스 뒷면의 엄지 나사를 풀고 패널을 뒤로 밀어 측면 패널을 제거합니다.
3.2. 전원 공급 장치 설치
- Locate the power supply mounting area at the rear bottom of the case.
- Secure the power supply unit (PSU) using the provided screws. Ensure the PSU fan faces the bottom or top, depending on your PSU and case design for optimal airflow.
3.3. 마더보드 설치
- 케이스 뒷면의 컷아웃에 I/O 실드를 설치합니다.
- Align the motherboard with the standoffs inside the case. Ensure all standoffs match the motherboard's screw holes.
- 적절한 나사를 사용하여 마더보드를 고정하십시오.
3.4. 저장 드라이브 설치
- For 3.5-inch HDDs, slide the drive into the drive bay trays. The trays are designed to flex slightly to accommodate the drive without screws in some configurations.
- For 2.5-inch SSDs/HDDs, secure them to the designated mounting points or use adapters if necessary.
- Utilize the top panel SATA docking station for quick access to 2.5/3.5 inch SATA drives. Simply insert the drive into the slot until it clicks into place.
3.5. 그래픽 카드 및 확장 카드 설치
- 케이스 후면에 있는 필요한 확장 슬롯 덮개를 제거하십시오.
- Insert the graphics card or other expansion cards into the appropriate PCIe slots on the motherboard.
- Secure the cards with screws or retention clips.
3.6. 케이블 관리
Route all cables (power, SATA, front panel connectors) through the designated cutouts and tie-down points behind the motherboard tray to ensure clean airflow and an organized interior.
4. 사용 설명서
4.1. 시스템 전원 켜기
- 모든 구성 요소가 올바르게 설치되었는지, 케이블이 단단히 연결되었는지 확인하십시오.
- 전원 케이블을 파워서플라이와 벽면 콘센트에 연결하세요.
- 케이스 전면 패널에 있는 전원 버튼을 누르세요.
4.2. Using Front Panel Ports
- USB 3.0/2.0 포트: Connect USB devices such as keyboards, mice, external drives, or flash drives.
- 오디오 잭: Connect headphones, microphones, or speakers.
- HDD Docking Station: Insert a 2.5-inch or 3.5-inch SATA HDD/SSD into the top docking slot for quick data access. Ensure the drive is properly seated.
5. 유지관리
5.1. 케이스 청소
- 케이스 외부는 부드러운 천으로 정기적으로 청소하세요.amp 옷감. 연마성 세제를 피하십시오.
- Use compressed air to remove dust from fan filters and internal components.
5.2. 팬 유지 관리
- Periodically check the case fans for dust buildup. Clean them gently with compressed air or a soft brush.
- 케이블이 팬 날개를 가리지 않는지 확인하세요.
6. 문제 해결
6.1. 시스템 전원이 켜지지 않음
- 전원 케이블이 파워서플라이와 벽면 콘센트에 제대로 연결되어 있는지 확인하십시오.
- PSU 스위치가 'ON' 위치에 있는지 확인하세요.
- 전면 패널 전원 버튼 케이블이 마더보드에 올바르게 연결되어 있는지 확인하십시오.
6.2. 과열 문제
- Ensure all case fans are spinning correctly and are not obstructed.
- Check for excessive dust buildup on fans and heatsinks.
- Verify proper cable management to allow for unobstructed airflow.
6.3. 전면 패널 USB/오디오 작동 안 됨
- Confirm that the front panel USB and audio cables are correctly connected to the corresponding headers on the motherboard.
- Check motherboard drivers for USB and audio.
7. 사양
| 특징 | 세부 사항 |
|---|---|
| 상표 | 전진 |
| 모델 번호 | 8303B30 |
| 색상 | 검은색 |
| 섀시 소재 | Alloy Steel (SGCC Steel) |
| 마더보드 호환성 | 마이크로 ATX |
| 치수(길이 x 너비 x 높이) | 48 x 19.5 x 48.2cm |
| 제품 무게 | 5.8kg |
| 전면 패널 포트 | USB 3.0 포트 2개, USB 2.0 포트 1개, 오디오 잭 |
| 스토리지 도크 | Top panel 2.5/3.5 inch SATA HDD docking station |
| 포함된 팬 | 5 x 120mm (2 front LED, 1 side LED, 1 rear, 1 top) |
| 냉각 지원 | Water cooling ready |
| 사이드 패널 | 플렉시글라스 |
| 권장 사용 | 노름 |
8. 보증 및 지원
8.1. 제조업체 보증
This product comes with a manufacturer's warranty of 1 year from the date of purchase. Please retain your proof of purchase for warranty claims. The warranty covers defects in materials and workmanship under normal use.
8.2. 고객 지원
For technical assistance, troubleshooting, or warranty inquiries, please contact Advance customer support. Refer to the official Advance web최신 연락처 정보와 지원 리소스를 제공하는 사이트입니다.