1. 서론
Thank you for choosing the Fonestar AS-24U Hi-Fi USB/SD/MP3 Amp앰프. 본 설명서는 기기를 안전하고 효율적으로 작동하는 데 필요한 필수 정보를 제공합니다. 사용 전에 꼼꼼히 읽고 나중에 참조할 수 있도록 보관하십시오.
2. 안전 지침
- 전원 공급 장치: 확인하십시오 amplifier is connected to a power source matching the specified voltag전자(230V).
- 통풍: 환기구를 막지 마십시오. 과열을 방지하기 위해 공기가 원활하게 흐르도록 장치 주변에 충분한 공간을 확보하십시오.
- 수분: 유지하다 amplifier away from water, moisture, and high humidity environments. Do not expose it to dripping or splashing.
- 열원: 라디에이터, 난방기, 스토브 또는 기타 열 발생 기기와 같은 열원 근처에 제품을 두지 마십시오.
- 청소: 청소하기 전에 전원 코드를 뽑으십시오. 마른 부드러운 천을 사용하십시오. 액체 세척제나 스프레이형 세척제는 사용하지 마십시오.
- 서비스: 이 제품을 직접 수리하려고 하지 마십시오. 모든 서비스는 자격을 갖춘 서비스 담당자에게 문의하십시오.
- 물체/액체 유입: 위험한 액체에 닿을 수 있으므로 이 제품의 개구부를 통해 어떤 종류의 물체도 밀어 넣지 마십시오.tag화재나 감전을 일으킬 수 있는 접점이나 단락 부품.
3. 제품 오버view
3.1 전면 패널
The front panel features controls for power, input selection, volume adjustment, and USB/SD media playback. It also includes a display for media information.
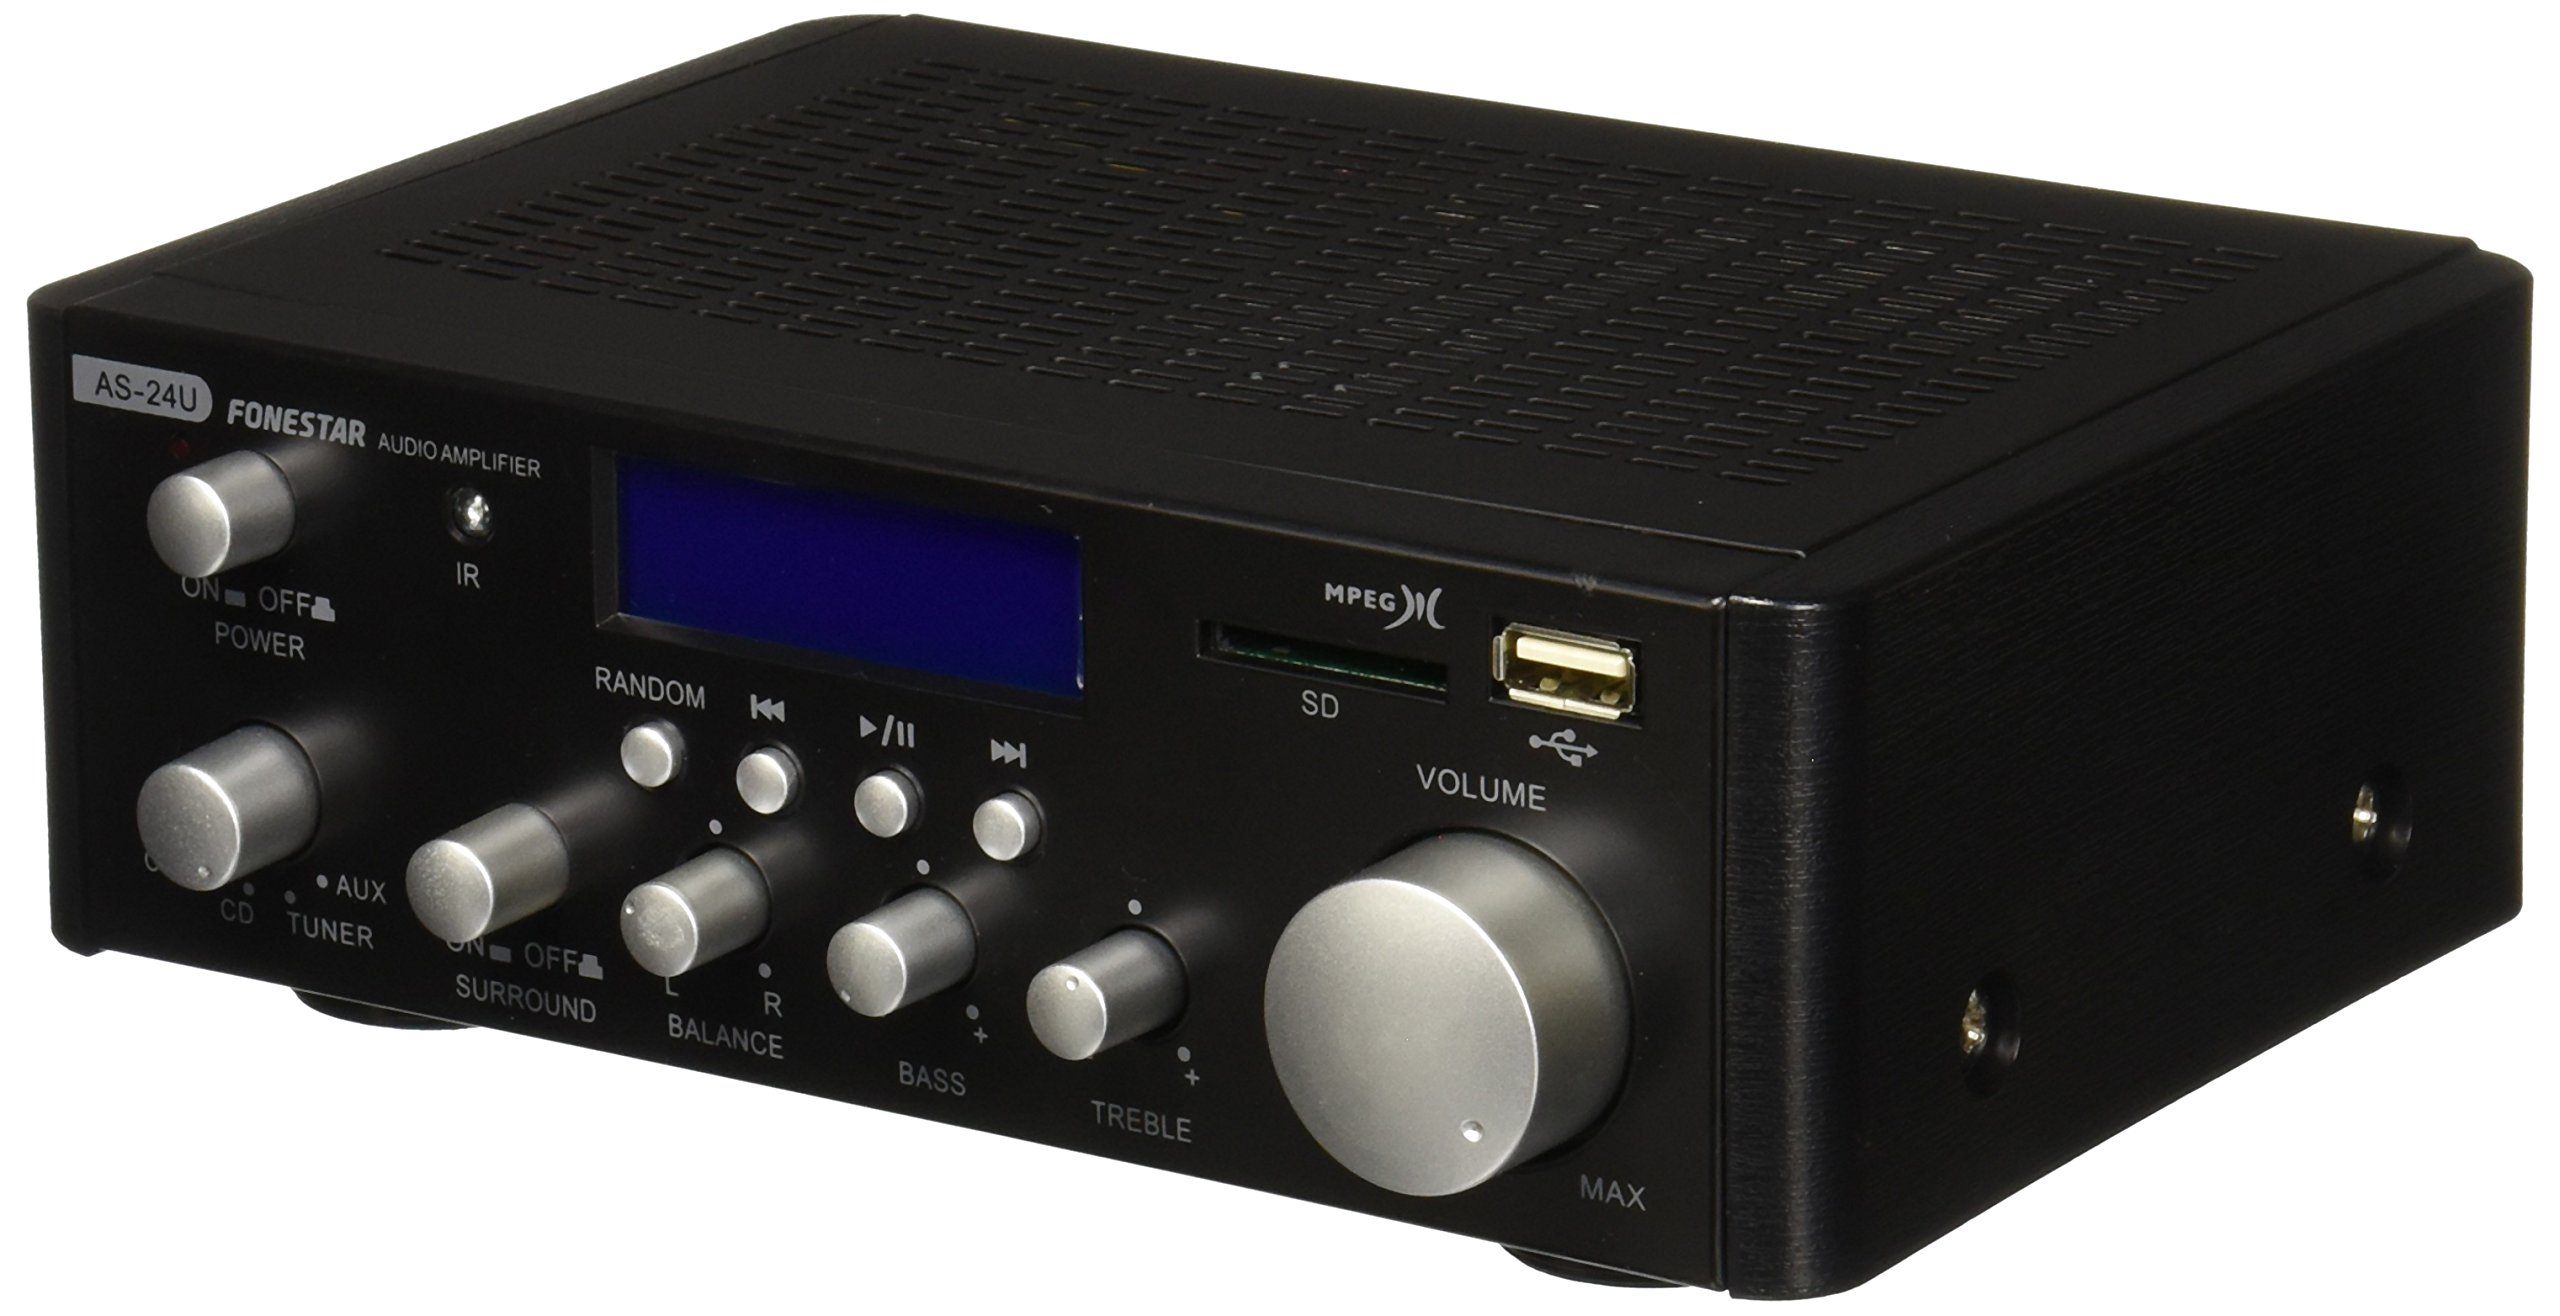
이미지 1: 앞면 view of the Fonestar AS-24U amplifier, showing the main controls and display.
3.2 후면 패널
The rear panel provides all necessary connections for audio input sources, speaker outputs, and power.

이미지 2: 후면 view of the Fonestar AS-24U amplifier, detailing input/output ports and power connection.
- INPUT (AUX, TUNER, CD): 외부 오디오 소스를 연결하기 위한 RCA 스테레오 입력 단자.
- SPEAKER OUT (STEREO): Spring clip terminals for connecting passive speakers (4-8 Ω).
- SPEAKER OUT (SURROUND): Additional spring clip terminals for surround speakers (8 Ω).
- 전원: AC power input for the main power cable.
- 권TAGE 셀렉터: Switch for selecting between 115V and 230V power input. Ensure this is set correctly for your region.
3.3 리모컨
함께 제공되는 리모컨을 사용하면 편리하게 작동할 수 있습니다. amplifier's media playback functions.
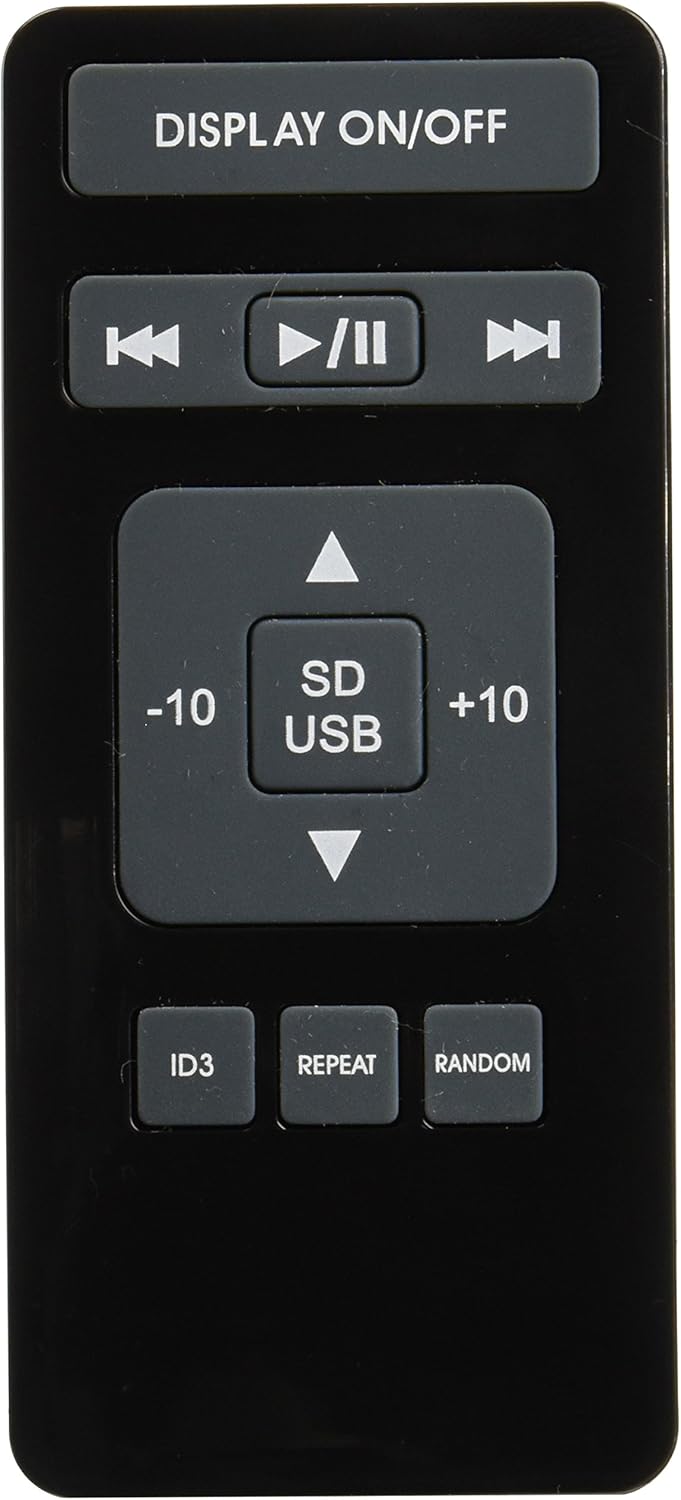
Image 3: Remote control for the Fonestar AS-24U amplifier, showing buttons for media playback and display control.
- 디스플레이 켜기 / 끄기 : 전면 패널 표시를 켜거나 끕니다.
- PLAY/PAUSE, PREVIOUS/NEXT: 미디어 재생 제어 기능.
- SD/USB: Selects between SD card and USB drive as the media source.
- -10/+10: Skips tracks by 10.
- ID3: Displays ID3 tag MP3에 대한 정보 files.
- 반복하다: Toggles repeat modes (e.g., repeat one, repeat all).
- 무작위 : Toggles random playback.
4. 설정
4.1 스피커 연결하기
- 확인하십시오 amplifier의 전원이 꺼져 있고 플러그가 뽑혀 있습니다.
- Connect your passive speakers to the SPEAKER OUT terminals on the rear panel.
- 양극(+) 단자를 연결하세요. amplifier to the positive (+) terminal on your speaker, and the negative (-) to the negative (-).
- For stereo speakers, use the 4-8 Ω terminals. For surround speakers, use the 8 Ω terminals. Ensure your speakers' impedance matches the ampLifier의 사양입니다.
4.2 오디오 소스 연결
- Connect your audio devices (e.g., CD player, tuner, auxiliary device) to the corresponding RCA INPUT jacks (CD, TUNER, AUX) on the rear panel.
- Ensure left and right channels are correctly matched (red for right, white for left).
4.3 전원 연결
- Verify the VOLTAGE SELECTOR switch on the rear panel is set to the correct voltage for your region (e.g., 230V).
- Connect the power cable to the POWER IN socket on the rear panel and then to a suitable wall outlet.
5. 사용 설명서
5.1 전원 켜기/끄기
전면 패널의 전원 버튼을 눌러 전원을 켜세요. amplifier on or off. A soft start protection circuit is integrated.
5.2 입력 소스 선택
Use the input selector knob or buttons on the front panel to choose between CD, TUNER, AUX, USB, or SD inputs.
5.3 볼륨 조절
Rotate the main volume knob on the front panel to adjust the overall sound level. Start with a low volume and gradually increase it to a comfortable listening level.
5.4 USB/SD 재생
- MP3 오디오 파일이 들어 있는 USB 플래시 드라이브 또는 SD 카드를 삽입하세요. file전면 패널의 해당 슬롯에 넣으십시오.
- Select the USB or SD input using the input selector.
- Use the playback controls (Play/Pause, Previous/Next) on the front panel or remote control to manage your music.
- The remote control allows for additional functions like skipping 10 tracks (+10/-10), displaying ID3 tags, repeating tracks, and random playback.
6. 유지관리
6.1 청소
청소하려면 amplifier, first unplug it from the power outlet. Use a soft, dry cloth to wipe down the exterior surfaces. Do not use abrasive cleaners, waxes, or solvents as they may damage the finish.
6.2 보관
저장하는 경우 amplifier for an extended period, ensure it is unplugged, clean, and stored in a cool, dry place away from direct sunlight and extreme temperatures.
7. 문제 해결
- 전원 없음:
- 전원 케이블이 양쪽에 안전하게 연결되어 있는지 확인하십시오. amp리파이어와 벽면 콘센트.
- 벽면 콘센트가 작동하는지 확인하세요.
- Verify the VOLTAGE SELECTOR switch is set correctly.
- 소리 없음:
- 올바른 입력 소스가 선택되었는지 확인하십시오.
- 모든 스피커 연결부의 극성이 올바른지, 단단히 고정되었는지 확인하세요.
- 볼륨이 최대로 설정되어 있고 음소거 상태가 아닌지 확인하세요.
- 다른 음원을 사용하여 테스트해 보세요.
- 왜곡된 소리:
- 볼륨을 줄이십시오.
- 스피커 임피던스 호환성을 확인하세요.
- 오디오 케이블이 손상되지 않았는지, 그리고 단단히 연결되어 있는지 확인하십시오.
- USB/SD 재생 문제:
- Ensure the USB drive or SD card is formatted to a compatible file 시스템(예: FAT32).
- 오디오를 확인하세요 files는 MP3 형식입니다.
- 다른 USB 드라이브나 SD 카드를 사용해 보세요.
8. 사양
| 상표 | 포네스타 |
| 모델 | AS-24U |
| Stereo Power Output | 25 + 25 W max, 15 + 15 W RMS (4 Ω), 12 + 12 W RMS (8 Ω) |
| Surround Power Output | 10 + 10 W max, 6 + 6 W RMS (8 Ω) |
| 입력 | 3 stereo (CD, Tuner, AUX), 2 x RCA 400 mV |
| 보호 | 소프트 스타트, 단락, 과부하 |
| 권tage | 230 볼트 |
| 치수(길이 x 너비 x 높이) | 5 x 5 x 10cm (약 50 x 50 x 100mm) |
| 무게 | 1.9kg |
| 스피커 연결 | 열광한 |
9. 보증 및 지원
This Fonestar AS-24U amplifier comes with a standard manufacturer's warranty. Please refer to the warranty card included with your purchase for specific terms and conditions. For technical support, service, or warranty claims, please contact your retailer or the official Fonestar customer service.


