1. 서론
The LASERLINER MultiFinder Plus is a highly versatile and reliable locating device designed for detecting various materials within walls, ceilings, and floors. Equipped with multiple integrated sensors, it provides precise detection of wood, metal (including copper, steel, and iron), and live electrical wires. Its user-friendly LCD screen and automatic calibration feature ensure easy and safe operation for both professionals and DIY enthusiasts.
This manual provides comprehensive instructions for the safe and effective use, maintenance, and troubleshooting of your MultiFinder Plus. Please read it thoroughly before operating the device.
2. 안전 정보
WARNING: Always exercise extreme caution when detecting near electrical installations. The device indicates live wires, but it is crucial to verify findings with other methods if there is any doubt. Disconnect power before drilling or cutting into walls.
- 사용하기 전에 모든 지침을 읽으세요.
- 장치를 극한의 온도, 습도 또는 직사광선에 노출시키지 마십시오.
- Use only the specified battery type (9V alkaline battery, Type 6LR 61).
- 장치를 깨끗하고 건조하게 유지하십시오.
- 기기를 열거나 개조하지 마십시오. 수리는 반드시 공인된 담당자만 수행해야 합니다.
- Be aware of potential hazards such as gas pipes, water pipes, and electrical cables.
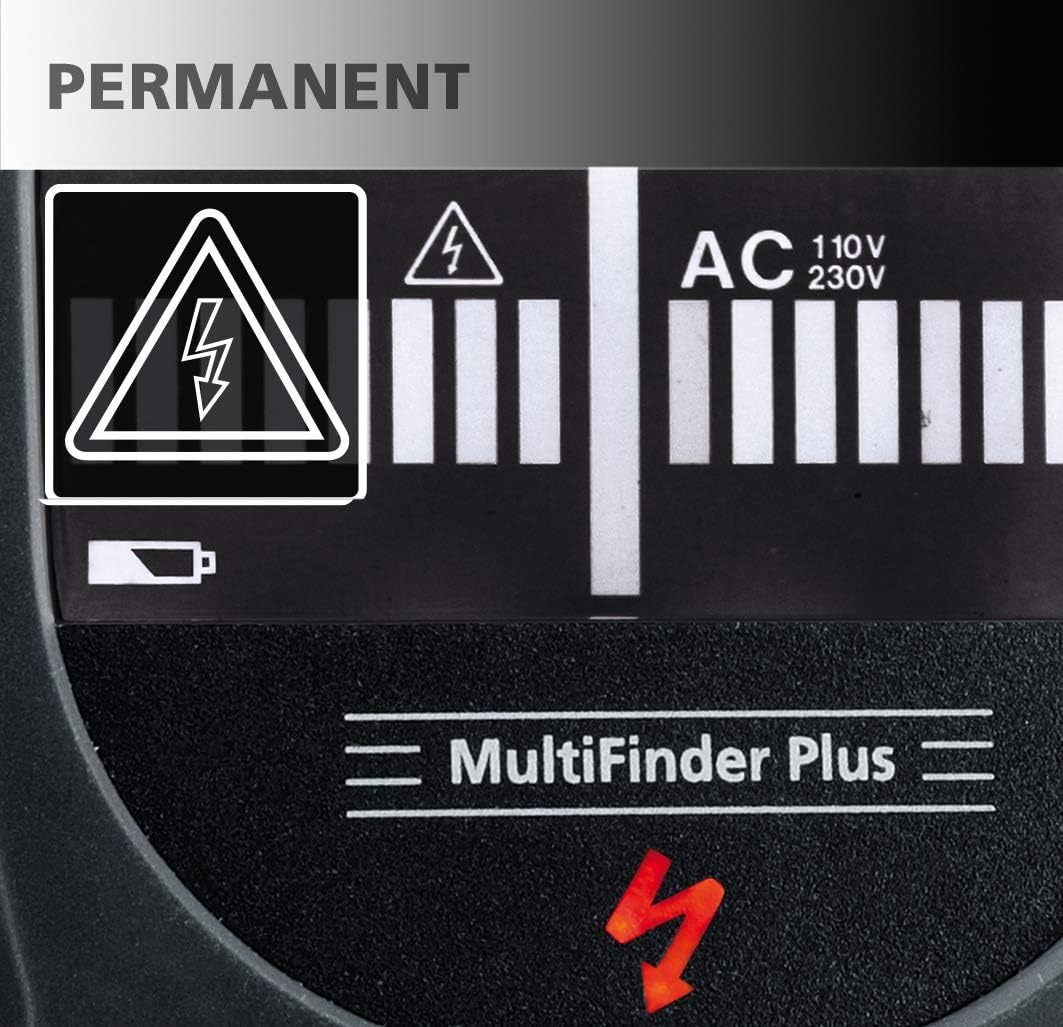
Image: The display shows a permanent electrical warning symbol (lightning bolt in triangle) when live wires are detected, indicating a potential hazard.

Image: A red warning light illuminates on the top of the device, accompanied by a lightning bolt symbol on the display, to alert the user to the presence of live electrical current.
3. 패키지 내용
- LASERLINER MultiFinder Plus device
- 1 x 9V alkaline battery (Type 6LR 61)
- 사용 설명서 (본 문서)
4. 제품 오버view
Familiarize yourself with the components of your MultiFinder Plus:

이미지: 앞면 view of the MultiFinder Plus, showing the LCD display, Mode button, and CAL button.
- LCD 디스플레이: Shows detection mode, signal strength, battery status, and warning indicators.
- 모드 버튼: Used to switch between detection modes (Wood/Stud, Metal, AC).
- CAL 버튼: Used for automatic calibration.
- Detection Sensor Area: Located on the back of the device, this area must be placed flat against the surface for accurate readings.
- 배터리 칸: 배터리 설치를 위해 뒤쪽에 위치합니다.
- 경고등: A red LED on the top of the device illuminates when live electrical wires are detected.

이미지: 클로즈업 view of the orange 'Mode' button and the black 'CAL' (Calibration) button, indicating simple, one-touch operation.

Image: The LCD display provides clear information, including 'MOVE' arrows to guide the user during scanning, indicating the direction to move for optimal detection.

Image: The MultiFinder Plus features a backlight on its display, ensuring readability in low-light conditions.
5. 설정
5.1. 배터리 설치
The MultiFinder Plus requires one 9V alkaline battery (Type 6LR 61).
- 장치 뒷면에서 배터리 덮개를 찾으세요.
- 덮개를 밀어 엽니다.
- Insert the 9V battery, ensuring correct polarity (+ and -).
- 배터리 덮개를 단단히 닫으세요.
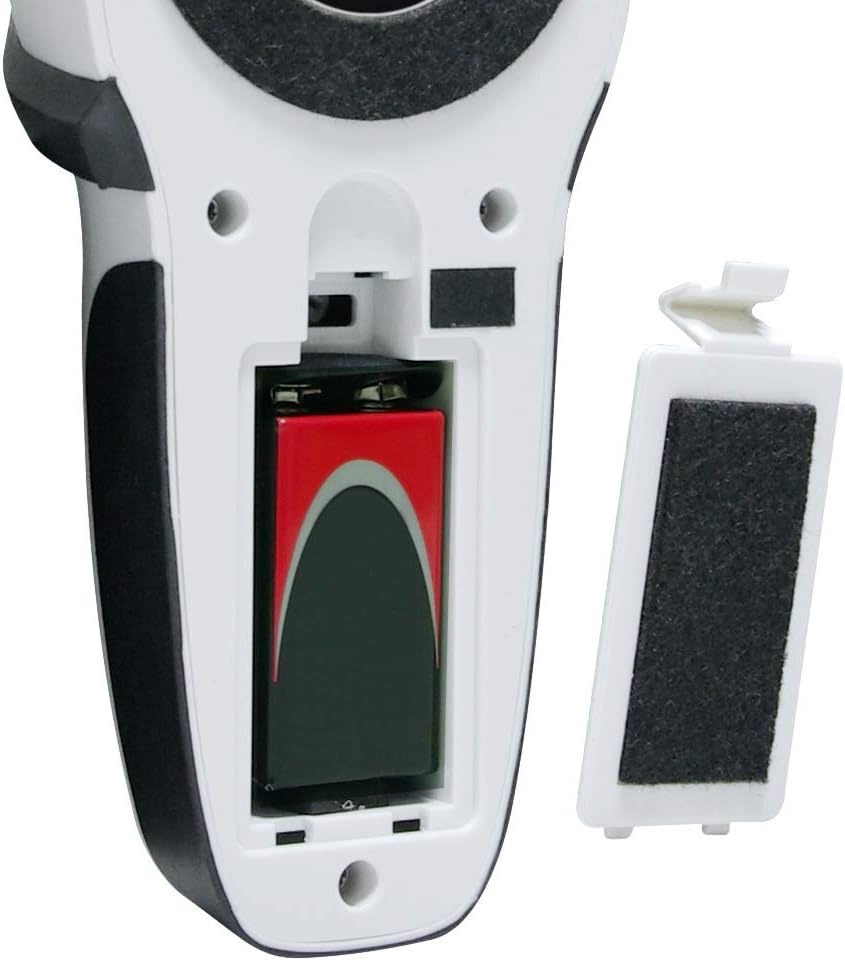
Image: The open battery compartment of the MultiFinder Plus, showing the correct placement of a 9V battery. The battery cover is shown detached.

Image: The MultiFinder Plus device displayed alongside a 9V battery, illustrating the required power source.
5.2. 초기 교정
Before each use, or when switching detection modes, it is recommended to perform an automatic calibration.
- Place the device flat against the surface you intend to scan, ensuring no objects are directly beneath it.
- 를 누르고 계세요 칼 button until the calibration process is complete (indicated on the LCD).
- The device is now ready for use in the selected mode.
6. 사용 설명서
6.1. 전원 켜기/끄기 및 모드 선택
장치의 전원을 켜려면 방법 button. To switch between detection modes (Wood/Stud, Metal, AC), press the 방법 button repeatedly until the desired mode is displayed on the LCD.
6.2. Detection Modes and Depths
The MultiFinder Plus offers three primary detection modes:
- Stud-Scan (Wood): Detects wooden studs and beams.
- Detection Depth: Approximately 2 cm to 4 cm.
- Metal-Scan: Detects ferrous and non-ferrous metals, including copper, steel, and iron. This mode can also detect non-live cables under plaster.
- Detection Depth: Up to 10 cm.
- AC-Scan: Detects live electrical wires (110V-230V).
- Detection Depth: Approximately 4 cm to 5 cm.

Image: A visual diagram illustrating the approximate detection depths for different scan modes: Stud-Scan (2-4 cm), AC-Scan (4-5 cm for 110-230 Volt wires), and Metal-Scan (up to 10 cm).
6.3. 스캔 절차
- Select the appropriate detection mode using the 방법 단추.
- Perform automatic calibration by pressing the 칼 button while the device is flat against the surface.
- 기기를 표면 위로 천천히 수평으로 움직이십시오. 일정한 접촉과 압력을 유지하십시오.
- Observe the LCD display for signal strength indicators and the 'MOVE' arrows, which guide you towards the center of the detected object.
- When an object is detected, the device will emit an acoustic signal, and the optical display will show a strong signal. For live wires, the red warning light will also illuminate.
- Mark the location of the detected object. For precise localization, scan the area from multiple directions.
6.4. Acoustic and Optical Signals
The MultiFinder Plus provides clear feedback:
- 음향 신호: A beeping sound indicates the presence of a detected object. The frequency or intensity may change as you get closer to the object.
- 광학 디스플레이: The LCD screen shows a bar graph indicating signal strength. The higher the bars, the closer you are to the object.
- 빨간색 경고등: Illuminates when live electrical wires are detected, providing an immediate visual alert.
7. 유지관리 및 관리
- 청소: 부드러운 천으로 장치를 닦으십시오. damp 천. 연마성 세척제나 용매를 사용하지 마십시오.
- 저장: Store the device in a dry, dust-free environment, away from direct sunlight and extreme temperatures (-20 °C to 70 °C).
- 배터리: 장기간 기기를 사용하지 않을 경우 배터리 누출을 방지하기 위해 배터리를 제거하세요.
- 구경 측정: Regular calibration ensures optimal performance.
8. 문제 해결
| 문제 | 가능한 원인 | 해결책 |
|---|---|---|
| 부정확한 판독값 / 오탐지 | Improper calibration; high humidity; presence of other electronic devices nearby; user error (e.g., not holding flat). | Re-calibrate the device on a clear section of the wall. Ensure the device is held flat against the surface. Move away from other electronics. |
| 장치 전원이 켜지지 않음 | 배터리가 방전되었거나 잘못 설치되었습니다. | Check battery polarity. Replace with a new 9V alkaline battery. |
| Weak or no signal detection | Object too deep; incorrect mode selected; battery low. | Ensure the correct mode is selected for the target material. Check battery level. Note maximum detection depths for each mode. |
| 끊임없이 울리는 소리 | Device is picking up ambient interference or needs re-calibration. | Move to a different area and re-calibrate. Ensure no hands or other objects are near the sensor area during calibration. |
9. 사양
| 특징 | 세부 사항 |
|---|---|
| 모델 번호 | 080.965A |
| 제조업체 | 레이저 라이너 |
| 감지 모드 | Wood/Stud, Metal (ferrous & non-ferrous, non-live wires), AC (live wires) |
| Max. Detection Depth (Wood/Stud) | Approx. 2 cm - 4 cm |
| Max. Detection Depth (Metal) | 최대 10cm |
| Max. Detection Depth (AC) | Approx. 4 cm - 5 cm (110V-230V) |
| 전원 공급 장치 | 1 x 9V Alkaline Battery (Type 6LR 61) |
| 작동 온도 | 0 °C ~ 40 °C (32 °F ~ 104 °F) |
| 보관 온도 | -20 °C ~ 70 °C (-4 °F ~ 158 °F) |
| 치수(폭 x 높이 x 깊이) | 80 x 186 x 40mm(약 3.15 x 7.32 x 1.57인치) |
| 무게 | 420그램(약 0.93파운드) |
10. 보증 및 지원
Laserliner products are manufactured with high quality standards and undergo strict quality control. This product comes with a standard manufacturer's warranty against defects in materials and workmanship. Please refer to the warranty card included with your purchase or visit the official Laserliner web자세한 보증 약관은 해당 사이트에서 확인하세요.
For technical support, service, or spare parts, please contact your local Laserliner distributor or the customer service department. Contact information can typically be found on the Laserliner web사이트 또는 제품 포장에 표시하세요.
보증 청구를 위해 구매 증명서를 보관하십시오.


