소개
This manual provides detailed instructions for the installation, operation, and maintenance of the SICCE Shark ADV 800 Internal Filter. Designed for both freshwater and saltwater aquariums, this internal filter is intended for submerged use only. Please read these instructions carefully before use to ensure proper function and longevity of your filter.

Image: The SICCE Shark ADV 800 Internal Filter, a compact and modular unit designed for submerged aquarium filtration.
안전 정보
- 필터에 대한 유지 보수 또는 취급 작업을 수행하기 전에 항상 전원 공급 장치를 차단하십시오.
- Ensure the filter is fully submerged during operation.
- 전원 코드나 플러그가 손상된 경우 필터를 작동하지 마세요.
- This appliance is for indoor use only and must not be used for purposes other than those specified.
- 어린이의 손이 닿지 않는 곳에 보관하세요.
패키지 내용
설치를 진행하기 전에 모든 구성 요소가 있는지 확인하세요.
- SICCE Shark ADV 800 Internal Filter unit
- Filter media (sponge)
- Venturi air intake system components
- 장착용 흡착컵
- 사용 설명서(본 문서)

Image: The Shark ADV 800 filter shown with its packaging and various components, including filter media and air intake parts.
설정
- 준비: Unpack all components. Rinse the filter unit and all media thoroughly with aquarium water or dechlorinated tap water before initial use. Do not use soap or detergents.
- 집회:
- Attach the suction cups to the filter body for secure mounting.
- Insert the provided filter media into the filter compartments. The Shark ADV features a modular design, allowing for additional filtering compartments (sold separately) to be added.
- If using the Venturi system for additional oxygenation, connect the air intake tube and adjust the air flow regulator as desired.
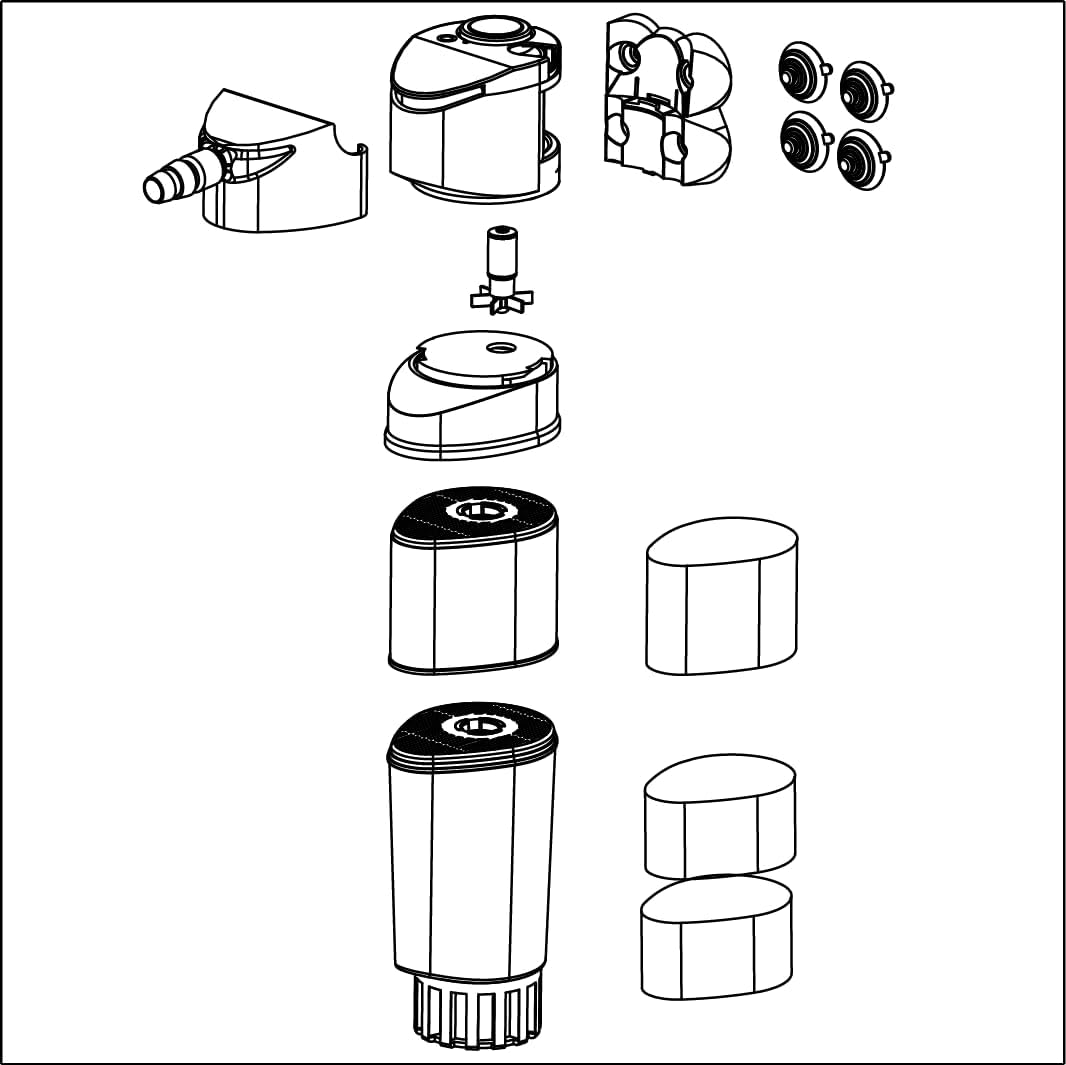
Image: An exploded diagram illustrating the individual components of the Shark ADV filter, including the motor head, impeller, filter cartridges, and suction cups.
- 놓기: Position the filter inside the aquarium, ensuring it is fully submerged. Secure it to the aquarium wall using the suction cups. Ensure the water outlet is positioned to create adequate water circulation.
- 초기 시작: Once securely placed and fully submerged, connect the power plug to an electrical outlet. The filter will begin operating.
작동 지침
- 전원 켜기/끄기: The filter operates continuously when plugged into a power source. To turn off, disconnect from the power outlet.
- 흐름 조정: The water flow rate can be adjusted using the dial located on the top of the filter unit. Rotate the dial to increase or decrease flow as needed for your aquarium size and inhabitants.
- Venturi System: The integrated Venturi system allows for additional oxygenation of the aquarium water. Adjust the air intake regulator to control the amount of air introduced. Note that operating the Venturi system may produce some noise.
- Fish Protection: The intake diameter is adjustable to protect smaller fish from being drawn into the filter. Ensure it is set appropriately for your aquarium's inhabitants.
유지
Regular maintenance is crucial for the optimal performance and longevity of your SICCE Shark ADV 800 filter.
- 청소를 위한 분해:
- 필터의 전원 공급 장치를 분리하십시오.
- The Shark ADV features a patented Magnetic Quick Uncoupling System (MCS System). This allows you to detach the filter body and media compartments from the motor head without removing the entire unit from the aquarium. Simply pull the filter body downwards to separate it from the magnetic connection.
- The transparent mechanical filter body allows for easy visual inspection of clogging levels.

Image: A hand demonstrating the magnetic quick uncoupling system, separating the filter's lower section from its upper motor unit for easy maintenance.
- 필터 매체 세척: Remove the filter media (sponge) from the compartments. Rinse the sponge thoroughly in old aquarium water (from a water change) to preserve beneficial bacteria. Replace the sponge if it is heavily degraded or cannot be cleaned effectively.
- Cleaning Impeller and Motor Head: Periodically clean the impeller and its housing in the motor head to prevent blockages and maintain efficient operation. Gently remove the impeller and clean any debris.
- 재조립: Reassemble the filter components, ensuring all parts are correctly seated. Reattach the filter body to the motor head using the MCS System.
- 다시 시작: Place the filter back into the aquarium, ensure it is fully submerged, and reconnect the power supply.
문제 해결
| 문제 | 가능한 원인 | 해결책 |
|---|---|---|
| 필터가 시작되지 않거나 흐름이 약함 |
|
|
| 과도한 소음 |
|
|
| 물이 맑지 않다 |
|
|
명세서
| 특징 | 세부 사항 |
|---|---|
| 모델 | Shark ADV 800 |
| 부품 번호 | SIC113 |
| 유량 | 211GPH(800L/h) |
| Filtering Volume | 320cm³ (세제곱미터) |
| 제품 치수 | 5 x 10 x 15 인치(대략) |
| 품목 무게 | 13.9 온스 |
| 애플리케이션 | 담수와 바닷물 |
| 용법 | Indoor, Submerged |
| 특별 기능 | Patented Magnetic Quick Uncoupling System (MCS), Venturi System, Adjustable Intake Diameter, Modular Design |

Image: A technical drawing showing the dimensions of different Shark ADV filter models, indicating height and base measurements.
보증 및 지원
The SICCE Shark ADV 800 Internal Filter comes with a Manufacturer Warranty. For specific warranty details, duration, and terms, please refer to the documentation included with your product or visit the official Sicce web대지.
For technical support, replacement parts, or warranty claims, please contact Sicce customer service through their official channels.
제조업체: 시체
Web대지: www.sicce.com


