소개
The TASCAM DR-100MKII is a high-performance linear PCM recorder designed for professional audio recording. This manual provides essential information for setting up, operating, maintaining, and troubleshooting your DR-100MKII to ensure optimal performance and longevity.
주요 특징
- High-resolution 24-bit/96kHz linear PCM (WAV) and MP3 recording.
- Robust aluminum chassis for durability in demanding environments.
- Dual XLR/TRS combo inputs with +4dBu line level and +48V phantom power.
- Independent left/right rotary input gain controls for precise level adjustment.
- Four built-in microphones: two unidirectional and two omnidirectional.
- Dedicated line output separate from headphone output for high-quality audio routing.
- Digital input for lossless connection from external playback devices.
- Mechanical switches for reliable and quick operation.
- Supports SD/SDHC memory cards (2GB SD card included).
- Includes RC-10 wired/wireless remote control.
- Dual battery power system (dedicated Li-ion and AA batteries).
설정
1. 배터리 설치
The DR-100MKII supports both a dedicated Li-ion rechargeable battery (BP-L2, included) and two AA dry cell batteries. For extended operation, both can be used simultaneously.
- 장치 뒷면에서 배터리 칸을 찾으세요.
- 배터리 덮개를 엽니다.
- Insert the BP-L2 Li-ion battery into its designated slot, ensuring correct polarity.
- Insert two AA batteries into their respective slots, observing the polarity markings.
- 배터리 덮개를 단단히 닫으세요.

그림 1: 후면 view of the DR-100MKII, showing the battery compartment and various switches for mic gain, auto/limiter, and speaker.
2. SD 카드 설치
The DR-100MKII uses SD or SDHC memory cards for recording. A 2GB SD card is included.
- Locate the SD card slot on the bottom of the unit.
- Gently push the SD card into the slot until it clicks into place. Ensure the card is inserted with the correct orientation.
- 제거하려면 카드를 다시 안쪽으로 밀어 넣어 살짝 튀어나오게 한 다음 잡아당겨 빼내세요.

그림 2: 하단 view of the DR-100MKII, highlighting the SD card slot and the built-in omnidirectional microphones.
3. Connecting Microphones and Line Inputs
The DR-100MKII offers versatile input options, including XLR/TRS combo jacks and a dedicated line input.
- XLR/TRS 입력: Located on the bottom of the unit, these inputs support balanced XLR microphones (with +48V phantom power if needed) or 1/4-inch TRS line-level devices. The locking mechanism ensures secure connections.
- 2번째 줄 입력: A 3.5mm stereo mini-jack input is available on the side for connecting external line-level devices.
- 디지털 입력: A dedicated digital input terminal allows for lossless connection from compatible digital audio sources.
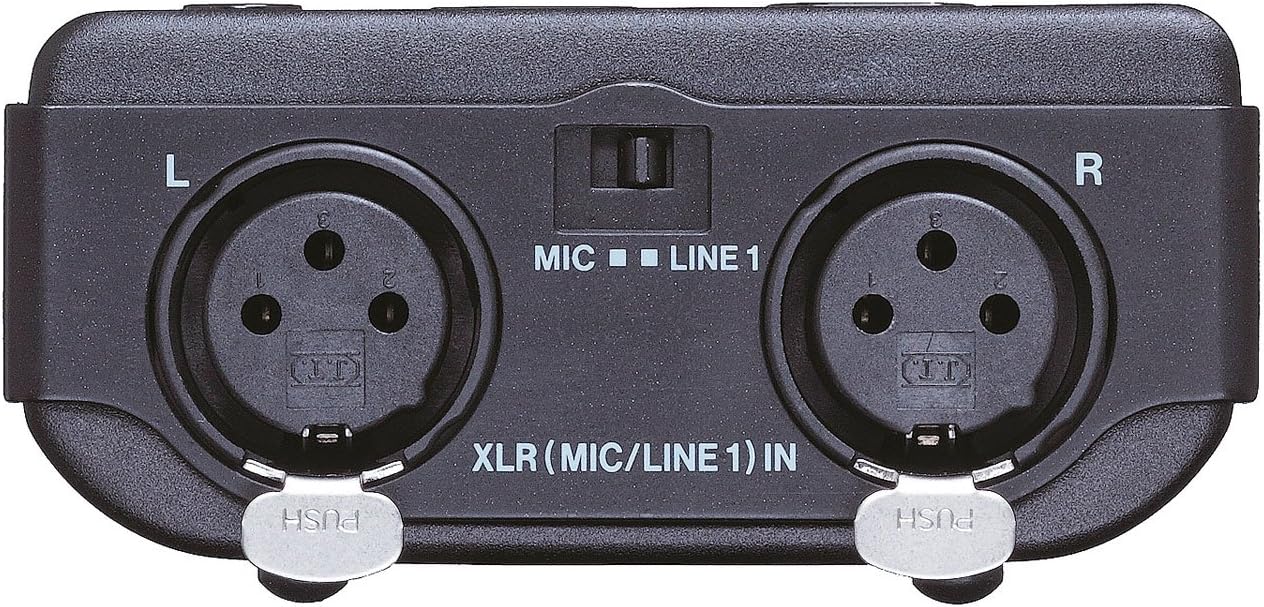
그림 3: 클로즈업 view of the DR-100MKII's bottom, showing the locking XLR (MIC/LINE 1) inputs for professional audio connections.

그림 4: 측면 view of the DR-100MKII, displaying the USB port, DC IN 5V, headphone output, and Line 2 input/output jacks.
4. Connecting Headphones and Line Output
- 헤드폰 출력: Connect your headphones to the 3.5mm headphone jack on the side for monitoring audio.
- 라인 출력: A dedicated 3.5mm stereo mini-jack line output is available for connecting the DR-100MKII to external mixers, amplifiers, or other audio devices. This output is independent of the headphone output.
5. 전원 켜기 / 끄기
To power on the unit, slide the power switch located on the side. To power off, slide the switch to the OFF position.
운영
1. 기본 녹음
The DR-100MKII can record in WAV (linear PCM) or MP3 formats.
- 입력 소스 선택: Use the INPUT switch to select between the built-in microphones (UNI MIC L/R, OMNI MIC L/R) or external inputs (XLR/LINE 1, LINE 2).
- 입력 레벨 조정: Use the large rotary input volume controls (L and R) on the top of the unit to set the recording level. Monitor the level meters on the LCD to avoid clipping.
- Press RECORD: 를 누르세요 기록 button to start recording. The button will illuminate.
- 녹음 중지: 를 누르세요 멈추다 녹음을 종료하려면 버튼을 클릭하세요.

그림 5: 전면 view of the DR-100MKII, showing the main display, control buttons, and built-in unidirectional microphones.

그림 6: 상단 view of the DR-100MKII, illustrating the large rotary input volume dials for precise left and right channel gain adjustment.
2. 고급 녹화 기능
- Auto Gain Control & Limiter: These functions automatically adjust the recording level to prevent distortion. Enable them via the switches on the back of the unit.
- 사전 녹음: Captures audio from 2 seconds before the RECORD button is pressed.
- 기록 지연: Delays recording start slightly to avoid capturing button press noise.
- 로우 컷 필터: Reduces unwanted low-frequency noise (e.g., wind, rumble). Settings: OFF/40/80/120Hz.
- 오버더빙: Allows recording new audio over an existing file, 새로운 것을 만듭니다 file.
3. 재생
- 선택하다 File: 탐색 버튼을 사용하여 원하는 오디오를 선택하세요. file 목록에서.
- Press PLAY/PAUSE: 를 누르세요 재생/일시정지 버튼을 눌러 재생을 시작합니다.
- Adjust Playback Volume: Use the volume controls on the side of the unit.
- Repeat/Loop: Access these functions through the menu for continuous playback of a file or a specific section.
- VSA (Variable Speed Audition): Adjust playback speed without changing the pitch, useful for transcription or learning.
4. File 관리
- 마크 기능: Add marks at specific points in a recording for easy navigation.
- Track Increment: Automatically or manually split recordings into new files. Auto track increment can be based on file size or input level.
- Divide Function: Split a WAV file into two at a desired point.
- 빠른 Tag: 빠르게 tag files for identification.
5. Using the Remote Control (RC-10)
The included RC-10 remote control can be used wirelessly (infrared) or wired for precise operation, minimizing handling noise during recording.
- 무선 작동: Point the remote at the DR-100MKII's IR receiver.
- 유선 작업: Connect the remote to the REMOTE/DIGITAL IN port on the side of the unit using the provided cable.

그림 7: 각도 view of the DR-100MKII, showing the REMOTE/DIGITAL IN port on the side, used for the RC-10 remote control and digital audio input.
유지
1. 청소
부드럽고 마른 천으로 제품을 닦으십시오. 연마성 세제나 용제는 마감재를 손상시킬 수 있으므로 사용하지 마십시오.
2. 배터리 관리
- 장기간 사용하지 않을 경우 배터리 누출을 방지하기 위해 배터리를 제거하세요.
- Recharge the Li-ion battery regularly to maintain its capacity.
3. SD Card Care
- Always format new SD cards with the DR-100MKII before first use.
- Avoid removing the SD card during recording or playback to prevent data corruption.
문제 해결
| 문제 | 가능한 원인 | 해결책 |
|---|---|---|
| 장치의 전원이 켜지지 않습니다. | 배터리가 방전되었거나 잘못 삽입되었습니다. | 배터리를 교체하거나 충전하십시오. 극성을 확인하십시오. |
| No sound during recording/playback. | Input/output levels too low; incorrect input source selected; headphone/line cables not connected properly. | Adjust input/output levels. Verify input source. Check cable connections. |
| Recording level is too low/high. | Input gain not set correctly. | Adjust the rotary input volume controls. Consider using Auto Gain or Limiter. |
| Cannot record to SD card. | SD card full, write-protected, or corrupted. | 불필요한 삭제 file카드를 잠금 해제하거나 포맷하세요(포맷하면 모든 데이터가 삭제됩니다). |
| 리모컨이 작동하지 않습니다. | Remote batteries depleted; IR path blocked; wired connection loose. | Replace remote batteries. Ensure clear line of sight for IR. Check wired connection. |
명세서
| 특징 | 사양 |
|---|---|
| 모델 번호 | DR-100MKII |
| 기록 매체 | SD card (64MB to 2GB), SDHC card (4GB to 32GB) |
| 녹음 형식 | WAV (16/24-bit, 44.1/48/96kHz), MP3 (32-320kbps) |
| 입력 | XLR/TRS combo (MIC/LINE 1), 3.5mm stereo mini-jack (LINE 2), Digital In |
| 출력 | 3.5mm stereo mini-jack (LINE OUT), 3.5mm stereo mini-jack (Headphone) |
| 마이크 | Built-in unidirectional x2, built-in omnidirectional x2 |
| 팬텀 파워 | +48V (selectable) |
| 전원 공급 장치 | Dedicated Li-ion battery (BP-L2), 2 x AA batteries, AC adapter (optional PS-P520) |
| 배터리 수명(대략) | 7 hours (digital recording) |
| 치수(폭 x 높이 x 깊이) | 약 80 x 153 x 35mm(3.15 x 6.02 x 1.38인치) |
| 무게 | Approx. 860 g (1.9 lbs) including batteries |
| 표시하다 | 128 x 64 backlit dot matrix LCD |
| USB 포트 | USB 2.0 Mini-B type |
보증 및 지원
For warranty information, technical support, and service, please refer to the official TASCAM website or contact your local TASCAM distributor. Keep your purchase receipt as proof of purchase for warranty claims.
Online resources, including updated manuals and software, may be available on the TASCAM support page.


