1. 서론
This manual provides comprehensive instructions for the setup, operation, and maintenance of your Geemarc CL100 Amplified Big Button Corded Phone. Please read this manual carefully to ensure proper use and to maximize the benefits of your new telephone.
The Geemarc CL100 is designed for ease of use, featuring large buttons, adjustable amplification, and visual indicators, making it suitable for individuals with hearing or visual impairments. This telephone is line-powered and does not require an external power source.
중요 참고 사항: This telephone does not include a built-in answering machine, speakerphone, caller display, talking caller ID, talking keypad, or voice assist functionality.
2. 제품 오버view
2.1 패키지 내용
- Geemarc CL100 Corded Telephone Base
- 핸드셋
- 코일 핸드셋 코드
- 전화선 코드
- 사용 설명서 (본 문서)
2.2 Telephone Layout
Familiarize yourself with the key components and controls of your Geemarc CL100 phone.

그림 1: 위에서 아래로 view of the Geemarc CL100 phone, illustrating the large numeric keypad, function buttons, and memory slots.
- 핸드셋 : For speaking and listening during calls.
- 숫자 키패드: Large, easy-to-read buttons for dialing numbers.
- P1, P2, P3 Buttons: Priority memory buttons for frequently called numbers.
- M1-M9 버튼: One-touch memory buttons for storing additional numbers.
- 재다이얼 버튼: 마지막으로 통화한 전화번호로 전화를 겁니다.
- 플래시 버튼: Used for network services (e.g., call waiting).
- 스토어 버튼: Used for programming memory numbers.
- 음소거 버튼: 통화 중 마이크를 일시적으로 음소거합니다.
- Tone Control Switch: Adjusts the audio tone for clearer conversations.
- 볼륨 조절 스위치: Adjusts the receiving volume during a call.
- 시각적 벨소리 표시기: Flashes when an incoming call is received.
- Memory Index Card: Pull-out card for noting stored memory numbers.

그림 2: 옆 view of the phone, illustrating the ringer ON/OFF switch and the telephone line connection port.
3. 설정
3.1 전화 연결하기
- 핸드셋 연결: Plug one end of the coiled handset cord into the handset and the other end into the handset jack on the side of the telephone base.
- 전화선 연결: Plug one end of the telephone line cord into the jack labeled with a telephone icon on the back or side of the phone base. Plug the other end into your wall telephone jack.
- 전원: The Geemarc CL100 is powered by the telephone line and does not require an external power adapter.
- 벨소리 스위치: Ensure the ringer switch (located on the side) is set to "Low" or "High" for audible ringing.
3.2 초기 점검
- 수화기를 들고 통화음을 들어보세요. 통화음이 들리지 않으면 모든 연결 상태를 확인하십시오.
- Make a test call to ensure proper functionality.
4. 사용 설명서
4.1 전화 걸기
- 핸드셋을 듭니다.
- 발신음을 기다립니다.
- Dial the required number using the numeric keypad.
- Upon completion of the call, carefully replace the handset in the cradle to disconnect.
4.2 전화 받기
When an incoming call is received, the phone will ring and the visual indicator will flash.
- 수화기를 들어 전화를 받습니다.
- Upon completion of the call, carefully replace the handset in the cradle.
4.3 마지막 번호 재다이얼
- 핸드셋을 듭니다.
- 발신음을 기다립니다.
- 를 누르세요 재 다이얼 button. The previously dialed number will be automatically redialed.
- Note: This function does not apply to numbers dialed from memory buttons.
4.4 음소거 기능
The Mute button allows you to speak privately without your caller overhearing.
- 통화 중에 무음 button. You will still hear the caller, but they will not hear you.
- 를 누르세요 무음 button again to resume normal conversation.
4.5 Storing Telephone Numbers (Memory Dialing)
Your telephone can store 12 direct memory numbers: 3 priority numbers (P1, P2, P3) and 9 standard memory numbers (M1-M9). Priority memories can store up to 24 digits, and M1-M9 can store up to 32 digits.
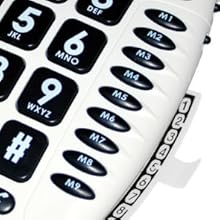
그림 3: Detail of the memory buttons (M1-M9) and the integrated memory index card.
- 핸드셋을 듭니다.
- 를 누르세요 가게 단추.
- 저장하고 싶은 전화번호를 입력하세요.
- 를 누르세요 가게 버튼을 다시 누르세요.
- Press the desired memory button (P1, P2, P3, or M1-M9) where you want to save the number.
- 핸드셋을 교체하십시오.
- Note: Use the index card located under the base to record your stored numbers for easy reference. Stored memories are protected even if the phone line is unplugged.
4.6 Dialing Stored Numbers
- 핸드셋을 듭니다.
- 발신음을 기다립니다.
- Press the appropriate memory button (P1, P2, P3, or M1-M9). The stored number will be dialed automatically.
4.7 Recall (R), * & # Buttons
These buttons are used in conjunction with new services provided on digital exchanges. For specific details on their use, please contact your network operator.
4.8 보청기 호환성
If you are using this telephone with a hearing aid, set your hearing aid to the "T" (Telecoil) setting for optimal audio quality.
5. 유지관리
- 청소: 전화기를 부드러운 천으로 닦으세요.amp 천. 연마성 세척제나 용매를 사용하지 마십시오.
- 저장: 휴대폰은 직사광선과 극한의 온도를 피해 서늘하고 건조한 곳에 보관하세요.
- 액체를 피하세요: Do not expose the telephone to water or other liquids.
- 코드 관리: Ensure the handset and line cords are not tangled or pinched to prevent damage.
6. 문제 해결
| 문제 | 가능한 원인 | 해결책 |
|---|---|---|
| 다이얼 톤이 없습니다 | 전화선 코드가 제대로 연결되지 않았습니다. | Check that both ends of the telephone line cord are securely plugged in. |
| 발신자의 목소리가 들리지 않습니다 / 발신자가 나의 목소리를 들을 수 없습니다 | Volume settings are too low or Mute is active. | Adjust the Volume control. Ensure the Mute button is not pressed. |
| 전화벨이 울리지 않음 | Ringer switch is set to "Off". | Set the ringer switch (on the side) to "Low" or "High". |
| Stored memory numbers are lost | This phone protects stored memories even if the phone line is unplugged. If numbers are lost, they may not have been stored correctly. | Re-store the numbers following the instructions in Section 4.5. |
| Difficulty dialing quickly | Some older phone systems may require a slower dialing pace. | Try dialing at a slightly slower pace. Consider using the memory dial function for frequently called numbers. |
7. 사양
- 모델: 지마르크 CL100
- 유형: 유선 전화
- Amp합리화: Up to 30 dB receiving volume
- 벨소리 볼륨: Adjustable up to 85 dB
- 메모리: 3 Priority (P1-P3), 9 One-touch (M1-M9)
- 전원: Line-powered (no external adapter required)
- 보청기 호환 가능: Yes (T-coil setting)
- 치수: 약 7.5 x 8 x 3cm(19 x 20.3 x 7.6인치)
- 무게: 약 2.25kg(1.02파운드)
- 색상: 하얀색
8. 보증 및 지원
8.1 보증 정보
For information regarding the warranty period and terms for your Geemarc CL100 telephone, please refer to the warranty card included with your purchase or visit the official Geemarc web사이트. 보증 청구를 위해 구매 증빙 자료를 보관하세요.
8.2 고객 지원
If you encounter any issues not covered in the troubleshooting section or require further assistance, please contact Geemarc customer support. Contact details can typically be found on the Geemarc web사이트 또는 제품 포장에 표시되어 있습니다.
온라인 리소스를 보려면 다음을 방문하세요. www.gemarc.com


