1. 서론
This manual provides essential information for the proper installation, operation, and maintenance of your Behringer Truth B1031A Active 2-Way Reference Studio Monitor. Please read this manual thoroughly to ensure optimal performance and longevity of your device. The B1031A is designed for professional audio applications, offering ultra-linear frequency response and precise sound reproduction.
2. 중요 안전 지침
- 전원: Connect the unit only to a power supply of the voltage specified in the manual or on the unit.
- 접지: 감전을 방지하기 위해 장치가 제대로 접지되었는지 확인하십시오.
- 통풍: 환기구를 막지 마십시오. 제조업체의 지침에 따라 설치하십시오.
- 물과 습기: Do not use this apparatus near water or expose it to rain or moisture.
- 열: 라디에이터, 난방 조절기, 스토브 또는 기타 장치(다음을 포함)와 같은 열원 근처에 설치하지 마십시오. amp열을 생성하는 발전기.
- 청소: 마른 천으로만 닦으십시오.
- 서비스: 모든 서비스는 자격을 갖춘 서비스 담당자에게 의뢰하십시오. 전원 코드나 플러그가 손상되었거나, 액체가 쏟아졌거나, 물체가 기기에 떨어졌거나, 기기가 비나 습기에 노출되었거나, 정상적으로 작동하지 않거나, 떨어졌을 때와 같이 기기가 어떤 식으로든 손상된 경우 서비스가 필요합니다.
3. 패키지 내용
Upon unpacking your Behringer Truth B1031A, please verify that all components are present and in good condition:
- Behringer Truth B1031A Active Studio Monitor (1 unit)
- 전원 케이블
- 사용 설명서 (본 문서)
누락되거나 손상된 품목이 있는 경우 즉시 대리점에 문의하십시오.
4. 제품 오버view
The Behringer Truth B1031A is an active 2-way reference studio monitor featuring an 8-inch Kevlar woofer and a 1-inch silk dome tweeter. It incorporates precision Class A/B amplifiers with active protection circuits, delivering 100 W for low frequencies and 50 W for high frequencies. Its design aims for ultra-linear frequency response and wide dispersion characteristics.
4.1. 전면 패널

The front panel features the primary acoustic components: the 8-inch Kevlar woofer for low-frequency reproduction and the 1-inch silk dome tweeter for high frequencies. Indicator LEDs provide visual feedback on the monitor's power status and signal clipping.
4.2. 후면 패널
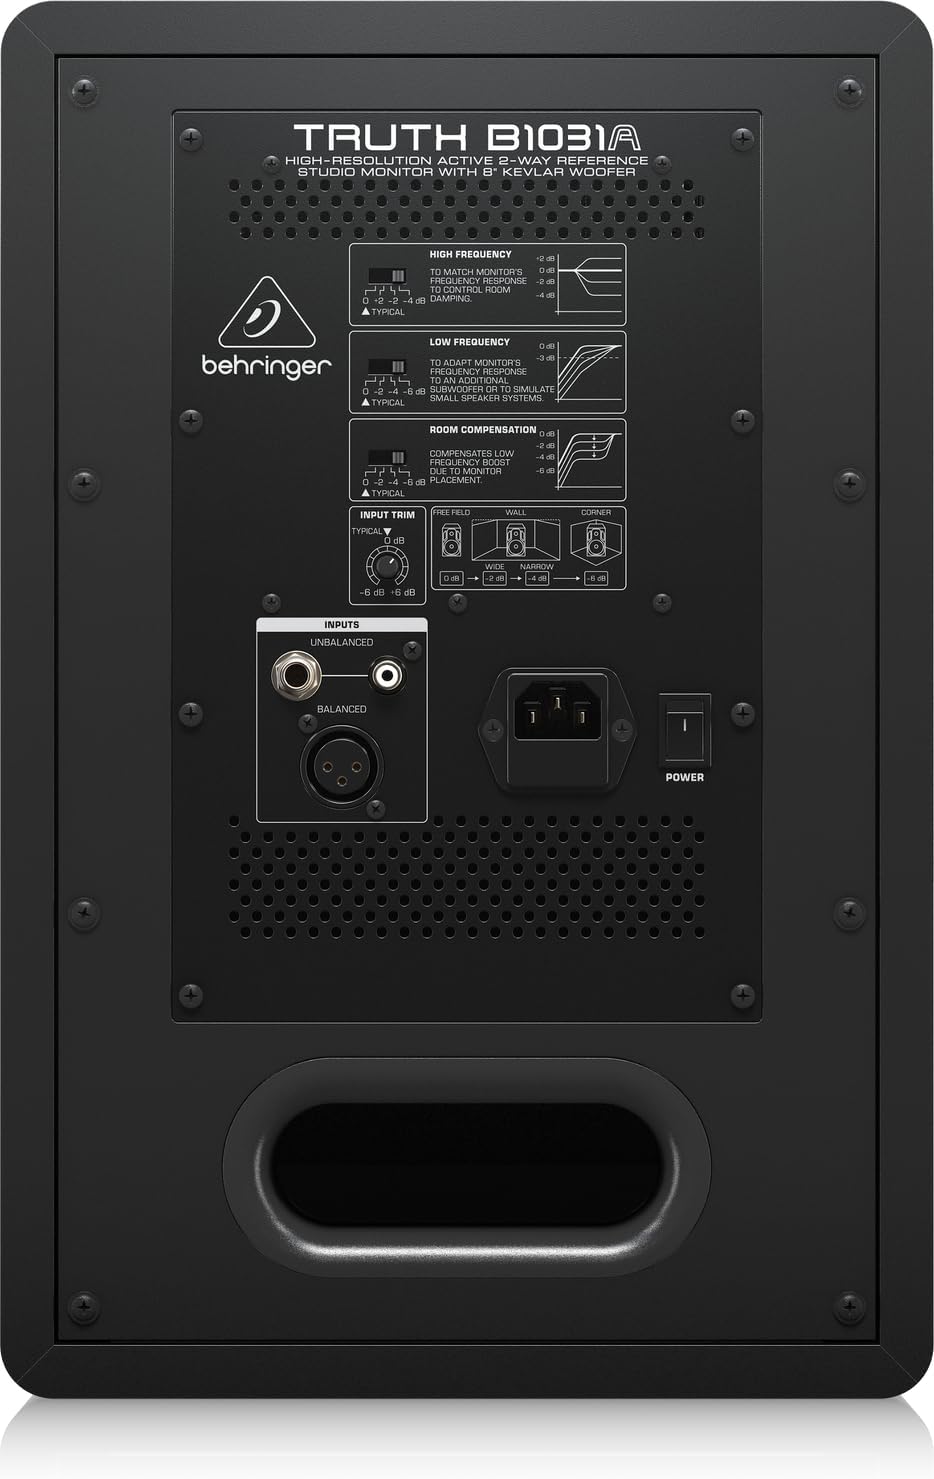
The rear panel houses all input connections and acoustic adjustment controls. These include:
- 밸런스드 XLR 입력: For professional audio connections.
- 균형 잡힌 1/4" TRS 입력: For professional audio connections.
- Unbalanced RCA Input: For consumer audio devices.
- 입력 트림: 입력 감도를 조정합니다.
- High Frequency Adjustment: Allows tailoring of the high-frequency response.
- Low Frequency Adjustment: Allows tailoring of the low-frequency response.
- 실내 온도 보정 스위치: Adjusts the monitor's response to compensate for room acoustics (e.g., placement near walls or corners).
- Power Switch and IEC Power Inlet: For connecting the power cable and turning the unit on/off.
5. 설정
5.1. 배치
Proper placement of your studio monitors is crucial for accurate sound reproduction. Consider the following guidelines:
- 스테레오 트라이앵글: Position the monitors and your listening position to form an equilateral triangle. The distance between the two monitors should be equal to the distance from each monitor to your head.
- 귀 높이: 트위터는 청취 위치에서 귀 높이에 맞춰 설치하는 것이 이상적입니다.
- 벽으로부터의 거리: Avoid placing monitors directly against walls or in corners, as this can exaggerate bass frequencies. If unavoidable, use the 객실 보상 switches on the rear panel to adjust.
- 대칭: Ensure the left and right monitors are placed symmetrically within the room to maintain a balanced stereo image.
5.2. 연결
Before making any connections, ensure the monitor is powered off and unplugged from the mains.
- 오디오 입력: Connect your audio source (e.g., audio interface, mixer) to the B1031A using either an XLR, 1/4" TRS, or RCA cable. For optimal signal integrity, balanced XLR or TRS connections are recommended.
- 전원 연결: Insert the supplied power cable into the IEC power inlet on the rear panel of the monitor, then plug the other end into a suitable AC power outlet.
6. 운영
6.1. 전원 켜기 / 끄기
- Ensure all audio connections are secure and the input trim is set to a low level.
- Flip the power switch on the rear panel to the 'ON' position. The power indicator LED on the front panel will illuminate.
- To power off, flip the power switch to the 'OFF' position. It is recommended to power off your audio source first, then the monitors.
6.2. 컨트롤 조정
- 입력 트림: Use this knob to match the output level of your audio source. Start with a low setting and gradually increase until you achieve a comfortable listening level without distortion.
- High Frequency Adjustment: This switch allows you to boost or cut high frequencies to suit your listening environment or preference.
- Low Frequency Adjustment: This switch allows you to boost or cut low frequencies. This is particularly useful for compensating for room acoustics or if you are using a separate subwoofer.
- 객실 보상: These switches are designed to optimize the monitor's performance based on its placement in your room. Refer to the diagram on the rear panel for recommended settings when placing the monitor near walls or in corners.
7. 유지관리
To ensure the longevity and optimal performance of your Behringer Truth B1031A monitor, follow these maintenance guidelines:
- 청소: 모니터 외부를 닦을 때는 부드럽고 마른 천을 사용하십시오. 연마성 세제, 용제 또는 왁스는 표면을 손상시킬 수 있으므로 사용하지 마십시오.
- 먼지: 스피커 콘과 통풍구에 먼지가 쌓이는 것을 방지하기 위해 정기적으로 먼지를 제거해 주세요. 먼지가 쌓이면 음질과 냉각 성능에 영향을 미칠 수 있습니다.
- 환경: Operate the monitor in a stable environment, away from extreme temperatures, humidity, and direct sunlight.
- 운송: When moving the monitor, ensure it is powered off and disconnected. Use appropriate packaging to protect it from physical damage.
8. 문제 해결
If you encounter issues with your B1031A monitor, consult the following table for common problems and solutions:
| 문제 | 가능한 원인 | 해결책 |
|---|---|---|
| 소리가 나지 않습니다 | No power; incorrect input connection; input trim too low; audio source issue. | Check power cable and switch; verify audio cable connections; increase input trim; check audio source output. |
| 왜곡된 소리 | Input signal too high; damaged cable; faulty audio source. | Reduce input trim or output level from source; try a different audio cable; test with another audio source. |
| 윙윙거리는 소리 | Ground loop; interference from other electronics; unbalanced cable used for long runs. | Ensure proper grounding; move monitor away from other electronic devices; use balanced cables (XLR/TRS). |
| 불균형한 입체 영상 | Improper monitor placement; differing acoustic settings between monitors. | Adjust monitor placement for symmetry; ensure High/Low Frequency and Room Compensation settings are identical on both monitors. |
If the problem persists after attempting these solutions, please contact Behringer customer support or a qualified service technician.
9. 사양
Technical specifications for the Behringer Truth B1031A Active Studio Monitor:
| 특징 | 사양 |
|---|---|
| 모델명 | 진실 B1031A |
| 스피커 유형 | 액티브 2웨이 레퍼런스 스튜디오 모니터 |
| 우퍼 직경 | 8 Inches (Kevlar cone) |
| 트위터 유형 | 1인치 실크 돔 |
| Amp정수기 유형 | A/B 클래스 |
| LF Amp리퍼 출력 | 100 와트 |
| HF Amp리퍼 출력 | 50 와트 |
| 총 출력 와트tage | 150 와트 |
| 연결 기술 | XLR, 1/4" TRS, RCA |
| 전원 | 유선 전기(110볼트) |
| 제품 크기(D x W x H) | 13.3인치 x 10.28인치 x 15.47인치 |
| 품목 무게 | 24.91 파운드 |
| 색상 | 검은색 |
| 재료 | 금속 |
10. 보증 및 지원
Behringer products are designed and manufactured to high-quality standards. For detailed warranty information, including terms and conditions, please refer to the warranty card included with your product or visit the official Behringer website. For technical support, service, or spare parts, please contact your local Behringer dealer or authorized service center. You can also find support resources and contact information on the 베링거 스토어.


