1. 서론
The Intermatic EI400C Electronic Countdown In-Wall Timer is designed to provide automatic shut-off functionality for various electrical loads, including indoor and outdoor lighting, bathroom fans, whole house fans, and other appliances. This timer offers precise control from 1 second to 24 hours, enhancing convenience and energy efficiency in your home or office. Its silent operation and simple push-button interface make it user-friendly, while its no-neutral wire requirement simplifies installation in most standard wall boxes.
2. 중요한 안전 정보
WARNING: Risk of Electric Shock. Improper installation can lead to serious injury or death.
- Always turn off power at the circuit breaker or fuse box before installing or servicing the timer.
- 설치는 자격을 갖춘 전기 기술자가 수행하거나 모든 지역 및 국가 전기 규정을 준수하여 수행해야 합니다.
- Do not use this timer with sunlamps, saunas, or any loads that could cause personal injury if timed incorrectly or if the timer malfunctions.
- 모든 전선 연결이 안전하고 적절하게 절연되어 있는지 확인하세요.
- 이 장치는 실내에서만 사용하도록 설계되었습니다.
3. 제품 오버view
The Intermatic EI400C is an electronic countdown timer designed for in-wall installation. It features a digital display and intuitive controls for setting countdown durations.
3.1개의 구성요소
- 디지털 디스플레이: Shows current time and countdown status.
- 켜기/끄기 버튼: Activates or deactivates the timer.
- 플러스(+) / 마이너스(-) 버튼: Adjust countdown duration.
- 일시 정지 버튼: Temporarily stops the countdown.
- 배터리 칸: CR2 리튬 배터리가 들어 있습니다.
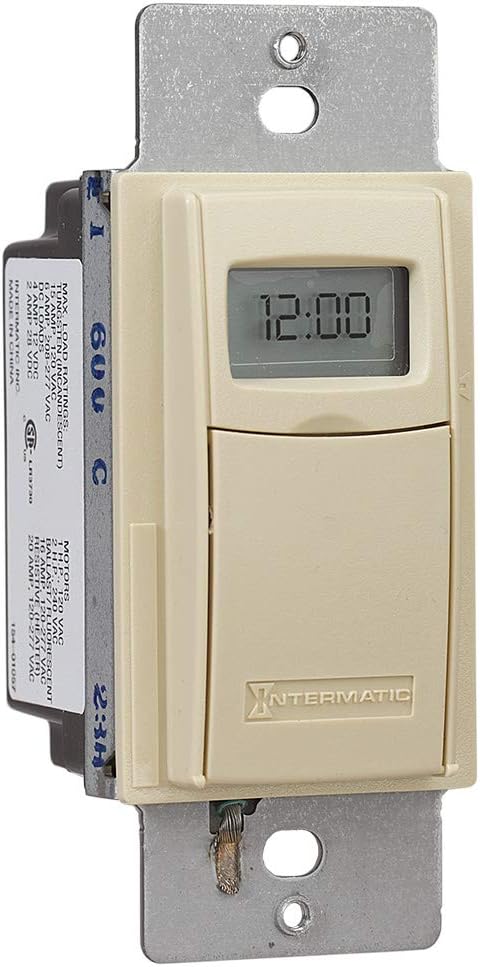
3.2 제품 이미지


4. 설정 및 설치
The Intermatic EI400C timer is designed for easy installation, compatible with single-pole or 3-way switch configurations and does not require a neutral wire connection.
4.1 사전 설치 단계
- 전원 끄기: Locate the circuit breaker or fuse that controls the switch you are replacing and turn off the power. Verify power is off using a voltag전자 테스터.
- 기존 스위치 제거: 벽면 플레이트를 조심스럽게 제거하고 기존 스위치를 벽면 박스에서 나사를 풀어 분리합니다. 기존 스위치에서 전선을 분리합니다.
4.2 배선 지침
The EI400C timer is compatible with both single-pole and 3-way switch setups. Refer to the diagram provided with your product for specific wiring configurations. Generally, the timer will have two load wires and a ground wire. For 3-way applications, one of the traveler wires from the existing 3-way switch will be connected to the timer.
- Connect the timer's wires to the corresponding house wires using wire nuts.
- 모든 연결이 단단하고 안전한지 확인하세요.
- The EI400C does not require a neutral wire, simplifying installation in older homes.
4.3 Mounting and Finalizing Installation
- Carefully push the wired timer into the wall box.
- Secure the timer to the wall box with the provided screws.
- Attach the decorative wall plate.
- 복원력 : 회로 차단기를 다시 켜세요.
4.4 배터리 설치
The timer comes with a replaceable CR2 lithium battery, which powers the internal clock and settings memory. The battery is typically pre-installed or needs to be inserted upon initial setup.
- Open the small front cover of the timer to access the battery compartment.
- Insert the CR2 lithium battery, observing the correct polarity.
- 배터리 덮개를 단단히 닫으세요.
5. 사용 설명서
The EI400C timer offers simple, push-button operation for setting countdown durations from 1 second to 24 hours.
5.1 Setting a Countdown Time
- 접근 제어: Gently open the front cover of the timer to reveal the control buttons.
- 시간 조정: 사용하세요 + 그리고 - buttons to set the desired countdown duration. The display will show the selected time.
- 타이머 시작: 를 누르세요 켜기/끄기 button to activate the timer. The connected load will turn on, and the timer will begin counting down.
5.2 Turning Off Before Countdown Ends
If you wish to turn off the connected load before the set countdown time expires, simply press the 켜기/끄기 button again. This will immediately turn off the load and reset the timer.
5.3 일시 정지 기능
를 누르세요 정지시키다 button to temporarily halt the countdown. The connected load will remain on. Press 정지시키다 다시 카운트다운을 재개합니다.
5.4 Lockable Settings
The timer features lockable settings to prevent unintended changes to the program. Refer to the detailed instructions included in the product packaging for how to activate and deactivate this feature.
5.5 Visual/Audible Warnings
The EI400C can be configured to provide a visual or audible warning before the timer turns off. Consult the full product manual for steps on enabling and customizing these warning options.
5.6 교육용 비디오
동영상 1 : An official Intermatic video providing an overview of their in-wall timers, including the EI400 series. This video demonstrates general features and benefits of Intermatic in-wall timers, which are applicable to the EI400C model.
6. 유지관리
The Intermatic EI400C timer requires minimal maintenance, primarily focusing on battery replacement.
6.1 배터리 교체
The internal CR2 lithium battery provides power for the timer's memory and display, typically lasting up to three years. When the battery is low, a 'LoBatt' indicator may appear on the display.
- Open the front cover of the timer.
- 기존 CR2 배터리를 배터리함에서 조심스럽게 꺼내십시오.
- 새로운 CR2 리튬 배터리를 삽입할 때 극성을 올바르게 맞춰주세요.
- 전면 커버를 단단히 닫으세요.
메모: Some users have reported that the battery compartment cover can be difficult to open or may not stay securely closed after multiple battery changes. Exercise care when opening and closing the compartment. If the cover does not stay closed, ensure the battery makes proper contact.
7. 문제 해결
This section addresses common issues you might encounter with your Intermatic EI400C timer.
| 문제 | 가능한 원인 | 해결책 |
|---|---|---|
| Timer display is blank or shows 'LoBatt' | Low or dead CR2 battery, or poor battery contact. | Replace the CR2 lithium battery. Ensure the battery is inserted correctly and the compartment cover is securely closed to maintain contact. |
| Timer shows 'NoOP' error | Indicates a problem with battery contact or internal operation. | Check and re-seat the CR2 battery. If the issue persists, the unit may require replacement. |
| Connected load does not turn on/off | No power to the timer, incorrect wiring, or faulty load. | Verify power at the circuit breaker. Double-check wiring connections according to the installation instructions. Test the connected load (e.g., light bulb) with a different switch or power source. |
| Difficulty opening battery compartment cover | Tight fit or worn plastic tabs. | Use a small, flat-head screwdriver to gently pry open the cover. Be careful not to damage the plastic tabs. |
| Timer does not hold settings after power outage | Dead or missing CR2 battery. | The CR2 battery maintains settings during power outages. Ensure it is installed and functional. |
8. 사양
| 특징 | 세부 사항 |
|---|---|
| 모델 번호 | EI400C |
| 상표 | 인터매틱 |
| 색상 | 상아 |
| 재료 | 플라스틱 |
| 권tage | 120-277 VAC |
| 최대 부하 | 20 Amps |
| 타이머 범위 | 1 Second to 24 Hours |
| 스위치 유형 | 단극 또는 3방향 |
| 장착 유형 | Standard Wall Box, Rectangular Decorator Wall Plate |
| 배터리 필요 | 1 CR2 Lithium (included) |
| 배터리 수명 | 최대 3년 |
| 치수 | 4.13 x 1.75 x 1.2 인치 |
| 품목 무게 | 6 온스(0.38 파운드) |
| 인증 | CSA 인증 |
| 한국어: | 078275101371 |
9. 보증 및 지원
9.1 보증 정보
The Intermatic EI400C Electronic Countdown In-Wall Timer comes with a 5년 한정 보증. 본 보증은 정상적인 사용 환경에서 발생하는 재료 및 제조상의 결함에 적용됩니다. 보증 청구를 위해 구매 증빙 서류를 보관해 주십시오.
9.2 고객 지원
기술 지원, 본 설명서에 나와 있지 않은 문제 해결 또는 보증 관련 문의는 Intermatic 고객 지원팀에 문의하십시오. 자세한 내용은 Intermatic 공식 웹사이트를 참조하십시오. web최신 연락처 정보는 웹사이트 또는 제품 포장을 참조하십시오.
온라인 리소스: 방문하세요 아마존에서 인터매틱 스토어를 만나보세요 추가 제품 정보 및 리소스를 확인하세요.


